Download
1 / 33
330 likes | 506 Vues
The ATLANTIS Tutorial Stephen Bieniek, Eric Jansen and Juergen Thomas. Loading Atlantis. The easiest way to use Atlantis is from the webstart , found here: http://www.hep.ucl.ac.uk/atlas/atlantis/?q=download Click on the “ Webstart ” option, for Temporary: Tutorial version:

E N D
The ATLANTIS Tutorial Stephen Bieniek, Eric Jansen and Juergen Thomas
Loading Atlantis The easiest way to use Atlantis is from the webstart, found here: http://www.hep.ucl.ac.uk/atlas/atlantis/?q=download Click on the “Webstart” option, for Temporary: Tutorial version: AtlantisJava-09-16-02-06 Alternatively you can download it directly to your laptop by clicking on the Download option, or from a terminal: $ wget https://atlantis.web.cern.ch/atlantis/download/AtlantisJava-09-16-02-06.tgz Then: $ tar xzf AtlantisJava-09-16-02-06.tgz $ cd AtlantisJava-09-16-02-06 $ java –jar atlantis.jar
Overview 1) What is Atlantis 2) Overview of the event display 3) Practical Session
An overview of ATLANTIS: ATLANTIS ATLAseveNTdISplay Atlantis provides a graphical representation of events to allow an intuitive understanding of whats going on. The mission statement so to speak is: “Try to put data from the ATLAS detector into the human brain in an intuitive way, so the human may make fast and correct conclusions. This is largely accomplished by using data oriented projections.” - Hans Drevermann The current team is: Tom McLaughlan, Juergen Thomas, Peter Watkins (Birmingham, UK) Peter Klok (Nijmegen, NL) Nikos Konstantinidis, Eric Jansen, Adam Davison, Stephen Bieniek, Ben Waugh (UCL, UK ) To contact our team with and questions or problems, email us on: hn-atlas-AtlantisDisplay@cern.ch
1) An overview of JiveXML ATLANIS is split into two programs: 1) The event file viewer 2) The event file generator The event file generator uses JiveXML to convert RAW/ESD/AOD files into single event XML files. These can then be read by the event file viewer. Events can be created like so: First set up your athena environment: asetup 17.0.4.7,here Then set up the panda environment: source /afs/cern.ch/atlas/offline/external/GRID/DA/panda-client/latest/etc/ panda/panda_setup.sh Then the event pick command: pathenaJiveXML/JiveXML_jobOptions_PhysicsRAW.py --eventPickEvtListrrr.txt -- eventPickDataType RAW --outDS user.username.AtlantisData11RAW_test1 --extOutFile "JiveXML*.xml" --eventPickStreamNamephysics_Muons More in depth instructions can be found here: '/afs/cern.ch/user/j/jpthomas/public/AtlantisTutorial/README'
1) An overview of JiveXML: Creating events on the grid Where: pathenaJiveXML/JiveXML_jobOptions_PhysicsRAW.py: The job options to create the event. Warning, these job options need to download a large file to run some tests, make sure you have enough room in your area. --eventPickEvtListrrr.txt A text file containing a list of events you want to look for in the form: 189280 143576946 186877 84622334 182796 74566644 --eventPickDataType RAW Chooses the type of data set to run over. RAW gives the best results. –outDS user.sbieniek.AtlantisData11RAW_test1 Name of your out put file --extOutFile "JiveXML*.xml" Tells panda to include the xml files --eventPickStreamNamephysics_Muons Which physics stream to find the events, if you don't include this option eventPick will ask you to include it and give you options for the suitable physics streams.
2) An overview of ATLANTIS: What ATLANTIS is used for ATLANTIS is used for 4 main tasks: Creating event displays for publication: Analysis of an individual event Detector calibration Monitoring the run in the control room.
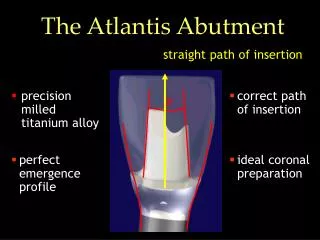
2) An overview of ATLANTIS: Analysis of an individual event This outside the scope of this tutorial. However, we do regular "advanced" tutorials which concentrate on this. However as a taster. By eye we can see clearly an electron an a muon in this event: 1) The electron is identified by its single track depositing all its energy in the Lar. 2) The muon is given away from the clear hits in the muon detectors. The 3 equal hits in the TILE are also a strong indication that this is a real muon, not a pion that punched through.
2) An overview of ATLANTIS: Monitoring in the control room There are two screens in the ATLAS control room showing live events. Live (when available) events can be seen by the public here: http://atlas-live.cern.ch/
2) An overview of ATLANTIS: The GUI A projection, shows information about the event A window (contains a projection) The tabs, how the different event display controls are organized The canvas, shows the event display
2) An overview of ATLANTIS: Projections ΦZ Projection Interaction Buttons Menu bar XY Different window options The Projection tab Y'Z Option from the selected tab X'Z Different projections ρZ Lego plot Φρ Output window
2) An overview of ATLANTIS: Objects Electron Object Tab Different Objects Jet Muon
2) An overview of ATLANTIS: Data and Cuts tab The "Data" tab allows you to control what information from the event file is shown in ATLANTIS. If a data type is shown in blue, the option will be applied to all projections. If it is in black, then the option will be applied to only the current, 'local', projection. This can be changed by right/alternative clicking on the date type and selecting the new option The "Cuts" tab allows you to recreate the analysis cut in the displayed event. For instance, we can apply a 1 GeV pT to tracks by: Cuts -> InDet -> Pt > "1 GeV"
2) An overview of ATLANTIS: Projection Interactions The tools to interact with the Canvas can be found at the top of the GUI The Zoom/Move/Rotate Tool This tool allow control more directly was the canvas shows the user. By default Zoom is selected. By holding down or while clicking on the canvas activates the Move or Rotate mode respectively. The Rubber Band Tool This is a tool that lets the user zoom into a specific area or select multiple objects displayed on the canvas. The Event Pick Tool This tool gives you event information by clicking on the displayed items on the canvas
2) An overview of ATLANTIS: The rubber band tool Zoom: as used earlier Creates a ‘list’ of event objects within the selected area Calculates the invariant mass and energy of the the combined event objects
2) An overview of ATLANTIS: The List manager The List Manager allows the user to keep track of, analyze and color event objects. The list manager can be viewed by clicking on the ‘Lists’ option in the tool bar. The list manager (right) Event objects selected from the rubber band tool are contained in a single list. Multiple event objects of the same type are grouped together but can be expanded. Highlighted object are chosen with the pick tool. Available options to color event objects in a list of highlighted object.
2) An overview of ATLANTIS: The List manager: Calculating the invariant mass In the lists manager right click on the ‘Lists’ box at the top and select ‘New Child’. This will create a new list which we will use to keep track of our muons. Using the pick tool select the two items, then click and drag item from the 'Highlight' list to the new list you have created. Right click on the List name and select summarize to view reconstructed invariant mass of the two objects.
2) An overview of ATLANTIS: Making a public image No numbers Must contain the information about the event number, run number and the ATLAS logo. Need approval of ATLAS Management
3) Practical Sessions: Run number: 182796 Event Number: 74566644
3) Practical Sessions: Run number: 182796 Event Number: 74566644 Download the three events from the twiki page, and load JiveXML_182796_74566644.xml.
3) Practical Sessions: Run number: 182796 Event Number: 74566644 You should now have an image up like this:
3) Practical Sessions: Run number: 182796 Event Number: 74566644 To remove numbers from the event, we select the hide scale option.
3) Practical Sessions: Run number: 182796 Event Number: 74566644 By changing the canvas layout, we can the projections in a different order.
3) Practical Sessions: Run number: 182796 Event Number: 74566644 We now decided which which projections to show. In general the point is to convey the key physics message of an event. To change the projection, click on a window on the canvas then select which projection you want in the 'projection' tab 1,2) Shows the layout the event 3) Shows event info to meet ATLAS requirements 4) When zoomed in shows the different vertices. Shows the leptons come from the primary vertex 2) 1) 3) 4)
3) Practical Sessions: Run number: 182796 Event Number: 74566644 On projection 4), select the Z/M/R tool. Click on the center of the image and drag out. Once you can make out the different vertice, hold down 'M' and click and drag on the image to center the primary vertex.
3) Practical Sessions: Run number: 182796 Event Number: 74566644 To better show pile up we can remove the pT cut on the tracks. After this we'll highlight the muons to show everything comes from a single vertex. Turning off the track cut locally: Cuts -> InDect -> right click on '|Pt|' and select local, then deselect the '|Pt|' tick box
3) Practical Sessions: Run number: 182796 Event Number: 74566644 Grey jets are boring. To change there color: Objects -> Jet -> Color Function -> Index. The default muon track collection doesn't attach to a vertex, we can change collection by: MuonDet -> Track -> Track Collection -> StacoTrackParticle To make the muons stand out more, we can increase there line width: MuonDet -> Trac -> Line Width -> 2
3) Practical Sessions: Run number: 182796 Event Number: 74566644 In window 2, the top right ρZ view, the entire muon system doesn't add much information to the event. Using the Z/M/R tool, zoom in. Also the image looks a bit cluttered with all the MDT hits. These can be removed by: Data -> MuonDet -> Deselect 'MDT'
3) Practical Sessions: Run number: 182796 Event Number: 74566644 Now for the final touches, and saving the image. First remove the fish eye indicator, and the canvas title bar. This is done in preferences. To save the image: File -> Save Image of Canvas
3) Practical Sessions: Run number: 182796 Event Number: 74566644
3) Practical Sessions: Run number:189280 Event Number: 143576946 For this event, you have the final image from the start. Other then the hints provided on the next slide its up to you to recreate the image.
3) Practical Sessions: Run number:189280 Event Number: 143576946 Hints about how to recreate the image. 1) The canvas layout is full screen. Different windows can be shown by clicking on the different layout shown here: 2) To find the two muons coming from the Z and color them separately you'll need to create a list. 3) To view the different parts of the detector use the rubber band and Z/M/R tool. 4) The colours of the back ground and detector parts can be chosen in the Geometry tab. 5) The green and red calorimeter histogram options can be found in the "Calo" tab.
3) Practical Sessions: Run number: 186877 Event Number: 84622334 For this event, you have no guide lines. Its up to you to decide what looks best. Remember to focus on the physics the image is trying to show.