Download
1 / 10
180 likes | 1.04k Vues
Learn all about Bunsen burners - parts, flames, and safety rules. Conduct experiments and record observations while ensuring proper use and handling. Test knowledge with a plenary.

E N D
Lesson 7 – Bunsen burners • Learning objectives • All pupils should • Know the main parts of a Bunsen Burner • Label a diagram of a Bunsen Burner • Know the different flames, what they are for and how to change from one flame to another • Most pupils should be able to • Record changes to a substance after heating • Some pupils should • Know the products of combustion
Safety Rules: Bunsen burner • Long hair tied back • Wear goggles • No loose clothing • Chairs pushed in • Bags under desks • Use heat proof mat • Check Bunsen burner for damage
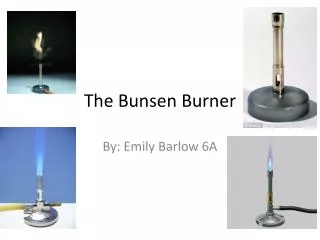
Demo • Safety goggles • Heat proof mat • Test tube holder • Test tube • Bunsen burner • Demo how to use a Bunsen burner to heat a test tube using test-tube holder (not tongs)
How to Use a Bunsen Burner 1. Check for breaks/holes. 2. Connect hose to gas tap. 3. Check air hole is closed. 4. Light a splint and hold above the nozzle. 5. Turn on the gas tap. 6. The Bunsen will light with a yellow flame. 7. IF YOUR FLAME GOES OUT, TURN OFF THE GAS TAP.
Let’s try it! • Now you will light your Bunsen burner • Rotate the collar to adjust the amount of air coming in to the Bunsen burner and note the colour of the flame • When you are confident that you are able to use the Bunsen burner you can carry out a simple experiment.
Heating Copper Sulphate • We will investigate what happens to copper sulphate when we heat it. • Heat until you see a colour change. • Leave to cool for 1 minute. • Add a few drops of water and observe the change.
Bunsen burner - PlenaryTrue or false? 1) Always wear eye protection when there is any danger to your eyes. 2) Always put hot tongs and test tube holders on a heatproof mat. 3) Put hot things on a heatproof mat, except things like test tubes that could roll off. Put test tubes in a test tube rack 4) Hold test tubes with tongs. 5) Put test tubes and tongs into the flame. 6) Hold test tubes at an angle when you heat liquids. Point it away from others