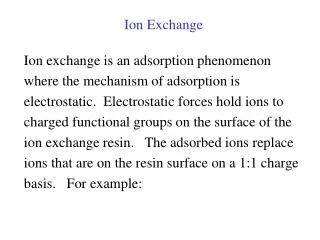
Ion Exchange Chromatography
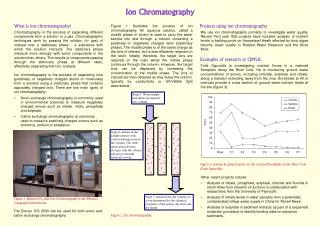
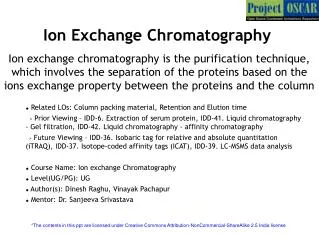
Ion exchange chromatography is the purification technique, which involves the separation of the proteins based on the ions exchange property between the proteins and the column. Ion Exchange Chromatography. Related LOs: Column packing material, Retention and Elution time

Ion Exchange Chromatography
E N D
Presentation Transcript
Ion exchange chromatography is the purification technique, which involves the separation of the proteins based on the ions exchange property between the proteins and the column Ion Exchange Chromatography • Related LOs: Column packing material, Retention and Elution time > Prior Viewing – IDD-6. Extraction of serum protein, IDD-41. Liquid chromatography - Gel filtration, IDD-42. Liquid chromatography - affinity chromatography > Future Viewing – IDD-36. Isobaric tag for relative and absolute quantitation (iTRAQ), IDD-37. Isotope-coded affinity tags (ICAT), IDD-39. LC-MSMS data analysis • Course Name: Ion exchange Chromatography • Level(UG/PG): UG • Author(s): Dinesh Raghu, Vinayak Pachapur • Mentor: Dr. Sanjeeva Srivastava *The contents in this ppt are licensed under Creative Commons Attribution-NonCommercial-ShareAlike 2.5 India license
Learning objectives 1 After interacting with this learning object, the learner will be able to: • Define buffer preparation • Prepare ion exchange column • Analyze the elution/purification of the sample • Assess the troubleshooting steps involved in the experiments. 2 3 4 5
Master Layout 1 Sample preparation (Slide: 5-11) 2 Resin/buffer preparation (Slide:12-14) 3 Sample addition (Slide: 15-17) Elution (Slide: 18-19) 4 UV-Visible spectrometry (Slide 20-26) Analysis (Slide:27-31) 5 Please animate the layout, by taking figures from each of the steps
Definitions and Keywords 1 1. Stationary Phase: The resins inside the column which interacts with the protein of different charge densities and enable it to separate . 2. Mobile phase: The buffers/ salt solution that is used to elute the protein by interacting with the resin and thereby free the proteins from the column. 3. DEAE-Sepharose: Diethyl amino ethyl sepharose is an anion exchanger which interacts more with cationic proteins. 4. CM-Cellulose: Carboxy methyl cellulose is an cation exchanger which interacts more with anionic proteins. 2 3 4 5
Audio Narration Description of the action Step 1: 1 T1:Reagents for Ion exchange chromatography 2 1000 500 250 3 100 The animator should draw graduated measuring cylinder as shown in slide with graduation 100ml, 250 ml,500ml,1000ml. The user should click on the appropriate cylinder for usage Measuring cylinder are used to make up the required final volume. 4 5
Step 1: 1 T1:Reagents for Ion exchange chromatography 2 3 Audio Narration (if any) Description of the action Show a measuring balance, with display, ON, OFF and TARE/0 buttons on it. let user ON it, display reading as 0.000g, let user picks up the paper from the rack, makes 1/10 of folding on the sides and places it on the balance. Now the display reading changes to 0.003g. Instruct user to TARE the reading. And animate to click the tare button. Once user clicks it, reading must show ”0” When measuring with paper, the weight of the paper need to be tarred from actual reading. 4 5 Video file: Balancing
Step 1: T1:Reagents for Ion exchange chromatography 1 Deionized Water DEAE 2 CM-cellulose Description of the action Audio Narration 3 Show the bottle labeled as “DEAE sepharose and CM –cellulose, deionized water”. Let user pick up the bottle labeled as DEAE-sepharose. Instruct user to click on the bottle to open the lid of the bottle and click on the spoon to take in hand and add the DEAE from the bottle to the paper show like gradual increase in the reading till it weighs about 1gm. Follow the same procedure for weighing CM –Cellulose. Instruct the user to set the pipette to 1000ul and open the lid of deionized water bottle to pipette out 1000ul and add to a empty DEAE containing tube. Repeat it for one more time to make 2ml and repeat the same for CM cellulose in another tube. Let user label the tube accordingly. User must click on the hands for the events to happen. Prepare DEAE-sepharose and CM-cellulose resin. DEAE is used to prepare the anion exchange column while CM cellulose for cation exchange column. 4 5
Step 2: T1:Reagents for Ion exchange chromatography 1 Monosodium phosphate 2 Disodium phosphate Description of the action Audio Narration 3 Instruct user to prepare 10mM phosphate buffer. Let user pick up bottle ” Monosodium phosphate” and “disodium phosphate”, spatula, measuring cylinder from the rack and keeps it on the table next to balance. let user tare the balance, user should click on the monosodium bottle, uncap it, with help of spatula weigh the required amount on a paper over the balance. Instruct user to weigh 0.04g of Monosodium phosphate and 0.18 g disodium phosphate”. Display a gradual increase in reading with quantity addition. if the gram exceeds user should remove some quantity or if it less add the quantity to get the exact required amount. Prepare 10mM phosphate buffer of pH7.2 4 5
Step 2: 1 T1:Reagents for Ion exchange chromatography 2 Description of the action Audio Narration 3 Prepare 10mM phosphate buffer of pH7.2 , the prepared buffer need to checked for pH to set it at 7.2. Instruct the user to click on the water bottle to pour in the measuring cylinder till it reaches 80ml. add to the weighed phosphate bottle from previous slide and then ask the user to take the bottle for mixing on the magnetic stirrer (see slide:10 for proper animation instruction). Show the clear solution, now instruct user to pour the solution from bottle to the beaker. Let user label the beaker accordingly as 10mM phosphate buffer. 4 5
1 2 Beaker Magnetic bead 3 Description of the action Audio Narration (if any) Show magnetic stirrer instrument. Let user place the beaker on it. Display the beaker containing powder at bottom, liquid layer on top and a magnetic bead at the bottom. Instruct user to ON the instrument, let user control the speed knob and regulate it accordingly to control the mixing speed in the beaker. Animate powder getting into the solution. Show a turbid solution turning colorless 4 The magnetic stirrer is used for evenly distribution of solute into the solvent. 5 Video file: Magnetic stirrer
Step 3: T1:Reagents for Ion exchange chromatography 1 Deionized Water NACL 2 Description of the action Audio Narration Show the bottles labeled as “Sodium Chloride, deionized water”. Let user pick up the bottle labeled as Sodium chloride. Instruct the user to click on the bottle to open the lid of the bottle and click on the spoon to take in hand to add sodium chloride from the bottle on to the paper. show like gradual increase in the reading till it weighs about 0.292gm. Follow the same procedure for weighing1.421gm, 2.922gm of sodium chloride and animate like putting them in separate beaker. Instruct user to click on the phosphate buffer (earlier prepared) to pour in the measuring cylinder till it reaches 80ml and then ask the user to place the bottle for magnetic stirrer (see slide:10 for proper animation instruction). Show the clear solution after sometimes, now instruct the user to pour the solution to the measuring cylinder and show the volume till 90ml and instruct user to add 10ml of phosphate buffer to make the final volume to 100ml. 3 Prepare 50mM,250mM, 500mM of High salt buffer solution. 4 5
Step 4: T2: pH meter standarization 1 2 STD 1 STD 2 3 Audio Narration Description of the action Display standard pH bottles and pH instrument and deionized water, discard placed on a table. Instruct user to calibrate the instrument. Let user ON the instrument. Initially for the pH rod is dipped in water, when user clicks on read button, display must show a reading “7”. Now show like taking out the rod and washing it with deionized-water, let user cleans the rod with tissue. Now pick the STD-1, uncap it, dip the cleaned rod into the solution, user must click read button with display showing “4”. now clean the rod and repeat the step to note down the reading for STD-2 and now the display should show “9” Before the pH reading, pH instrument need to be calibrated with standards. Once with STD-1 at pH 4 and with STD-2 at pH 9. 4 5 Video file: pH meter
Step 5: T2: pH measurement 1 2 NaOH HCl 3 Audio Narration Description of the action Instruct user to set the pH for phosphate buffer pH at 7.2. Now take the bottle labeled as “Phosphate buffer“, uncap it, dip the cleaned pH rod into the solution. User need to click on read button. Initially display must show a reading 6. now instruct user to add NaOH to adjust the pH. Now allow the user to click on NaOH bottle so that drops of NaOH should be added with filler, user need to mix the solution with glass rod, click on read button and the reading should show anywhere near 6.1- 6.3. let user keeps adding the NaOH drop till the pH display shows 7.2. Prepare Phosphate buffer of pH 7.2 , buffers play a very important role during equilibration step. 4 5
Step 6: T2: pH measurement 1 2 NaOH HCl 3 Audio Narration Description of the action • Animate like the user transferring the beaker solution to 100ml measuring cylinder and reading should show 92ml. • Instruct the user to click on the water and animate like the user pouring it to makeup the volume to 100ml. All action should happen when the user clicks the hand image. Prepare Phosphate buffer of pH 7.2 4 5
Description of the action Audio Narration Step 7: T3: Column Preparation 1 CM Column 2 DEAE Column 1 2 3 Animate like the user tightening the knob at the bottom in the column. The user must click on the beaker labeled as DEAE and animate like the user pouring the solution inside the tube. Show like the particles are settling in the tube with water at the top. Repeat the same for CM cellulose. Animate as shown in the figure Let user click on the hand for the things to happen Show the blue ring with positive charge in column 1 and negative charge in column 2 Pack the columns by DEAE and CM cellulose resins. The packing is the main step which determines the effective separation for the samples. 4 5
Description of the action Audio Narration Step 8: 1 T3: Column Preparation Buffer Buffer Buffer 2 Column 3 stopper Instruct user to “Equilibrate the column”. Animate like the user tightening the knob at the bottom in the column. The user must click on the beaker labeled as phosphate buffer and animate like the user pouring the solution inside the tube. Now instruct the user to click on hands to place a beakers at the bottom of the columns and open the stopper. Animate like the liquid comes out of the tube in drop to the beaker and show like closing the stopper and show a liquid layer at the top of the column Equilibrate the column using Phosphate buffer of pH 7.2, which helps to attain a same condition through out the column. 4 5
Description of the action Audio Narration Step 9: T3: Sample Loading 1 Buffer 2 Column sample 3 stopper Instruct user to take out sample stored at -80’C. animate user taking out the sample, thawing the tube, animate frozen state to liquid state in tube, now the user should take the pipette set to 200ul, pipette out the sample and add to the column as shown in figure. Events must happen as and when the user clicks on the pipette animate a clock for 10 minutes Load the sample to both anion exchange and cation exchange columns to carry out separation. 4 5
Step 10: T4: Mechanism of separation 1 2 3 4 Column 2 Column 1 5
Description of the action Audio Narration Step 10: T4: Mechanism of separation 1 2 Animate rings of different color with each ring possesing positive or negative charges passing through the column and bind to the resin. Negative charge rings in the sample should bind to resin in column1 and positive charge to resin in column 2. Show like positive charge ring unbinding to column 1 similarly negative charge ring unbinding to column 2. Cationic protein bind in CM-cellulose resin while anionic protein bind to DEAE resin based on the strength of charge interaction 3 4 5
Step 11: T5: Elution 1 50mM Nacl MOBILE PHASE FUNNEL 2 3 4 5
Description of the action Audio Narration Step 12: T5: Elution 1 Draw a mobile phase funnel as shown in previous slide. Instruct the user to take the funnel and place on the top of the column. Now show three beakers labeled as 50mM NaCl, 250mM Nacl and 500mM NaCl. Now instruct the user to click on 50 mM NaCl solution beaker to pour into the funnel. Pour the low ionic strength mobile phase through the column for elution step. 2 3 4 5
Step 13: T5: Elution 1 2 3 4 5
Description of the action Audio Narration Step 13: T5: Elution 1 The elution step helps for the collection of the sample at different fractions. Animate like the rings with the charges moving down as in previous slide figure . Animate like negative rings binding to the resin in column 1 while the positive rings flow through the column. Similarly Animate like positive rings binding to the resin in column 2 while the negative ions rings flow through the column. 2 3 4 5
Step 14: T5: Elution 1 2 3 4 5
Step 15: ) 1 T5: Elution 2 3 4 collection tube 5
Description of the action Audio Narration Step 14,15: 1 T5: Elution Now instruct the user to click on the knob at side to open and show like the sample flowing out into collection tube as shown in previous slide Animate similarly from 20-26 with beaker labeled as 250mM (in slide 20) Once this is done again show the same animation now with the beaker should be labeled as 500mM NaCl (in slide 20). So the animation must be for 3 times starting with 500mM, 250mM and last with 500mM NaCl. When adding the 250mM and 500mM solution show like the movement of bound ion as in 22. Animate both column 1 and column 2 separately as per the instruction from 20-26 and follow the instruction carefully in slide 23 and animate the ions flowing accordingly Collect the eluted sample at different fractions. Proteins with low ionic interaction will be eluted first and when the ionic strength is increased proteins with high ionic interaction will be eluted out later. 2 3 4 5
Step 16: 1 T6: UV-visible spectrometry analysis 2 Cuvette 3 4 5 Video file: : UV spectrometry
Audio Narration Description of the action Step 16: 1 T6: UV-visible spectrometry analysis Show a instrument labeled as “UV –visible spectrometry” and the samples in the stand as shown in figure. Animate buttons like “start, auto zero, absorbance, stop” on the instrument Now instruct the user to switch on the instrument, set the wavelength to 595nm by pressing on numbers-open the lid of the instrument and take a cuvette as in figure and click on phosphate buffer to take it into cuvette and animate like keeping it inside the instrument to press “auto zero”. Display a value on the system as “0.000” animate like the user opening the lid to take the cuvette and discarding the solution, now animate like the user taking the sample-1 (collection tube-1) and adding it to the cuvette, keeping it inside, closing the lid and press absorbance. show the values as in next slide for each sample follow the same for (collection tube 2-15) Detect the presence of protein of using the UV –visible spectrometry. The high absorbance reading indicate the presence of protein. 2 3 4 5
Step 16: 1 T6: UV-visible spectrometry analysis 2 3 4 5
Step 17: 1 T6: UV-visible spectrometry analysis 2 3 4 5
Description of the action Audio Narration Step 17: 1 T6: UV-visible spectrometry analysis Draw the chromatrogram graph with absorbance at Y axis and volume of eluent in x axis to determine the protein using the literature or to know the presence of protein. The sample collected can be directly injected into the LC-MS analysis. For further information please go through future viewing IDD. Animate like the user drawing the graph as shown in previous slide with absorbance at Y axis and volume of eluent in x axis 2 3 4 5
Button 01 Button 02 Button 03 Slide 20-26 Slide 15-17 Slide 27-31 Slide 5-11 Slide 12-14 Slide 18,19 Tab 01 Tab 02 Tab 03 Tab 04 Tab 05 Tab 06 Tab 07 Name of the section/stage Animation area Interaction 1: slide-19: provide user sample mixture of both cation and anion proteins, ask for user input. Instruction: user can start with any one column at first place, later by going through the absorbance reading user must make out the with high protein concentration the sample must undergo another step of column separation. Interactivity area Instructions/ Working area Credits
Questionnaire: APPENDIX 1 Question 1: The cation exchange resin is CM cellulose DEAE Sepharose Cellulose Question 2 The anion exchange resin is DEAE-sepharose CM-cellulose Cellulose Sepharose Question 3 The stationary phase of the ion exchange chromatography is Nacl Phosphate buffer Resin Proteins
Questionnaire: APPENDIX 1 Question 4: The mobile Phase in ion exchange chromatography is High salt phosphate buffer containing Nacl Phosphate buffer Resin Proteins Question 5 What is the absorption wavelength of the proteins used 595nm 500nm 600nm 800nm
APPENDIX 2 Links for further reading • Reference websites: • http://oscar.iitb.ac.in • http://www.mnstate.edu/provost/ionexchangeprotocol.pdf • http://sbio.uct.ac.za/Sbio/documentation/Ion_exchange_chromatography.pdf
APPENDIX 3 Summary The experiment mostly involves the sample preparation, column preparation, buffer preparation, elution buffer, followed by sample addition to the column, separation and mobile phase addition to the column in increasing concentration followed by elution, collection of sample for analysis and spectrometric analysis and interpretation.