Streamline Attendance Tracking Software for Efficient Workforce Management
E N D
Presentation Transcript
Attendance Tracking Module Our Attendance software allows human resource managers and department heads to track employee attendance.
Attendance Tracking Module VacationScheduler™ tracks scheduled vacation days. The Attendance Tracking Module allows you to track actual attendance. If you are using paper forms, this software will make your job easier. Once you enter the data, you can print reports in a variety of formats.
Create Your Own Attendance Codes You define your own attendance codes. If you are used to a certain set, you can continue to use them. Attendance codes can be up to 15 characters long. For example, for Vacation you could use: V VAC VACATION
Create Your own Attendance Codes (Continued) Codes can include numbers as well as letters: 8X – might stand for working 8 hours. 4H – might stand for working 4 hours. COMP – might stand for compensation.
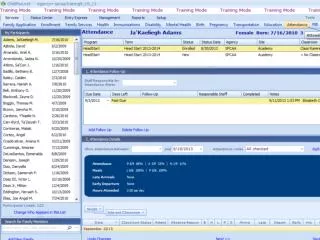
Recording Attendance When you record employee attendance you have two choices: 1. Only record time off. 2. Record time worked and time off.
Recording Attendance Recording attendance does not take long. You pick a department. You set the date.
Recording Attendance (continued) • A temporary table is created listing all the employees of the department. • The first step is to set the type of absence for each absent employee.
Set the Number of Time-Off Hours • When the temporary table is created, Time-Off hours are set to 8.00. • Work Hours are set to 0.00. • If the employee is entitled to be credited with 8.00 time-off hours you just have to set the type of absence.
Set Time-Off Hours and Work Hours • You can change the value of time-off and work hours. • In the example, the employee became sick and went home early. • The employee is credited with 6.25 Time-Off hours and 1.75 Work Hours.
Add an Attendance Note • You can add a note about the absence if you wish to do so.
Either Save the Records ORAdd Attendance Records for Those that Worked. • If you just want to record time-off you are almost done. • Click the “OK” button. • Records with an attendance code will be added to the attendance table. OR • Add attendance codes for those who worked.
Add Attendance Codes for Those that Worked. • You can add attendance codes for those that worked on an individual basis. Just go through the list of employees. OR • Use the “Fill Code” procedure. Using it you can add attendance codes for the rest of the employees with just several mouse clicks.
The “Fill Code” Procedure. Adding Records For Employees that Worked. • First, click on the “Fill Code” Button. • The “Pick a Code Screen” opens. • In our example, we picked 8X. • We set the time-off hours to 0. • We set work hours to 8. • When we click the “OK” button, all records without an attendance code will be filled.
Make Final Adjustments • If you need to make any adjustments you can do so now, before the records are saved to the attendance table.
Add Records to the Attendance Table • Click on the OK Button. • Records are moved FROM the temporary table TO the attendance table. • Next, you can add records for another department.
The Attendance Form. • Once the records are in the attendance table, you can also make adjustments. • Records can be deleted. • You can print reports. • Look at the records for just one employee. • Add a record for a single employee.
Add Just One Record at a Time • You can also add one employee record at a time.
Filter on Screen Records • The Date filter allows you to see the records for one date OR a range of dates. • The Department Filter allows you to look at the records for one department. You also set the range of dates to view. • The Employee Filter lets you look at just one employee’s records. Again you can limit the range of dates.
You can Sort Records in a Variety of ways. • Department, Date, Name • Department, Date, Employee Number • Date, Employee Number • Department, Name, Date • Department, Employee Number, Date • Employee Number, Date
Check for Missing Records • From the Attendance Form you can check for missing records. • Just click on the “Missing Records” button. • The “Missing Records Report Form” will open.
Missing Records (Continued) • Set the company code. • If the department field is left blank, all departments will be searched for missing records, otherwise enter a department. • Set the date you want to check.
Missing Records Report • Use this report to make sure you did not miss an employee. • Records can be sorted by employee number or by last name.
Delete a record • Click on the record you wish to delete. • Click on the “Delete Record” button.
Three Types of Reports • Reports on an individual employee. • Reports for a department or work center. • Reports for the company.
Reports You can query the data in a variety of ways. Look at a range of dates. Look at one department’s data. Look at one employee’s data. You can choose from 11 report formats. Sort by code then employee number. Sort by date, employee name. Many others.
Query Parameters • Query parameters act in combination to allow you to look at the data you want to see in a report. • The first parameter is the company code.
Query Parameters ( part 2) • The next parameters that may be of interest are the “Start” and “End” dates. • In this example we want to see the records between 11/1/06 and 11/3/06. • If you leave both date fields empty you would see all data from all dates.
Query Parameters • In this example, we left the “End Date” field blank. • When the query is run, you would see all records from 1/1/06 to present. • You could also enter today’s date in the End Date field.
Query Parameters – Attendance Code • In this example we see the attendance code field. • We are asking for all vacation records from 1/1/06 to present for company ST. • If you leave the attendance code field blank you will see all records with all attendance codes starting 1/1/06.
Query Parameters - Department • This query will only show vacation records from the maintenance department from 1/1/06 to the present.
Look at One Employee’s Records. All that you need to do is to enter the employee number. You can use the “Find Employee” button to locate the employee number you need.
Attendance Reports • You can look at the data sorted in a variety of ways. • The next few slides will show you what several of the reports look like.
Attendance History • From time to time you will want to move records from the attendance table to the attendance history table. • All the reports available with the attendance table are also available with attendance history.
GoToMeeting™ • If you are interested in seeing the live software, call us at (888) 865-2865. • We are happy to set up a convenient time to do an across-the-internet meeting using GoToMeeting™.
Attendance Tracking Module To return to the Table of Contents - Press the ESC key. To replay the presentation – Press the spacebar or click the mouse.