Download
1 / 5
50 likes | 75 Vues
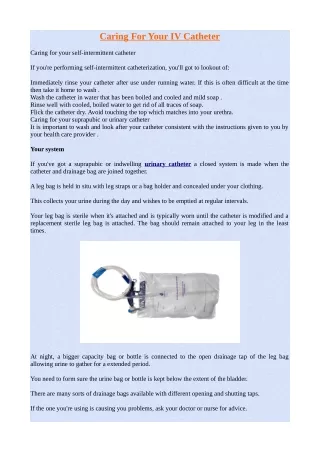
If you've got a suprapubic or indwelling urinary catheter a closed system is made when the catheter and drainage bag are joined together.

E N D
Caring For Your IV Catheter Caring for your self-intermittent catheter If you're performing self-intermittent catheterization, you'll got to lookout of: Immediately rinse your catheter after use under running water. If this is often difficult at the time then take it home to wash . Wash the catheter in water that has been boiled and cooled and mild soap . Rinse well with cooled, boiled water to get rid of all traces of soap. Flick the catheter dry. Avoid touching the top which matches into your urethra. Caring for your suprapubic or urinary catheter It is important to wash and look after your catheter consistent with the instructions given to you by your health care provider . Your system If you've got a suprapubic or indwelling urinary catheter a closed system is made when the catheter and drainage bag are joined together. A leg bag is held in situ with leg straps or a bag holder and concealed under your clothing. This collects your urine during the day and wishes to be emptied at regular intervals. Your leg bag is sterile when it's attached and is typically worn until the catheter is modified and a replacement sterile leg bag is attached. The bag should remain attached to your leg in the least times. At night, a bigger capacity bag or bottle is connected to the open drainage tap of the leg bag allowing urine to gather for a extended period. You need to form sure the urine bag or bottle is kept below the extent of the bladder. There are many sorts of drainage bags available with different opening and shutting taps. If the one you're using is causing you problems, ask your doctor or nurse for advice.
Leg bags are often secured to your thigh, knee, or calf area, counting on the length of drainage tubing on the leg bag. The leg bag is best left secured to your leg during the night to stop trauma. Your nurse will show you: the correct position to wear your leg bag how to secure it using either a bag holder or straps? how to connect your overnight drainage bag or bottle. Empty your leg bag at regular intervals to avoid it becoming too full and heavy, which can pull on your catheter. This should occur every 2 to three hours or when the bag is about half to three-quarters full. Correct positioning will make sure that the catheter is comfortable and, in males, won't cause pressure or discomfort at the tip of the penis. Males susceptible to reflex erections could also be advised to connect the catheter to their abdomen. this may prevent pressure on the tip of the penis if an erection occurs. It is recommended that you simply change the position of the bag from one leg to the opposite a day . Changing your leg drainage bag It is important that you simply skills to properly change your leg drainage bag. The leg bag can stay in situ until the catheter is modified . Sometimes the bag may have to be changed more frequently due to damage or odor. Make sure you usually have a spare bag reception. To change your leg bag: Wash and dry your hands thoroughly. Release the bag from your leg by undoing the straps or removing it from the bag holder. Wash and dry your hands. Open the packet of your new drainage bag able to be connected. Using soapy water, wipe round the area where the catheter connects to the bag. Pinch the top of the catheter together with your fingers, in order that no urine can drain out, and gently disconnect the bag. Put this bag aside. Remove the plastic cover from the tip of the new bag and immediately connect it to the drainage port of your catheter. Always take the bag to the catheter not the catheter to the bag. Re-secure your new leg bag to your leg using straps or your leg bag holder. Empty the urine from your old leg bag into the rest room and rinse it out. Wrap it in newspaper, place during a bag , secure it and put it within the rubbish bin. Wash and dry your hands thoroughly. Overnight drainage bag or bottle Your overnight drainage bag is greater in volume (2 L) and tubing than your leg bag.
Alternatively, you'll use an overnight bottle that holds 4 L. Night bags or bottles are connected to either your leg bag or catheter valve at bedtime. This enables you to sleep during the night without having to awaken to empty your leg bag or catheter valve. It is important that you simply use the overnight drainage bag or bottle. If your leg bag becomes full and you are doing not awaken , there's an opportunity that your bladder will become full and therefore the urine may reflux (flow) back to your kidneys. This may cause infection which may cause you to very unwell. To attach your overnight drainage bag or bottle: Wash and dry your hands thoroughly. Empty the urine from your leg bag or bladder if employing a catheter valve. Wash and dry your hands thoroughly. Remove the plastic cover from the highest of the night bag or bottle and put it into a clean, dry container until morning. Connect the white tip of the night bag or bottle into the drainage tap at the bottom of your Urine Leg Bag or catheter valve. Check that the drainage tap on your night bag is closed. Open the drainage tap on your leg bag or catheter valve. this may allow urine to empty directly into your night bag or bottle. Place your night bag on its stand (if used) or into a clean bucket, kept for this purpose only. Position the night bag or bottle below the extent of your bladder. this may enable you to maneuver in bed without the danger of pulling on your catheter (see figure 5). Make sure the night bag drainage tap is off the ground . Wash and dry your hands thoroughly. Removal and cleaning of overnight drainage bag or bottle The night bag or bottle is reusable and thus must be cleaned after each use. To remove your overnight drainage bag or bottle: Wash and dry your hands thoroughly. Close the drainage tap of your leg bag or catheter valve. Gently disconnect your night bag or bottle from your leg bag or catheter valve. Empty the contents of your night bag or bottle into the rest room . Place the white tip under running water and wash your night bag or bottle using gentle liquid hand soap. Use warm, not predicament to scale back the danger of scalding. don't use detergent like washing up liquid. Rinse the bag or bottle with clean water then rinse again with a vinegar solution (1 part vinegar to eight parts water) to scale back odor. Put the plastic cover back onto the white tip of your night bag or bottle tubing and leave the bag to dry during a clean place, like over the shower rail, until it's required again. confirm that the drainage tap is open and not touching the ground . Wash and dry your hands thoroughly. Prior to reusing your night bag lay it on a flat surface. Flatten the bag from the top of the tubing and
towards the drainage tap. This removes any air inside the night bag which can cause an airlock. Close the drainage tap. Catheter valves Some people that have a iv catheter inserted into their bladder are better suited to a catheter valve. A catheter valve may be a tap that's inserted into the drainage port of your catheter. Using a catheter valve helps maintain bladder health. It allows your bladder to fill with urine, thus supplying you with the feeling of getting a full bladder (if you've got felt) and wanting to urinate. To empty the bladder, the catheter valve tap is opened and urine is allowed to empty . There is no got to attempt to pass urine within the normal way as you'll cause bypassing of urine down the surface of the catheter. To allow urine drainage overnight, an evening bag/bottle is attached to the catheter valve. A catheter valve isn't suitable for everybody . Your doctor or nurse will advise you whether a valve may be a right management for you. Changing your catheter valve The catheter valve is sterile when it's attached to the catheter after insertion. Ideally it should remain in situ until subsequent catheter change when a replacement sterile valve are going to be placed. It is important that you simply always have a spare catheter valve just in case of an emergency. To change your catheter valve: Wash and dry your hands thoroughly. Using soapy water, wipe round the area where the catheter connects to the valve. Open the packet containing the new catheter valve and check the faucet is within the closed position. Avoid touching the white end which matches into your catheter. Pinch the ends of your catheter together to stop urine leakage and take away the old catheter valve from your catheter. Put this to at least one side and insert the new catheter valve into the catheter. Wrap the old catheter valve within the newspaper and place it within the rubbish bin. Wash and dry your hands thoroughly. Supplies and storage of kit The nurse within the hospital will offer you some equipment to require home with you. However, after this it's your responsibility to get further supplies, as needed, of: catheters drainage bags
catheter valves. Your nurse will offer you an inventory of suppliers where you'll buy your catheter equipment. Ask your nurse if you're eligible for funding to help together with your equipment. All equipment should be stored together during a clean, dry box, drawer or cupboard. Your catheter should be stored flat. Keep your catheter faraway from children and pets. Keep your catheter faraway from fires and direct sunlight.