Geometry and Measurement
Geometry and Measurement. What You Will Learn. To draw a line segment parallel to another line segment To draw a line segment perpendicular to another line segment To draw a line that divides a line segment in half and is perpendicular to it To divide an angle in half

Geometry and Measurement
E N D
Presentation Transcript
What You Will Learn • To draw a line segment parallel to another line segment • To draw a line segment perpendicular to another line segment • To draw a line that divides a line segment in half and is perpendicular to it • To divide an angle in half • To develop and use formulas to calculate the area of triangles and parallelograms. • CHALLENGE • Try to draw what the what you think the first 5 bullets may look like.
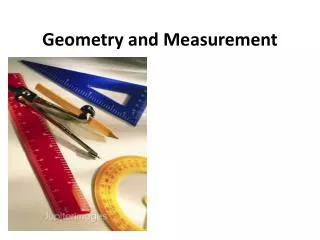
What You Will Need • Geometry Set • Ruler • Protractor • Right Triangle • Pencil • Textbook
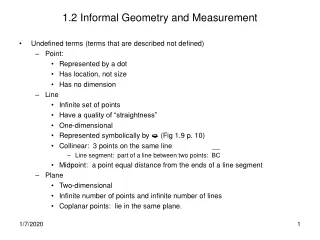
Review Line Segment: the part of a line between 2 end points. Line: a line segment with no end points
3.1 Parallel and Perpendicular Line Segments • After this lesson you will be able to… • Draw line segments that are parallel to each other • Draw line segments that are at right angles to each other.
What Are Line Segments? • Parallel Line Segments • Describes lines in the same plane that never cross, or intersect • They are marked using arrows • The perpendicular distance between line segments must be the same at each end of the segment. • To create, use a ruler and a right triangle, or paper folding
Parallel: two lines or two sides that are the same distance apart and never meet. Arrows: show parallel sides Vertex: the point where sides meet or intersect Lesson 1 Students will be able to describe different shapes Learn Alberta http://www.learnalberta.ca/content/memg/index.html?term=Division02/Parallel/index.html
Parallel: two lines or two sides that are the same distance apart and never meet. Arrows: show parallel sides (where do the arrows go below)? Vertex: the point when sides meet or intersect Lesson 1 Students will be able to describe different shapes Learn Alberta - parallel http://www.learnalberta.ca/content/memg/index.html?term=Division02/Parallel/index.html
PAGE 84 • Let’s us draw parallel line segments • Try to draw and check your drawings.
What Are Line Segments? • Perpendicular Line Segments • Describes lines that intersect at right angles (90°) • They are marked using a small square • To create use a ruler and a protractor, or paper folding.
Perpendicular: where a horizontal edge and vertical edge intersect to form a right angle OR when two sides of any shape intersect to make a right angle Right Angle: 90’ symbol is a box in the corner Vertical Perpendicular side Vertical side Perpendicular side Horizontal Learn Alberta - Perpendicular http://www.learnalberta.ca/content/memg/index.html?term=Division02/Perpendicular/index.html
Perpendicular: where a horizontal edge and vertical edge intersect to form a right angle OR when two sides of any shape intersect to make a right angle Right Angle: 90’ symbol is a box in the corner How many perpendiculars do you see in each diagram
Perpendicular: where a horizontal edge and vertical edge intersect to form a right angle Right Angle: 90’ symbol is a box in the corner How do you describe a perpendicular using points
OnYour Own… • What are 5 examples of parallel line segments in the real world? • What are 5 examples or perpendicular line segments?
PAGE 85 • Let’s us draw perpendicular line segments • Try to draw and check your drawings.
Practice • Pg 87. #5 • What are the parallel and perpendicular line segments in the painting.
Practice • Pg 87. #5 • What are the parallel and perpendicular line segments in the painting. • Segments CD, EF, and GH are parallel. • AB is perpendicular to CD, EF, and GH.
Practice • Identify the parallel and perpendicular streets in the diagram.
Practice • Identify the parallel and perpendicular streets in the diagram. Major Street and Centre Street are parallel Main Street and North Street are parallel. Major Street is perpendicular to Main Street and North Street. Centre Street is perpendicular to Main Street and North Street.
On Your Own… • Page 87 Practice and Apply #7, 9, 10, 12, 13, Extend #15, 16
What is A Perpendicular Bisector? • On your rice paper: • Use a ruler to draw a 15 cm line segment • Label the endpoints A and B. • Fold the piece of paper so that the points A and B lie on top of each other. • Use a ruler to draw a line segment on the crease. Label this line segment CD. Label the point where the two line segments intersect P. • Use a ruler to measure lengths AP and BP. What do you notice? • Use a protractor to measure the 4 angles made by the intersecting line segments. What do you notice about these angles.
What is a Perpendicular Bisector?? • A Perpendicular Bisector: • Is a line segment in half and is at right angles (90°) to the line segment.
Example • Pg. 93, #9 • In some First Nations communities, fish are dried on a drying rack like the one shown. An extra support is needed for this drying rack to hold all the salmon that were caught. Use what you know about drawing perpendicular bisectors to explain how to do this. Include the lengths shown in the picture in your explanation
Solution • Cut a support post that is 1.4 m long. To find the halfway point of the top horizontal pole, divide the length of 3 m in half to get 1.5 m. Place the support at this halfway point. Measure a right angle where the top pole and the support meet in order to position the support perpendicular to the top pole.
Let’s Practice Pg. 92 • #4- Trace the lines onto your rice paper. Use your protractor to measure the correct angles • #6, 7, 8, 10 • Due Tomorrow for Homework!!
3.3 Draw Angle Bisectors http://www.freewebs.com/mrsdeleon/mathlinks.htm#Geometry
What Will I Learn?? • To draw a line that divides a line segment in half and is perpendicular to it • To divide an angle in half
Lesson #3 How much fence will you need to enclose this baseball field? Student Outcome: I will be able to understand perimeter.
Lesson #3 Perimeter: the distancearound a shape or the sum of all the sides Student Outcome: I will be able to understand perimeter.
Lesson #3 How can you figure out these perimeters? Student Outcome: I will be able to understand perimeter.
Lesson #3 You need a tarp to cover this soccer field. How do you figure this out? Student Outcome: I will be able to understand perimeter.
Lesson #3 Area: the amount of surface a shape covers : it is 2-dimensional - length (l) and width (w) : measured in square units (cm ²) or (m²) Student Outcome I will be able to understand perimeter and area.
Lesson #3 46 cm Figure the area for these objects? 50 cm 8 cm Student Outcome: I will be able to understand perimeter and area. 183 cm 6cm 100 cm
Lesson #3 46 cm Figure the perimeter for these objects? 50 cm 8 cm Student Outcome: I will be able to understand perimeter and area. 183 cm 6cm 100 cm
Lesson #3 Page 128 What are the perimeters for each rectangle? What are the areas for each rectangle? What do you notice? Student Outcome: I will be able to understand perimeter and area.
8 cm² Lesson #3 Page 129 14cm² 18cm² 20cm² Student Outcome: I will be able to understand perimeter and area. What did we find out?
8 cm² Lesson #3 Page 129 14cm² 18cm² 20cm² Student Outcome: I will be able to understand perimeter and area. What did we find out? The rectangles with the least width has the least area. The rectangle closest in shape to a square has the greatest area.
Lesson #3 Area and Perimeter Video ( Learn Alberta) http://www.learnalberta.ca/content/me5l/html/math5.html?goLesson=12 Student Outcome: Student Outcome: I will be able to understand perimeter and area.
What is an Angle Bisector?? • An angle bisector is a line that divides the angle evenly in terms of degrees.
Area of a rectangle or square Area = length x width A = l x w Area of a parallelogram Area = base x height A = b x h
Area of a triangle Area = (base x height) ÷ 2 Area = (b x h) ÷ 2
http://www.calfeedesign.com/index.htm http://upload.wikimedia.org/wikipedia/commons/thumb/c/cd/Bicycle_Frame_Diagram-en.svg/443px-Bicycle_Frame_Diagram-en.svg.png