Download
1 / 78
870 likes | 1.49k Vues
This lesson provides critical knowledge on wound care and management of soft tissue injuries. Participants will learn how to effectively clean various types of wounds, identify signs of infection, and use appropriate dressings and bandages based on standard guidelines. The lesson further covers when to seek medical attention for deeper or more severe wounds, along with first aid techniques for injuries such as punctures and avulsions. It emphasizes the importance of infection prevention and proper injury management to promote healing and avoid complications.

E N D
Wounds and Soft Tissue Injuries Lesson 11
Lesson Objectives • Describe how to clean a wound. • Describe the signs and symptoms of an infected wound and what to do about it. • List standard guidelines for using dressings and bandages. • Explain how to determine when a wound needs medical attention.
Lesson Objectives • Describe first aid for punctures, wounds with impaled objects, avulsions and amputations, and for injuries of the genitals, scalp, and specific facial areas. • Demonstrate how to apply a roller bandage.
Wounds • Different types of wounds require specific first aid • All wounds have risk of infection • Wound care involves cleaning and dressing a wound • Prevents infection • Protects wound so it can heal
Wounds • Do not waste time cleaning a wound that is bleeding severely – controlling bleeding is always the priority.
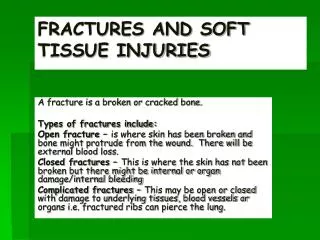
Types of Open Wounds • Abrasions • Lacerations
Types of Open Wounds • Punctures • Avulsions
Types of Open Wounds • Amputations • Burns
Cleaning Wounds • Clean wound to prevent infection unless it is very large or bleeding seriously • Wash hands and wear medical exam gloves • Gently wash wound with soap and water and rinse
First Aid: Wound Care • Gently wash wound with soap and water. Rinse for 5 minutes. • Remove any large particles. • Pat area dry. • Cover wound with sterile dressing and bandage.
Wound Cleaning Alert! • Do not try to clean major wound after controlling bleeding – it may start bleeding again • Do not put antibiotic ointment on puncture or deep wound • Use only on abrasions and shallow wounds
Wound Cleaning Alert! • Do not use alcohol, hydrogen peroxide, or iodine on wound • Avoid breathing or blowing on wound • Do not attempt to remove clothing stuck to wound • Cut around clothing and leave in place • Do not scrub wound
Wound Infection • May occur with any open wound • At greater risk are wounds from bites, • puncture wounds, dirty wounds, • wounds with jagged edges
Wound Infection • Use antibiotic ointment only on abrasions or shallow wounds • If signs of infection, see healthcare provider
Signs and SymptomsWound Infection • Wound area is red, swollen, and warm • Pain • Pus • Fever • Red streaks or trails on skin near wound
Purpose of Dressing Wounds • Helps stop bleeding • Prevents infection • Protects wound while healing
Types of Dressings • Gauze squares • Roller gauze • Nonstick pads • Adhesive strips • Bulky • Occlusive • Improvised
Guidelines for Using Dressings • Wash hands and wear medical exam gloves • Choose dressing larger than wound • Do not touch part of dressing that will touch wound • Lay dressing on wound • Cover whole wound
Guidelines for Using Dressings • If blood seeps through, do not remove dressing but add more on top • Apply bandage to hold dressing in place
Use of Bandages • Cover a dressing • Keep dressing on wound • Maintain pressure to control bleeding
Types of Bandages • Adhesive compresses • Adhesive tape rolls • Tubular • Elastic • Self-adhering • Gauze roller • Triangular • Improvised
Guidelines for Bandaging • Apply bandage firmly but do not cut off circulation • Do not cover fingers or toes • Keep checking tightness of bandage • Ensure bandage is secured so dressing will not move
Guidelines for Bandaging • With elastic and roller bandages • Anchor first end • Tie, tape, pin, or clip ending section • Use non-elastic roller bandage as pressure bandage to control bleeding and protect wound • Use elastic roller bandage to support joint and prevent swelling
Guidelines for Bandaging • Wrap bandage from bottom of limb upward • Avoid bending joint once it is bandaged
Skill: Roller Bandage
Turn bandage diagonally across top of foot and around ankle.
When to Seek Medical Attention • Bleeding not easily controlled • Any deep or large wound • Significant wound on face • Infected wound • Any bite • Foreign object in wound
When to Seek Medical Attention • Puncture wound • Unsure about tetanus vaccination • Any wound you are unsure about • Wounds that require stitches • Cuts on face or hands when edges don’t close • Gaping wounds • Cuts longer than 1 inch
Special Wounds • Puncture wounds • Impaled objects • Amputations • Genital Injuries • Head and face wounds
Injury Prevention • Follow OSHA in work setting • Follow tool manufacturer guidelines • Wear appropriate safety helmet • Wear eye shields • Wear mouth guard • Do not chew ice, hard candy, or popcorn kernels
Injury Prevention • Wear athletic cup, pelvic shield, groin pad or protector • Wear a sports bra
Puncture Wound • Greater risk of infection • Germs may not be flushed out • Remove small objects or dirt (not impaled object) • Gently press on wound edges • Helps promote bleeding
Impaled Object • Removing an object could cause more injury and bleeding • Leave it in place and dress wound around it • Control bleeding by applying direct pressure at sides of object
Impaled Object • Pad object in place with large dressings or folded cloth • Support object while bandaging it in place • Keep victim still • Seek medical attention
Avulsion • Try to move skin or tissue into normal position (unless contaminated) • Control bleeding • Provide wound care • If avulsed body part completely separated – care for it like an amputation
Amputation • Control bleeding and care for wound first, then recover and care for amputated part
Amputation • Wrap severed part in dry, sterile dressing or clean cloth (do not wash) • Place part in plastic bag, seal it • Place sealed bag in another bag/container with ice • Part should not touch ice directly • Give part to responding crew
Genital Injuries • Provide privacy for victim • Use direct pressure to control external bleeding • Call 9-1-1 for: • Severe or continuing bleeding • Significant pain or swelling • Possibility of sexual abuse
Genital Injuries • Injured testicles • Support with towel between legs • Vaginal bleeding • Have woman press sanitary pad or clean folded towel to area
Head and Face Wounds • Consider possible neck or spinal injury • Do not move victim’s head while giving first aid
First Aid: Scalp Wound Without Suspected Skull Fracture • Replace any skin flaps and cover wound with sterile dressing • Put roller or triangular bandage around victim’s head to secure dressing
Eye Injuries • Serious because vision may be affected • Avoid putting pressure on eyeball • Movement of eye will worsen injury • Keep unaffected eye covered
Blow to Eye • If eye bleeding or leaking fluid • Call 9-1-1 or take victim to emergency department • Put cold pack over eye for up to 15 minutes • Eases pain • Reduces swelling • Do not put pressure on eye
Blow to Eye • Do not remove contact lens • Have victim lie still • Seek medical attention if: • Pain persists • Vision is affected
Large Object in Eye • Do not remove • Stabilize with dressings or bulky cloth (paper cup for large object) • Cover both eyes • Call 9-1-1 or get victim to emergency department
Dirt or Small Particle In Eye • Do not let victim rub eyes • Wait to see if victim’s tears will flush out object • Gently pull upper eyelid out and down over lower eyelid to catch particle on lashes