Download
1 / 14
140 likes | 313 Vues
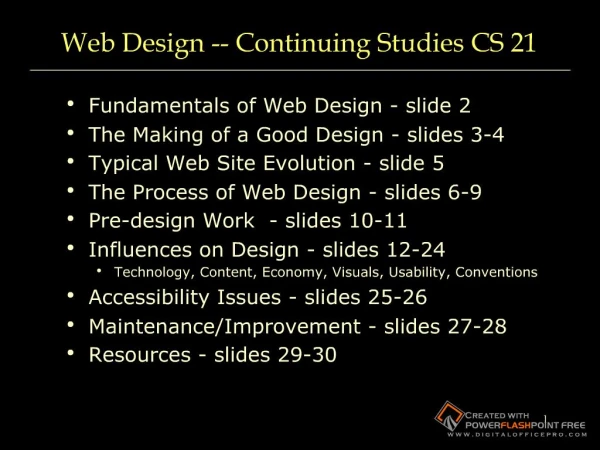
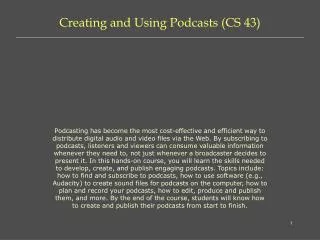
Creating and Using Podcasts Stanford University Continuing Studies CS 43. Mark Branom markb@stanford.edu http://www.stanford.edu/people/markb/ 650.725.1717 Course Web Site: http://www.stanford.edu/group/csp/cs43/. Week 2 Agenda. Planning the Podcast Obtaining Audacity

E N D
Creating and Using PodcastsStanford University Continuing Studies CS 43 Mark Branom markb@stanford.edu http://www.stanford.edu/people/markb/650.725.1717 Course Web Site: http://www.stanford.edu/group/csp/cs43/
Week 2 Agenda • Planning the Podcast • Obtaining Audacity • Installing the LAME mp3 encoder • Recording a Podcast • Establishing a Tripod Account • Saving the audio file to the local servers
Planning the Podcast (review) • Research your topic. • Write out what you plan to say. • Block out the segments of your podcast. • Typical 60-minute radio show: • Introduction and “hook” (a snapshot of what is covered and why listeners would want to listen) • Segment 1 • Break • Segment 2 • Break • Segment 3 • Break • Final points and summary of podcast • Typical 10-minute podcast: • Introduction and “hook” • Main segment • Summary of segment • Final points
In-class Exercise: Mapping Out a Podcast • Pair up with the person sitting next to you. • Map out a one-minute podcast with your neighbor. Don’t record it (we’ll do that later); just plan what you will say. • Introduce yourself “Hello, and welcome to the [YourName] show. I’m your host, [YourName]. Today I’ll be interviewing [NeighborName].” • Interview the person sitting next to you • “So, [NeighborName], please tell the listeners a little about yourself.” • “I see, and where do you live?” • “What exciting things are going on in the neighborhood?” • “Anything else you would like to add?” • Closing remarks “Well, [NeighborName], it looks like we’ve come to the end of time for the show. Thank you so much for allowing our audience to learn a little more about you and your neighborhood. This is [YourName], and you’ve been listening to the [YourName] Show, brought to you by Stanford University and the Continuing Studies department. Until next time, thanks for listening.” • Then, you will switch roles with your neighbor and practice again.
Recording and Editing Podcasts (review) To record a podcast, you’ll need: • A computer (any modern computer will do – Mac, Windows, Linux) • A microphone (a good microphone will cost around $100) http://radio.about.com/od/podcastin1/a/blcomparemikes.htm • Software to record and edit the podcast. For audio podcasts, Audacity is a good choice. For video podcasts, Windows Movie Maker (Windows) and iMovie (Mac) are good choices. • Storage for the audio file you create (a web server such as Tripod, a free podcasting service such as Podshow or Podbean, etc.)
Obtaining Audacity • Audacity is a free, open source software for recording and editing sounds in Linux, Mac OS X, and other operating systems, and is great for creating audio podcasts. • About Audacity:http://audacity.sourceforge.net/ • Downloading Audacity (don’t forget to download the LAME mp3 encoder, too):http://audacity.sourceforge.net/download/ • Audacity documentation:http://audacity.sourceforge.net/help/documentation
In-class Exercise:Record a Podcast Using Audacity, record the interviews you and your neighbor worked on in the Mapping Out A Podcast exercise. One interview should be recorded on your computer, the other on your neighbor’s. To record: • Launch Audacity. • Click the Record button. • Start talking! • When finished with the first interview, click the Stop button. • Save your sound file in the Audacity Project format (.aup) on the desktop (using the filename yournameinterview.aup). • Repeat steps 1-5 to record the second interview on your neighbor’s computer.
Minor Editing Using Audacity • After you record a podcast, you will need to edit the sound file before publishing it. The handout Sound Editing with Audacity – Basic Instructions, which we will use in class, was developed by Stanford’s Center for Teaching and Learning. It details the basic steps for editing sound files using Audacity, and is available at:http://ctl.stanford.edu/Podcasting/audacity.pdf • In-class Exercise: Minor Editing of the Podcast • In Audacity, listen to the podcast. • Remove any large pauses, and alter the sound using one or more of the Effects, if appropriate. • Export (save) the interview as an MP3 file to the desktop (using the filename interview.mp3).
Establishing a Tripod Account — Step 1 • You’ll need a web server to host your podcast once it is finished. Tripod is a free web hosting service that we’ll use in class. • To establish a Tripod account, go to http://www.tripod.com/ and click Start Now!
Establishing a Tripod Account — Step 2: Choose the free version Under Tripod Free, click Sign Up
Establishing a Tripod Account — Step 3 • Select a member name and password • Personalize your account with your information (if you feel uncomfortable giving out personal information, use fake information) • Required fields are: • Title, First Name, Last Name, Zip Code, Email address, Birth Year, Birth Month, and Birth Day • Choose the type of ads you wish to appear on your site • Uncheck the Tripod & Terra Lycos Network Offers you don’t want • Enter the confirmation code • Press the “I Agree” button
Establishing a Tripod Account — Step 4 Unless you want to take advantage of the “special offers”, scroll down and click “No Thanks”.
Establishing a Tripod Account — Step 5 Click “I’m an experienced site builder and want to upload my files – take me to the File Manager”, then click “Next”.
If all has gone well… You should see the following screen. You may now quit Internet Explorer. Be sure to keep track of your Tripod username and password!