Download

1 / 39
430 likes | 775 Vues
HVACR318 – Refrigeration II. Charging Refrigerants. Charging Defined. Charging a system is to add or replace refrigerant in a system. Refrigerant is never used up. It either leaks out or it is contaminated by: Water Acid Noncondensibles . Charging Refrigerants - Methods . Weighing

E N D
HVACR318 – Refrigeration II Charging Refrigerants
Charging Defined • Charging a system is to add or replace refrigerant in a system. • Refrigerant is never used up. It either leaks out or it is contaminated by: • Water • Acid • Noncondensibles.
Charging Refrigerants - Methods • Weighing • Using scales to check the amount added • Measuring • Using a dial-a-charge cylinder • Superheat and Subcooling • Most accurate • Combine with weighing in the charge. • Allow system to run for 10 minutes before taking readings.
Charging Refrigerants - Methods • Sight Glass • Never used to check the charge • Not accurate • Varies based on system conditions • Amperage or Wattage • Not accurate at all • Do not use unless you have no other options.
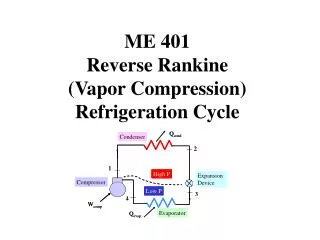
States of Refrigerant Charging • Refrigerant can be charged as a: • Vapor • Liquid
Vapor Charging - Overview • Entails taking vapor refrigerant out of a refrigerant drum and putting it into the low side of the system. • If the system is not operating, you can add vapor to both the low and the high side of the system until the pressures equalize.
Vapor Charging • If the system is running, add vapor to the low side ONLY. • High side is under a higher pressure than the drum. • Opening the high side on a running system can put too much pressure on the refrigerant cylinders and cause them to explode.
Vapor Charging • In some cases, the refrigerant drum may be cold and cause it to have a lower pressure than the low side of the system. • Warm up the drum or the cylinder. • Warm water bath • Heater blanket
Vapor Charging - Advantages • Advantages • Easiest way of adding refrigerant to top off a running system. • Liquid refrigerant cannot enter the suction side of the compressor. Vapor is allowed.
Vapor Charging - Disadvantages • Disadvantages • Slow process for adding large quantities of refrigerant. • High drum pressures can force oil out of the compressor. • Blended refrigerants may fractionate (or separate) as they are charged.
Liquid Charging - Overview • Entails adding refrigerant in the liquid state into a system. • In a non-operating system, you can add liquid refrigerant through the king valve on the receiver. • King Valve = Service Valve.
Liquid Charging • On an operating system you can front seat the king valve. • Jump out low pressure control • Be careful not to overcharge
Liquid Charging • Liquid charging on an operating system through the low side: • Must be careful • Experienced technicians only • Flooding may result
Liquid Charging • There are commercially available charging devices for charging liquid in the suction line; it acts like a metering device. • If the compressor becomes cold or frost starts to develop, stop charging with a liquid. Let it boil off.
Liquid Charging - Advantages • Advantages: • Fast • Convenient (through low side)
Liquid Charging - Disadvantages • Disadvantages • System may have to be turned off • Easy to overcharge
Weighing Refrigerants - Overview • Usually accomplished using various scales: Dial, Electronic and Electronic Charging Scales. • Dial Scales • Can be difficult to use and inaccurate. • Set the charge on a dial and the scale shuts off when complete. • Not digital, and have faded from popularity.
Weighing Refrigerants • Electronic Scales • Portable • Less Expensive • Accurate • You cannot walk away and allow charging to occur without youthere – must watch scale.
Weighing Refrigerants • Electronic Charging Scales • Combination of electronic scale and old ‘dial-a-charge.’ • Accurate • Automatic
Measuring Refrigerants - Overview • Graduated Cylinder • Dial-A-Charge • Put refrigerant into cylinder up to the line and then charge the system. • Not used much anymore, as they are not safe. • Tech must handle liquid refrigerant.
Steps to Charge • Make sure system is in a vacuum and do not remove gauges. • Connect cylinder to the small center hose on the manifold. • Open refrigerant cylinder • Purge the air out of the center line.
Steps to Charge 1 • Open the center manifold valve and allow the refrigerant into the charging manifold. • Decide on low or high side charging. • Place the cylinder onto the scale and zero the scale out. • Open the high or low side valve on the manifold and weigh the refrigerant in.
Steps to Charge 2 • While charging system, watch amperage of compressor. • If amperage goes above FLA (Full Load Amperage) shut off valve and wait for the amperage to stabilize and drop. • Never walk away from a unit while charging system.
Steps to Charge 3 • Once system is charged, check superheat and subcooling prior to removing the gauges. • Close all valves and remove the gauges. • Double check for leaks and clean up your work area. • Record the quantity of refrigerant you have added to the system.
Steps to Charge 4 • Watch the difference in gauge pressure as you are charging. The gauges can be misleading.
Troubleshooting • Low Charge: • Insufficient Cooling (low capacity) • Long Running Time • Continuous Running Time • High Operating Costs • Evaporator Icing Up • Superheat Higher than normal • Subcooling high
Troubleshooting • Low Charge, cont’d • Low wattage • Volts x Amps • Suction pressure low, discharge pressure low. • Compressor temperature higher than normal.
Troubleshooting • Overcharge • High suction pressure • High discharge pressure • Compressor sweating all over • Flooding - liquid in compressor • High wattage • Volts x Amps
Troubleshooting • Overcharge, cont’d: • High current draw • Low or no superheat • Flooded evaporator • Liquid filled evaporator