Download
1 / 7
70 likes | 216 Vues
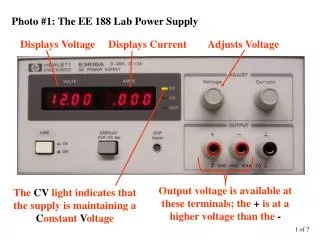
Photo #1: The EE 188 Lab Power Supply. Displays Voltage Displays Current Adjusts Voltage. Output voltage is available at these terminals; the + is at a higher voltage than the -. The CV light indicates that the supply is maintaining a C onstant V oltage.

E N D
Photo #1: The EE 188 Lab Power Supply Displays Voltage Displays Current Adjusts Voltage Output voltage is available at these terminals; the + is at a higher voltage than the - The CV light indicates that the supply is maintaining a Constant Voltage
Photo #2: What is this terminal? This terminal connects to the power supply case and to the power line safety ground. In most cases it is not used. The internal voltage source connected to the + and – terminals is isolated from the ground terminal (sometimes referred to as “floating”). This allows connection of the voltage source to a circuit independently of how the circuit might be connected to ground.
Photo #3 Adjusts Current Limit (With the terminals shorted, turn the current adjust knob clockwise to increase the current limit) Note that the output voltage drops as needed to limit the current The CC light indicates the supply is providing Constant Current Safety Note: This power supply has built-in protection for a short circuit; a battery, on the other hand, might start a fire or explode if shorted.
Photo #4 The current limit value is set using the current adjust knob when shorted You can also set or display the current limit by holding in the DISPLAY/OVP/CC Set button rather than shorting the output terminals with a wire
Photo #5 One lamp connected to the power supply Arrows show direction of current flow
Two lamps connected in parallel Photo #6 Note that there are 2 independent “parallel” current paths Arrows show direction of current flow
Two lamps connected in series Photo #7 Note that there is only 1 shared “series” current path Arrows show direction of current flow