MW100 Quick Start Guide
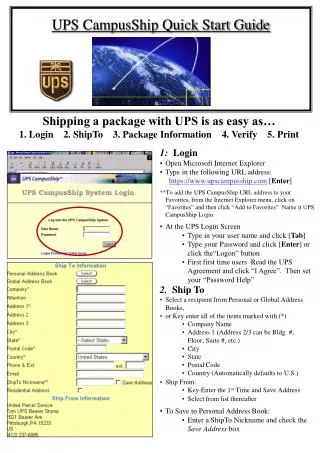
Yokogawa Network Solutions Presents:. MW100 Quick Start Guide. The following guide is designed to help the user take a MW100 system and quickly get an input channel and math channel configured for measurement and recording and then display the results in real-time. Getting Connected Part 1.

MW100 Quick Start Guide
E N D
Presentation Transcript
Yokogawa Network Solutions Presents: MW100 Quick Start Guide The following guide is designed to help the user take a MW100 system and quickly get an input channel and math channel configured for measurement and recording and then display the results in real-time.
Getting Connected Part 1 Many computers are assigned addresses on a network via DHCP. When not connected to a DHCP network, the computer fails to get a proper IP address assigned to it and defaults to a 169 series address. When initially configuring a MW100 – you may need to use an Ethernet cross-over cable and a static IP address for your PC.
Getting Connected Part 2 Install the MW100 software that comes with each Head unit and open the MW100 IPConfig software. If for some reason the software cannot find your MW100 – ensure that security software is not blocking the search effort. Alternately the MW100 can be temporarily set to address 192.168.0.10 by setting dip-switch 8 on the front of the unit to the down position and restarting the unit. Connection can then be made through a web browser by browsing to this address.
Getting Connected Part 3 If Parts 1 and 2 worked, then open a web browser and type the IP address of the MW100 into the address bar and connect to the MW100. If necessary configure communication settings locally on the MW100 through Communication Setting link.
Reconstructing MW100 System Whenever an MW100 system is first assembled or a module is changed – it needs to be reconstructed so the modules can be individually configured. An MW100 system should automatically detect what modules are attached. If attaching a new module to an older MW100 system – ensure the MW100 head unit has the latest firmware so that it can recognize the module.
Setting Measurement Rates The MW100 can scan input modules at up to three different rates – with a single rate assigned to each module. All channels within a module will be scanned every interval. Select Apply to execute changes.
Setting Math Rate MW100 has powerful math channels that can be used to give input channels offsets, calculate flow totals, perform logical operations, and many other useful features. Math channels will calculate at the specified interval. Select Apply to execute changes.
Setting Recording Options The MW100 supports interval based recording and event (trigger based) recording. Select Apply to execute changes.
Set Date and Time All data recorded by the MW100 is time and date stamped – ensure the correct information is set within the MW100 as well as on PCs that will be viewing the data files. Confirm that time zone and daylight savings time are appropriately set as well or data may be incorrectly offset.
Setting Temperature Unit Yokogawa data acquisition systems treat the temperature unit as a fundamental setup parameter and it is important to select this early on in the configuration process as changing it once a unit is fully configured will reset items like channel configurations and other settings. Select Apply to execute changes.
Configuring Inputs Channels can be individually configured with universal input modules supporting TCs, RTDs, VDC, DI (level or contact) and ADC via a shunt. Select Apply to execute changes. Be careful to select the appropriate Apply as the second Apply – applies global settings (bulk changes).
Configuring Math Channels Math channels can be recorded and displayed like regular input channels and allow for powerful capabilities like offsets, totals, logical conditions, and other more advanced features. Select Apply when to execute changes.
Configuring an Input Channel Alarm The MW100 has a powerful alarm system that supports up to 4 alarms per input channel as well as 4 alarms per math channel. Select Apply to Execute changes. Note that if the underlying channel is changed then the associated alarm setting may be reset. Yokogawa implemented this as a safety procedure to ensure that alarms are forced to be reconfigured when an associated channel is changed.
Configuring Tag Names Optionally each input channel and math channel can be given a name. Select Apply to execute changes.
Configuring Display Groups The MW100 allows for up to 18 groups of channels to be configured for display purposes. In monitoring mode – up to two groups can be seen at a time with the ability to change groups on the fly. Select Apply to execute changes.
Display by Channel Number or Tag Name When groups of channels are displayed in the real-time monitor they can be viewed by name or channel number. If no name is configured – the display will revert to channel number. Select Apply to execute changes.
Display by Channel Number or Tag Name Now that the MW100 has been configured, it is time to monitor it in real-time. Ensure that the MW100 software has be installed on the PC or that the PC has the latest copy of Sun’s JAVA virtual machine installed (www.java.com) so that real-time display modules (JAVA applets) can execute. Select Apply when switching operation modes.
Real-time Monitoring of Two Groups The MW100 web interface can be used to display two groups of channels simultaneously in different formats. It can also be used to manually set analog outputs, insert messages into trends, start/stop math, start/stop recording, acknowledge alarms, and manually set digital outputs. If the interface fails to populate properly there could be a problem with the JAVA virtual machine (conflicting versions or it may not be installed).
Alarm Summary The MW100 has a powerful alarming system that can log and display alarm status. The Alarm Summary can be reached from the main web menu or from the real-time monitoring page and will include time and date stamps for all logged alarms. The alarm summary page does not update automatically – so you will need to select the update button or refresh the page to see new alarms.