Kaspro Quick Start Guide
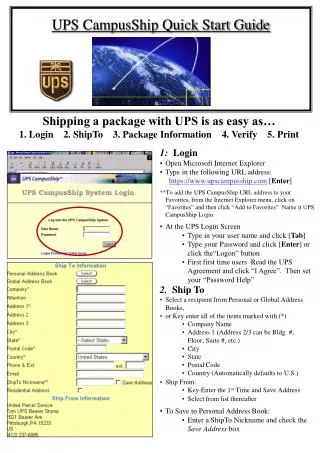
Kaspro Quick Start Guide. Follow These Steps to Start an Application Using the KA Software For Gemini, Galaxy and Castor models. After Installation.


Kaspro Quick Start Guide
E N D
Presentation Transcript
Kaspro Quick Start Guide Follow These Steps to Start an Application Using the KA Software For Gemini, Galaxy and Castor models
After Installation • After you have installed the software, go to the Windows Start button, choose All Programs and look for the KASPRO entry. Click on this and it will expand to show the following:
Starting the Software • Next click on the KA Software icon to start the software for the Kaspro programming environment.
Step 1 – Choose HMI • On the left side, choose the HMI button in the Graph element window. Then you will get a new window which shows the HMI selections.
Step 1 Cont. • Choose from this list the HMI you are working with.
Step 1 Cont. • To add the HMI click and drag the icon to the work area and drop it there. A dialog box will appear asking you to select the orientation of the display, choose either Horizontal (the default setting) or Vertical.
Step 1 Cont. • Your work area should now look like this:
Step 2 – Choose Driver/PLC • Next choose the PLC button in the Graphic element window.
Step 2 Cont. • This opens up the list of drivers. From this list select the driver that best matches your application. It is possible to select multiple drivers. Again, click and drag the driver to the work area and drop it. We are using the Modbus RTU driver for this example.
Step 2 Cont. • Your work area should now look like this:
Step 3 – Connect Comms • Now we need to connect the two devices so they can communicate. To do this choose the Connector button from the Graphic element window and drag the serial connector to the work area and drop it.
Step 3 Cont. • You should have something like this on your work area:
Step 3 Cont. • Now simply drag the ends of the connector to the appropriate com port on each device. When the connector “sticks” it is connected. Try moving each device and the connection should follow.
Step 4 – Serial Settings • Double click on the HMI to bring up the Properties dialog box and then choose the Serial Port 0 Setting tab.
Step 4 Cont. • Make these settings agree with the PLC or device your are connecting to the HMI. The settings on the right are not typically used other than the default settings. • Double click on the PLC and you can set the drop address or Ethernet IP address if appropriate. Be certain to make this address agree with that of the PLC.
Step 5 – Page Design • Now go across the screen to the Project construct window and expand the tree to show the HMI0 components.
Step 5 Cont. • Select 0:Frame0 and you will see this. The black area is the window work area.
Step 5 Cont. • In the graphic element window you will see three more buttons, PLC Parts, Function Parts and Project Database. These components will allow you to do most of the design and layout for the pages you create. In each case you must click and drag the icon to the work area. When you drop the icon a dialog box for the component selected will appear.
Step 5 Cont. • For this exercise we will create a timer to gives us a moving value and then we will get a value from the PLC and display it. • First, choose PLC Parts and then the Number Display icon.
Step 5 Cont. • In the dialog box choose Addr. Type LW Then select the Numeric Data tab.
Step 5 Cont. • Set the range to 0 to 100. Then click OK.
Step 5 Cont. • You should now have this display: Now we will create a timer that will increment this value. Go to the Function Parts and select and drag the Timer.
Step 5 Cont. • Set the Exe. Cycle to 5. Then press the Timer Function tab.
Step 5 Cont. • Set the following as noted in Red ink: Then press OK.
Step 5 Cont. • Now the timer will count from 0 – 100 and the display box will show the value. You can add a trigger to this and then make a Bit State Switch to toggle the trigger address and start and stop the timer.
Step 6 – Get PLC data • Drag another Number Display to the work area and configure it as follows: Then press OK.
Step 6 Cont. • Your work area should now look something like this:
Step 7 - Simulating • Next we will simulate our project. First, compile using the compile icon on the tool bar - Down in the Message window you will see the compile results.
Step 7 Cont. • Next click on the Simulate Offline icon - You should now see this -
Step 7 – Cont. • Press Simulate and the you will get this - • The left box should be counting by 1. If you are connected to the PLC, then choose Direct Online Simulation and both boxes should have a value.
The End • Thanks for following along, we hope this was helpful. Look for more examples in this series to get your projects established faster and easier. • http://www.kaspro-group.com/e-learning.html