UPS CampusShip Quick Start Guide
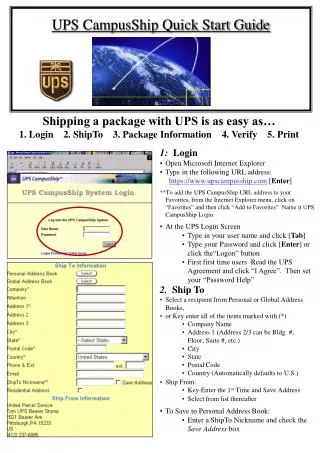
UPS CampusShip Quick Start Guide Shipping a package with UPS is as easy as… 1. Login 2. ShipTo 3. Package Information 4. Verify 5. Print 1: Login Open Microsoft Internet Explorer Type in the following URL address: https://www.upscampusship.com [ Enter ]

UPS CampusShip Quick Start Guide
E N D
Presentation Transcript
UPS CampusShip Quick Start Guide Shipping a package with UPS is as easy as… 1. Login 2. ShipTo 3. Package Information 4. Verify 5. Print • 1: Login • Open Microsoft Internet Explorer • Type in the following URL address: • https://www.upscampusship.com [Enter] • **To add the UPS CampusShip URL address to your Favorites, from the Internet Explorer menu, click on “Favorites” and then click “Add to Favorites” Name it UPS CampusShip Login • At the UPS Login Screen • Type in your user name and click [Tab] • Type your Password and click [Enter] or click the“Logon” button • First first time users Read the UPS Agreement and click “I Agree”. Then set your “Password Help” • 2. Ship To • Select a recipient from Personal or Global Address Books, • or Key enter all of theitems marked with (*) • Company Name • Address 1 (Address 2/3 can be Bldg. #, Floor, Suite #, etc.) • City • State • Postal Code • Country (Automatically defaults to U.S.) • Ship From: • Key-Enter the 1st Time and Save Address • Select from list thereafter • To Save to Personal Address Book: • Enter a ShipTo Nickname and check the Save Address box
3: Package Information • Fill in all fields marked with an (*) • Enter Weight (not required for UPS Letter) • Select Package Type • Choose Shipping Service: • Ground • Air • International • **International shipments containing items other than documents require (3) copies of a commercial invoice. • Enter Dimensions (only required when using your own packaging) • Enter Insured Value (if Desired • Additional Cost) • Charge-Back/Department Codes: • Fill in the mandatory Reference 1 field with the appropriate Code • Fill in the Optional Reference 2 field • Check Additional Handling if Applicable • IF Saturday Delivery--apply orange UPS Saturday sticker • If Desired check Send email shipment notification and enter email addresses and message for shipment notification • CLICK Ship Package to Continue
4: Verify • Is the Ship To information correct? • Is the Ship From information correct? • Are the Package Details correct? • **If any information is not correct, edit the by clicking on the “Edit Package Info” button • **If all of the information is correct, click on the “Ship This Package button • 5: Print • The UPS Shipping Label will appear on your screen • Label options: • When using 8 1/2 x 11” paper: • Print to local Laser printer • Fold paper in half and insert into UPS pouch • (Item # 171604) • Peel backing from UPS pouch and apply to package • Supplies: UPS supplies can be ordered by • calling 1-800-PICK-UPS or by • visiting www.ups.com
Package Tracking • Click on “View Shipped Packages”. You can Pick # of days of specify a Date Range • Click on the 1Z UPS “Tracking Number” Void a Package/Reprint Shipping Label • Click on “Details” • Click on “Void Package” or “Reprint Shipping Label” • Note: • For packages not shipped, users have 24 hours in which to void before being billed • Reprint Shipping Label should only be used if a problem exists with the original address label that printed