Visual Display Plan
Visual Display Plan. Gifted and Talented Program. How might your board be used?. On display in the MHHS media center The Student Learning Conference Celebration of Excellence end-of-year G/T function. Title. Purpose: Hypothesis: Procedure:. Results/Research Goals


Visual Display Plan
E N D
Presentation Transcript
Visual Display Plan Gifted and Talented Program
How might your board be used? • On display in the MHHS media center • The Student Learning Conference • Celebration of Excellence end-of-year G/T function
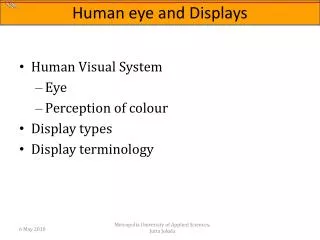
Title Purpose: Hypothesis: Procedure: • Results/Research Goals • Description of Graphs/Tables • Continue with information, photos, graphs, artifacts, etc. as appropriate.. Conclusions: Future Work: Graphs and Tables Artifact Artifact Name School Name Mentor Name Mentor Co. Photo or Diagram Visual Display Plan – Basic Layout Abstract or Background Internship Click here for a sample!
Purpose • In the purpose section, tell the audience the following things: • What were you trying to accomplish • Why did you do this project • What question(s) were you asking? OR What hypothesis were you testing • What gap in the knowledge are you addressing • The purpose is usually located at the upper section of the left wing panel.
Hypothesis • List in this section what assumptions or predictions you have made. • Usually located at the upper section of the left wing panel either above or below the purpose section.
Methods/Procedure • For scientific boards: • Include a detailed description of each step taken • Give a complete list of materials • Use active verbs to clearly and concisely state your procedure/method • Placing a lab notebook on the table in front of the board can be used to illustrate how meticulously the experiment was conducted • For social science, fine arts, etc., this section should be organized logically, often chronologically, and clearly describe each aspect of the work completed, such as: • An annotated bibliography based on extensive library and electronic research • Contacting, surveying or interviewing experts • Procedure for examining, designing, or testing models • Designating a target audience and outlining the design and distribution of questionnaires • Method of compiling data
Methods/Procedure • Use bullets when possible. • The procedure is usually located below the purpose on the lower section of the left wing panel.
Results • This section documents in the form of charts, graphs, models, products, and photographs, the proceeds of the investigation. • Captions should accompany each of these artifacts. • Use computer-generated graphs and charts whenever possible. • When questionnaires are used, place them in a binder on the table in front of the board. • Consider how to include your final product on the board. • Scientific competitions frequently have specific formats to follow for this section, and should be adhered to. • Save interpretation and analysis of this data for the summary and conclusion sections.
Results • The results usually comprises the center section of the presentation board. It is the focal point of the presentation. • Graphs require a key, labeled axes, and a title. • Charts require labeled rows and columns, and a title. • It is customary to use a short caption of explanation for each item. • Avoid placing items in a grid-like pattern.
Conclusion/Summary • This section is where the data is analyzed and interpreted. • Present insights and speculate about patterns in the data. • State whether the data supports or negates the hypothesis. Negating the hypothesis can be an important discovery. • If the results were inconclusive, be honest about it, and present modifications that might have yielded more reliable information. • All studies have limitations, point out these limitations. Acknowledging inevitable limitations demonstrates scholarly sophistication and humility, and addresses critics’ questions. • List topics worth further investigation. • The conclusion/summary is usually located on the upper section of the right wing panel.
Name Plate • The name plate is customarily located on the bottom corner of the right wing panel. • A standard format in academics is: • Your Name • School Name • Mentor Name(s)-Include Dr. or Ph.D., etc. • Mentor’s Official Company Name • Acknowledgment of other individuals who significantly contributed to your project
Constructing the Board • Title/Header Board • Using a header board makes the title more prominent, and adds considerably to the stability of the board when it is standing on a table. • Titles should be descriptive, interesting, and concise. Two short lines are preferred to one long line. • A standard format in academics is: Category, Colon, Topic. Such as Kindergarten: A Great Start • Other than scientific/professional symbols, each word of the title begins with a capital letter. • Titles can be a computer-generated banner, individually die-cut letters, or a small poster. Finished letter size should be between 2” and 3” tall, centered and bolded.
Constructing the Board • Basics… • Type all text • Condense the text: Less is more! • Use bullets whenever possible • Prepare computer-generated graphs and charts • Board Colors – white, black, red, green, blue, yellow • When there is a choice, consider these points: • Use color symbolically. Example: Red and white if the presentation is on the American Red Cross. • Black boards allow the greatest flexibility for choosing paper backing colors for the text and artifacts.
Constructing the Board • Backing the artifacts • Text and artifacts are mounted to the background papers and presentation board with either spray adhesive or glue stick. Spray adhesive is repositionable and is the recommended method. • Laminated items can only be mounted with mounting film or rubber cement. Rubber cement requires a long drying period and edges of items adhere poorly. • Laminating makes items resistant to soiling and damage. • However, laminated items are more difficult to mount. The edges frequently curl up and items may fall off the display board. • Lamination makes the items shiny and somewhat harder to read.
Constructing the Board • Paper Colors • A color scheme of two or three complementary paper colors that also coordinate with the board color is recommended. • Items can be mounted on one or two sheets, varying the color order/combination. • Background colors should not conflict with the content. Bright, primary colors conflict with topics such as sudden infant death syndrome, or end-stage cancer treatment. • Scientific experimentation display board items are often backed on black if the board color is white.
Constructing the Board • Layout • Several small pages are preferred to one long page of text. • Allow at least 1/2” to 1” of board space between each item. More is better. • Remember that each item will be backed on paper. Thus, allow an additional 1/2” to 1” spacing all around each item when making the layout plan. • Avoid placing items in a grid-like pattern. Objects attract the most attention, and keep readers interested longer, if they are placed at different heights and angles. • Most readers focus on the middle of the center panel, thus, place the most important results in the upper section of the center panel. • The bottom two inches of the board is like a dungeon, no one wants to go there. This area is difficult for readers to see and is usually reserved for the nameplate and any artifacts that will sit on the table in front of the board.
Display Plan Assignment – What to Submit by March 18th • Drawing of Board • Typed text in 12 point font on 1 page. • If you have images or graphics, submit them. • You should never attach anything to your board that hasn’t been edited.