Download
1 / 1
10 likes | 30 Vues
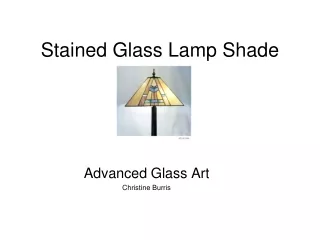
DIY a Lamp Shade for a Strip Bar Light

E N D
DIY a Lamp Shade for a Strip Bar DIY a Lamp Shade for a Strip Bar Light Light https://www.fisherlight.com/ In the 1970s, strip bar lights were very popular. This type of light reduces shadows, so it is particularly suitable for make-up. Although this light doesn't match well with some modern decor styles, these fixtures are a perfect candidate for lampshade makeovers. Here’s the steps to make lamp shade for a strip bar light. 1.Cut the height of the end ribs of a grosgrain ribbon. Along the rib, you can run a small bead of lampshade glue and place the length of the strip on the line. 2.Fold the ribbon around the wire and center it. Open both ends of the ribbon. Along the inside of the ribbon, apply a second small bead of glue. Press the ribbon closed. Hold the ribbon in position for the glue to dry along the wire with bulldog clamps. Do the same things on other outside rib wire. 3.On the bottom side of the bottom wire close to one of the ends you just covered, leave a drop of glue. Place the end of the grosgrain ribbon in the glue. Run the sides of the ribbon vertically up the backside of the lampshade. The ribbon will return to cover where it started after wrapping the top wire. 4.After the ribbon crosses up the back of the lampshade for the second time, you need to angle the ribbon slightly. To hold the ribbon in place, you can add a drop of glue on the top and bottom wires every three or four wraps. Continue to do until you reach the other already covered end wire. Then, use a litter more glue to finish the bottom wire. Along the wire edges, you need to place bulldog clips until the glue dries. 5.Remove the clips. Use one continuous grosgrain ribbon to wrap (counter clockwise) the lampshade edges starting on the bottom right and at least one inch from the corner. Miter the corners. Glue the ribbon to both sides of the frame to get a clean look. Overlap where you started and finish at the corner. Carefully miter it completely. 6.Clip the trim. Let the lampshade to dry overnight. If you prefer, delete the clip and add another trim.