MARKSMANSHIP PRINCIPLES
MARKSMANSHIP PRINCIPLES. Previous Page. Home Page. Help. Next Page. “ You have been trained to take your place as a Rifleman in a Commando. You can yomp 70 miles with a 70lb pack, but unless you can shoot accurately and effectively at the end, you do not

MARKSMANSHIP PRINCIPLES
E N D
Presentation Transcript
MARKSMANSHIP PRINCIPLES Previous Page Home Page Help NextPage
“ You have been trained to take your place as a Rifleman in a Commando. You can yomp 70 miles with a 70lb pack, but unless you can shoot accurately and effectively at the end, you do not deserve to call yourself a Marine. ” Lt Gen J M C Garrod OBE 9th October 1987
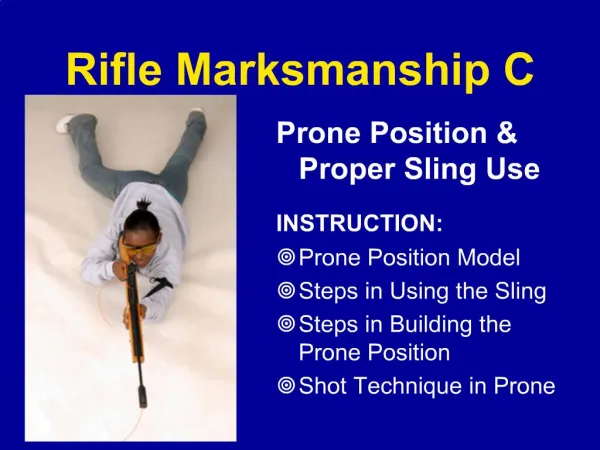
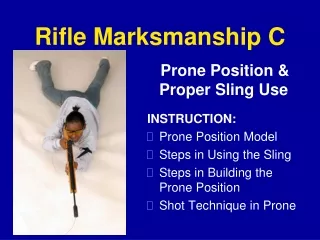
1 – The position and hold must be firm enough to support the weapon.
ELEMENTS OF A GOOD SHOOTING POSITION 1 – Bone Support 2 – Muscle Relaxation
BONE SUPPORT When adopting a fire position, try to avoid resting ‘bone on bone’ (eg – resting your elbows on your knees) as this causes an unstable position and will cause your position to wobble slightly, ultimately affecting where your rounds will go. MUSCLE RELAXATION When adopting a fire position, try not to ‘overstrain’ your muscles. If you are gripping the weapon too tightly or are adopting a particularly uncomfortable position, the muscles will become strained and can lead to minor shaking/movement to the position, again affecting where your rounds will go.
FACTORS COMMON TO A GOOD FIRING POSITION Head Butt Placement Right Hand Left Hand Left Elbow Right Elbow Legs
LEFT HAND & ARM The left elbow is positioned as close as possible to a point directly below the weapon. This ensures that the weight of the weapon is supported by the bone of the outside rear of the elbow joint, instead of by muscular effort. The hand guard should be across the palm of the hand and held with the fingers together. The grip should be no more than a stable platform for the weapon. No attempt should be made to grip the hand guard tightly or pull it backwards with the left hand. The position should be one of support. RIGHT HAND & ARM This is the controlling hand and is a most important factor in good shooting. The hand must be located high on the pistol grip, with the web of the skin between thumb and forefinger positioned at the back of the pistol grip. The grip must be firm, pulling back into the shoulder but taking care not to twist the weapon away from the upright. The forefinger should be naturally on the trigger. The position of the right elbow is determined after taking the correct grip with the hand. The right elbow also serves to maintain a consistent position for the right shoulder.
BUTT PLACEMENT The butt should be positioned against the muscle between the should joint and the lower edge of the collar bone. It should not come into contact with the bone itself. When Combat Body Armour (CBA) is worn, care must be taken to ensure that the butt is positioned correctly, it is especially important to check that it is not lower than is usual. HEAD The cheek must not bepressed against the cheek piece. It should rest lightly at a position in which it can be maintained for successive shots. The head should be upright: (1) To ensure that the instinctive sense of balance is maintained. (2) To position the centre of the eye straight behind the sight.
2 – THE WEAPON MUST POINT NATURALLY AT THE TARGET WITHOUT ANY UNDUE PHYSICAL EFFORT
SIGHT ALIGNMENT Aiming requires the alignment of a number of different points. IRON SIGHT - The eye The centre of the backsight aperture The centre point of the tip of the foresight SUSAT - The eye The centre of the aperture and foresight tip viewed as one A perfectly formed circle framing the clearly focused pointer SIGHT PICTURE Correct focus is essential to correct sight alignment. It is important for the soldier to realize that two objects at different distances from the eye cannot be focused at the same time. The objects that can be focused are: IRON SIGHT - The target or the tip of the foresight SUSAT - The target and the tip of the pointer simultaneously.
SIGHT ALIGNMENT This is a4 point relationship between the EYE looking squarely through the REAR-SIGHT APERTURE across the tip of the clearly focused FORESIGHT and onto the POA.
SIGHT PICTURE When focusing on the tip of the foresight, target becomes blurred
4 – THE SHOT MUST BE RELEASED AND FOLLOWED THROUGH WITHOUT UNDUE DISTURBANCE OF THE POSITION
SHOT RELEASE AND FOLLOW THROUGH There are three aspects to coordinate in order to master this principle: breath control, trigger operation and the follow through. BREATH CONTROL – Breathing is a natural body function which happens without conscious thought on the part of the individual. The natural process of breathing causes body movement which must be CONTROLLED. There are three aspects of the breathing cycle that are important to the soldier: (1) During the normal cycle the lungs are neither completely filled nor emptied (2) After breathing out there is a natural pause (3) The whole cycle takes approx five seconds It is clear that there must be a pause in the breathing cycle so that the shot can be released without movement. As a natural pause occurs after breathing out, it is logical to extend that pause to six or seven seconds to enable the shot to be released. The pause must not extend longer than seven seconds since any natural impulse to resume breathing will affect the soldiers ability to concentrate.
TRIGGER OPERATION During the period of breath restraint the aim must be perfected and the trigger operated smoothly to allow the shot to be fired without any alteration to the aim or to the grip with the right hand. There are two recognised methods of trigger operation DELIBERATE TRIGGER OPERATION – The finger is placed on the trigger, whilst taking a few slow deep breaths, the trigger slack should be taken up, the aim perfected and a steadily increasing pressure applied to the trigger. The pressure on the trigger should continue to be increased as long as the aim picture remains correct. If the aim picture deteriorates, the trigger pressure already taken should be held. Once the sight picture improves pressure should be increased until the shot is fired. Pressure must be applied directly to the rear as this will not disturb the natural alignment of the weapon to the target. Once the shot has been fired it is important that the trigger is not released but held to the rear for a second or two. The trigger is then released and breathing allowed to continue normally CONTINUOUS TRIGGER OPERATION – There will be occasions when little time will be available to deliver accurate, deliberate fire. On such occasions the shots must be fired quickly and as accurately as they can under such conditions. The finger is to be placed on the trigger, when the target appears the firer should exhale quickly to the point of the natural pause and take up the trigger slack. The natural breathing pause is extended to perfect the aim picture as best as possible, whilst pressure on the trigger is increased the shot is fired. It is important that the trigger is not snatched. The pressure on the trigger is to be held momentarily as part of the follow through.. FOLLOW THROUGH – It is important that once the shot has been fired that nothing influences the action of the rifle before the bullet has left the barrel. Holding the pressure on the trigger and remaining in the aim for about a second after operating the trigger, the ’follow through’ will eliminate any movement caused by the soldier
REFERENCE Infantry Training Vol II Pam No. 5 The SA80 A2 (5.56mm) System (Rifle, Light Support Weapon and Carbine) and Associated Equipment - 2004
QUIZ • How many marksmanship principles are there ? a - 4 b - 3 c - 2
How many marksmanship principles are there ? a - 4 b - 3 c - 2
How should the weapon be held? a - Loose, to absorb recoil b - Very tight, so the weapon will not move c - Firm enough to support the weapon
How should the weapon be held? a - Loose, to absorb recoil b - Very tight, so the weapon will not move c - Firm enough to support the weapon
What is the 4 part relationship on the sight picture? a - Eye, target, foresight, rear sight b - Rear sight, foresight, target, eye c - Eye, rear sight, foresight, target
What is the 4 part relationship on the sight picture? a - Eye, target, foresight, rear sight b - Rear sight, foresight, target, eye c - Eye, rear sight, foresight, target
What are the different types of trigger control? a - Quick and slow b - Deliberate and Continuous c - Hard and soft
What are the different types of trigger control? a - Quick and slow b - Deliberate and Continuous c - Hard and soft
FACTORS COMMON TO A GOOD FIRING POSITION Head Butt Placement Right Hand Left Hand Left Elbow Right Elbow Legs
Created by Sgt Pearce JG Platoon Weapons Instructor