White Balance
White Balance. Reading: Hands On Digital Photography- pp. 36-39; 70-75. Spot Metering Example: Subject is mostly bright/white.

White Balance
E N D
Presentation Transcript
White Balance Reading: Hands On Digital Photography- pp. 36-39; 70-75
Spot Metering Example:Subject is mostly bright/white • A spot reading from the white petal provided the photographer with the normal exposure (18% gray image tone with film cameras/GrayScale Density of 128 in Digital). • The photographer then increased the exposure by 2 stops to assign a 72% white tone (grayscale density of 228 approx.) to the petal and let the rest of the tones to fall where they may.
Types of Light • Sunlight • Moonlight • Good Light • Bad Light • Soft Light • Harsh Light • Storm Light • Flash Light • Incandescent • U.V. Light • Black Light • Fluorescent • Indirect/Bounce • Highlights
Film Speed Film speed uses stops, just like shutter and apertureFor example, going from ISO50 to ISO200 buys you 2 stops more light. Slower films are less sensitive and generally require longer exposures / more light. Faster films react rapidly, and can be used in low light situations. Film Speed vs. Contrast and GrainThe trade-off between slow and fast films is quality. Slow films generally produce sharper, more detailed images, while faster films often have higher contrast and grain.
Somewhat insensitive film, with a equally lower speed index requires more exposure to light to produce the same image density as a more sensitive film, and is thus termed a slow film. Highly sensitive films are termed fast films. The ISO system is also used to measure the sensitivity of digital imaging systems. In both digital and film photography, the exposure of higher sensitivities generally leads to reduced image quality (via coarser film grain or higher image noise of other types). In short, the higher the film speed, the grainier the image will be. Remember aperture, shutter speed, and film speed (ISO) all combine to affect the image – be careful not to forget what you’ve set them to! Low ISO Low ISO, Long Exposure High ISO, Long Exposure
The longer a picture is being taken, the more chance there is that movement/unsteady camera will cause it to blur – so a fast shutter speed is desirable for sharp photos (remember you will have to compensate the aperture to keep it in good exposure) No flash Flash Using flash creates enough light to allow a fast shutter speed – very good for capturing movement, but short range and can lose background ISO affects the camera’s sensitivity to light: Low ISO = less sensitive to light, slower shutter speed (likely to blur in low light, but little grain) High ISO = more sensitive to light, faster shutter speed (less likely to blur, but more grain) High ISO Low ISO
The Visible Spectrum For the purposes of the class we are primarily concerned with the visible spectrum. That is the part of the electromagnetic spectrum with wavelengths of light from 400 nanometers to 700 nanometers. These are the colors you see in the Rainbow. In the world of films there are specialty films that are sensitive to other parts of the spectrum. X-ray and Infrared are common ones.
Films are rated for their relative sensitivity to light. This designation is known as the ISO Number or Film Speed. The International Standards Organization is responsible for this standardized rating. Films that have low numbers are “slower” films but have finer grain Films that have higher numbers are “faster” films but have more grain Digital photography has the same system for the purposes of determining exposure. There is also an equivalent visual experience to “grain” in digital photography
Exposure for all cameras is determined by a meter calibrated for an 18% gray card This arrangement tends to works well under most conditions where the scene has a variety of tones or colors represented. This arrangement encounters difficulties when the light and tonal ranges are extreme It is important to understand this concept and how it works so that you may intelligently compensate when you run into those adverse lighting conditions
It is critical to understand how your camera works! All Digital imaging is based on what came before it and it is important to understand the controls that you have available for creative purposes If you have a “point and shoot” digital camera you need to familiarize yourself with the following modes: Shutter Priority, Aperture Priority, Manual and Programmed Exposure.
Exposure Compensation Any of the above metering modes can use a feature called exposure compensation (EC). The metering calculation still works as normal, except the final settings are then compensated by the EC value. This allows for manual corrections if you observe a metering mode to be consistently under or over-exposing. Most cameras allow up to 2 stops of exposure compensation; each stop of exposure compensation provides either a doubling or halving of light compared to what the metering mode would have done otherwise. A setting of zero means no compensation will be applied (default). • Exposure compensation is ideal for correcting in-camera metering errors caused by the subject's reflectivity. No matter what metering mode is used, an in-camera light meter will always mistakenly under-expose a subject such as a white dove in a snowstorm (see incident vs. reflected light). Photographs in the snow will always require around +1 exposure compensation, whereas a low-key image may require negative compensation. • When shooting in RAW mode under tricky lighting, sometimes it is useful to set a slight negative exposure compensation (0.3-0.5). This decreases the chance of clipped highlights, yet still allows one to increase the exposure afterwards. Alternatively, a positive exposure compensation can be used to improve the signal to noise ratio in situations where the highlights are far from clipping.
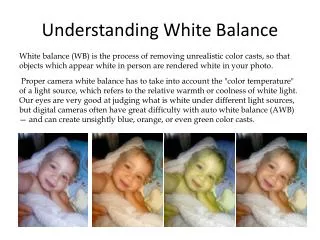
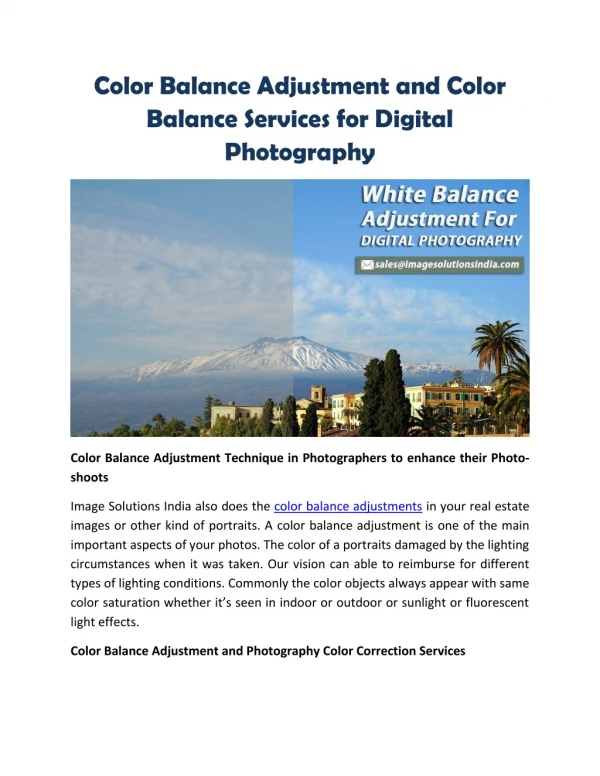
White Balance • White Balance • Understanding White Balance in Digital Photography • White balance (WB) is considered as one of the most important settings of a digital camera. Let’s consider a scenario where you want to capture the beauty of sea waves hitting the shore with an overcast sky at the background. Sounds interesting? Well, if you don’t use the correct white balance setting of your digital camera, you may get a picture with colors different from the actual ones. Therefore, in order to produce a beautifully exposed image with true to life colors, you must learn to effectively use the white balance setting of your digital camera. • 1 • Color Temperature • To understand the concept of White Balance, you need to first understand the concept of color temperature. Color temperature is a characteristic of visible light. It provides a method of describing these characteristics and is measured in Kelvin (K). A light having higher color temperature will have more blue light or larger Kelvin value as compared to lower light, which has a smaller Kelvin value. The following table shows the color temperature of various sources of light.
White Balance How does the Light Affect the Color? You must have noticed some photos turn out with an orange/yellow cast if shot under tungsten lighting or a bluish cast if shot under fluorescent lights. This occurs because each source of light possesses a different color temperature. A digital camera can measure the colors in the red, green, and blue light of the spectrum, as reflected to its sensors. In a photo taken under the midday sun there is the whole spectrum of light (which makes up “white” sunlight). Under these conditions, the colors in an image appear nearest to the “true” colors. An image taken under tungsten bulb (a normal household incandescent bulb) without adjusting the digital camera for white balance produces the dull orange shade as it spreads the biased light. Similarly, an image taken under the fluorescent lighting produces a brighter bluish cast. However, it is possible to shift the color in the desirable direction, provided you have a good understanding of your digital camera and its settings.
Why Adjust White Balance • Since different sources of light have different color hues, a picture taken with a normal white balance under artificial lighting conditions transmits the low heat to the camera’s sensor. This light touches the red bits of the spectrum, which results into dull yellow or orange shades in the picture. Though the human eyes can automatically adjust to different lights and color temperatures to sense right color, a camera needs to be adjusted to different lights for accurate color reproduction. By adjusting the white balance setting of your digital camera, you can alter the required light or temperature to produce the most accurate colors in a digital image.
White Balance • Auto – The Auto setting helps in adjusting the white balance automatically according to the different lighting conditions, but you can try other modes to get better results. • Tungsten – This mode is used for light under a little bulb like tungsten, and it is often used while shooting indoors. The tungsten setting of the digital camera cools down the color temperature in photos. • Fluorescent – This mode is used for getting brighter and warmer shots while compensating for cool shade of fluorescent light. • Daylight – This mode is for the normal day light setting, while shooting outdoors. Many cameras do not have the Daylight mode. • Cloudy – This mode is ideal for while shooting on a cloudy day. This is because it warms up the subject and surroundings and allows you to capture better shots. • Flash – The flash mode is required when there is inadequate lighting available. This mode helps pick the right White Balance under low light conditions. • Shade – A shaded location generally produces cooler or bluer pictures, hence you need to warm up the surroundings while shooting shaded objects.
Manual White Balance • You can also adjust your digital camera manually by setting a white object as the reference point. This is done to guide the camera how white the object would look in a particular shot. It is advisable to manually adjust the white balance when taking a picture to compensate for the changing lighting conditions. As the daylight changes during early morning and late evening hours, the varied light intensity is easily perceived by the camera. Therefore, you need to correct the white balance regularly while shooting during these times of the day. To manually set the white balance in your image, you first point your camera at a pure white object, set the exposure and focus. Now, activate the white balance on the object by pressing the button. It may take few seconds for the camera to perceive the shot, but it will this color setting until the next white balance is performed.
White Balance • Conclusion • Some people consider it amateurish to use pre determined settings, when in fact there may be times when we are in a rush and cannot adjust everything manually. Also remember that using these modes will teach you about photography and ideal settings for different conditions. If in doubt, you can use Auto mode, then adjust the settings manually. Auto settings are there to be used so try them all, and become familiar with what each one does.