Download
1 / 80
810 likes | 1.05k Vues
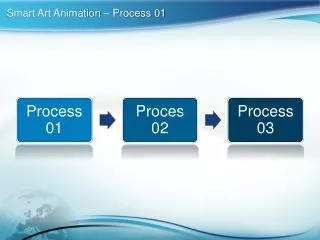
Process of Animation. Process of Animation. Process of Animation. #1 The first step involves a story board . A story board is a board to draw pictures to make an animated story. #2 In the second step, modeling is used to create three dimensional characters and people.

E N D
Process of Animation SMM4800
Process of Animation SMM4800
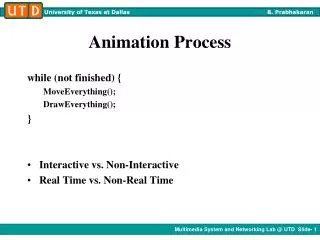
Process of Animation #1 The first step involves a story board. A story board is a board to draw pictures to make an animated story. #2 In the second step, modeling is used to create three dimensional characters and people. #3 Then, animation is used to make the three dimensional characters move. Usually this is done with animation software on the computer. #4 Next, shading is applied to the image so it looks realistic. #5 Computer generated light is applied to the scene to make it more realistic. #6 Finally, rendering puts all the elements together to make the final realistic product. SMM4800
Story • The first thing you'll probably want to do is to sit down and make a few notes on the story you're trying to tell. • Professional animators always have a story- even if it's a simple one- and knowing what's supposed to happen and who it happens to is very important in making a good movie. • Who are the characters? Where are they located? What happens to them, and what do they do about it? • Having these ideas clearly in mind is crucial to making an interesting movie. • You might or might not need to write anything down at this point; thinking it through is the key (although it helps to have notes at least, to help with the next step.) SMM4800
Scenes and Storyboards • Once you have a story, it helps to break it down into scenes. • Very few movies (at least of those longer than a minute or so) are filmed as one long scene, and although using multiple scenes presents certain complications, it also allows you to work with smaller files with shorter timelines, and render individual clips more quickly. • For each scene, it can help to sketch out a storyboard- a sequence of simple drawings that show what the scene is supposed to look like. SMM4800
Scenes and Storyboards • Don't try to put too much detail, or make everything look realistic- just sketch in the things that you'll show in that scene, in a few quick pictures. • If you can't draw people use stick figures, but get something on paper- this helps you to visualize where people and things need to be on the 'set' and how the camera will see them. • You can write down any dialogue or audio effects that'll be in the scene on the storyboard as well, and this will help with the next step SMM4800
Scenes and Storyboards • A storyboard is made, all the animators and directors come together to discuss the entire film. • The storyboards are presented as the story • Storyboards are the blueprint for creating animation • Each shot or scene in the animation is illustrated and described in a series of drawings that resemble a comic book • It’s easier to make changes at this stage than at any other point in the process • So the key to creating storyboards is to just have fun and brainstorming SMM4800
Scenes and Storyboards • Once the story is laid out, the dialogue is recorded. This is done before animation, so the animators know what the characters will say. • After the dialogue is recorded, the animators can make rough sketches of just the characters. Usually these drawings are quite messy, there is still no color, or background. Some animated films have used over 50,000 individual drawings. • Once the storyboards are approved, scan each of the drawings, load them into an editing program and synchronize them with the audio track SMM4800
Scenes and Storyboards • At most animation studios, the best animators only sketched a few animation drawings, leaving gaps in between. Later on, a person called an "inbetweener" would finish the scenes, by drawing in between the areas that the animator had left. • By putting some basic motion to the images, moving the camera, and editing the sequence to match the audio we can create an ‘animatic”, which gives a real good idea of the pacing of the sequence, and one final chance to make changes to the storyboard before going into production SMM4800
Scenes and Storyboards • Storyboards are essential to keeping costs low and the production organized SMM4800
Sound • Now that you have the dialogue noted down for each scene, you should record it and save out the sound files you'll need. • At the same time, you can record any sound effects you'll want, and even add music if you like. • Then mix it all down into a soundtrack for your scene. • The idea is to have a unified audio file that has as much sound as you'll need to animate over- do the sound before you animate. SMM4800
Sound • Regardless of which software you use, it's always easier to animate over the sound, rather than trying to synchronize the sound with the animation later on. • Also, having a soundtrack with noises, dialogue, sound effects etc. will be a huge help with the timing of the animation; you can get a good idea of which movements need to happen at what points by what the audio is doing. • At this point, depending on how you'll be doing your dialog (if there is any) you'll want to also save separate copies of each character's audio files- just the things they're saying in the scene- to facilitate lip-synching later on. SMM4800
Modeling • Computer models are virtual objects which are custom-built based on a storyboard concept • Character models are usually created from simple drawings or character sheets as they are called • Sometimes a traditional clay model is created and brought into the computer using a digitizing arm which records specific surface points which are then transformed into a 3D model • In either case, the finished model is nothing more than a wireframe representation that defines the surface of the model SMM4800
Modeling • The next step in modelling is to apply texture, which is what brings the wireframe representation to life • Textures can be images mapped onto the surface like decals on a model car, or procedural based, which can mimic the organic look of natural objects. SMM4800
Modeling • Each model can have hundreds of surface textures that describe colour, luminosity, diffusion, specularity, glossiness, reflection, transparency, refraction, bumpiness and many other attributes. • It is essential to have a storyboard before you ca modelling. • You really have to know how each character or object will be lit before the process of creating surface textures can be completed SMM4800
Modeling • As you might imagine, modelling and texturing is extremely time consuming • But, there is really no way to short-cut the process • If you want the final animation to have that high-end look, you have to spend time on modelling and textures SMM4800
Preparations to Animate • Here you make sure you've got everything you need- with the audio ready to go, you can generate lip-synch files, build or buy any props you'll need, prepare background video clips or special image files, etc. SMM4800
Preparations to Animate • Users of any program will want to make sure that any image or video files they'll use as backdrops or image maps are ready to go, and that any other assets- 3D props, prepared figures, scripted actions or saved poses, etc.- are available and working properly. • To bring animated characters to life, you need to create a series of controls that will allow you to add just the right amount of movement SMM4800
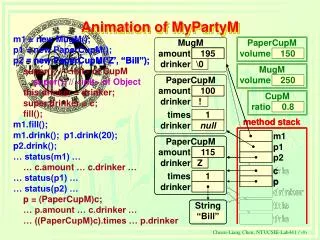
Rigging • Animation controls are called “rigs” • You pull the control and the arm moves, or the leg moves, or the character smiles • Character rigs can involve hundreds of controls • For instance, each finger can have 3 control points which means you will have 15 control points for each hand • Each one of those control points keeps track of 6DOF of motion – 3 degrees of rotation (pitch, bank and yaw) and 3 degrees of movement in the X, Y and Z plane SMM4800
Rigging • In addition to rigging that controls character motion,there is another layer of control applied to the face. • These controls allow the animator to move the eyes, eyebrows, eyelids, general facial features, and mouth of the character • The rigging process is very time consuming, however, once a character is successfully “rigged”, the process of bringing that character to life with all the subtleties necessary to create the illusion, is pretty straightforward. • A proper rig simply makes the process of animating fun! SMM4800
Rigging • Now, with everything in place, you can finally start animating. • Animation is defined as the illusion of life imparting that illusion to a character takes a skilled eye, a clear vision of the illusion as a whole, and the ability to wade through a technical process that involves many layers • By now the scene will be very familiar- you've worked out your story, drawn the storyboards and gone over the dialogue, you know the timing, you have all the pieces assembled and it's now time to put it all together and build the scene that you'll be rendering. SMM4800
Rigging • One nice side effect of the process you've been following is that it tends to reveal story and dialogue elements that don't work before you spend a lot of time animating and rendering them. • Properly done, animated features typically don't have much that winds up on the cutting room floor- the stuff that doesn't work gets left out long before any rendering takes place. • As you animate, be sure to save frequently- and save copies too, if you think you might want to go back and redo anything later. • Back up your work regularly- nothing spoils your day like having a hard-drive crash eat your last week's worth of work. SMM4800
Rendering • Speaking of rendering, it's usually a really good idea to make sure the timing of your scene works properly, by doing preview renders periodically to check your work. • You can save these or throw them out after viewing, but a fast preview-mode render is an excellent reality check for your work in progress. • Rendering a sample still-frame image every now and then at full size and full quality can be a good way to check the effects, lighting and overall 'look' of the scene as well. SMM4800
Rendering • Once you're happy with the scene and you think it's as good as it's going to get (did you check the lighting? Are all the textures and shades working properly? Is the timing right- are things moving naturally?) it's time to do the final render • Once all of the shots are animated, each sequence is prepared for final rendering and compositing. • This is where everything comes together to produce the animated sequence the audience will see. SMM4800
Rendering • Turn on any features you deactivated for previews, choose the quality level and frame size you want, run any simulations you need to have, save your file one last time (and save a copy too, just in case) and then start the render. • Make sure your computer won't be needed for a while- a full-size, full-quality render of a movie can take some time. • It might also be a good idea to turn off any scheduled events- automatic shutdown, etc.- that you normally use, to avoid disrupting the render process. SMM4800
Rendering • Once it's rendering, it's best to leave the computer strictly alone- there'll be a temptation to do other things on it while the render progresses, but doing this slows the render process and tends to be very frustrating since most of the computer's horsepower is used in rendering, leaving you with a very sluggish machine at best. • Render at the largest resolution you'll be using, so you won't need to scale the video up in the editing process; also, save the rendered file at the highest possible quality settings (save it uncompressed or as an image sequence if you have enough hard drive space.) SMM4800
Rendering • To begin, each shot is broken down into components that can be layered and composited • Layering the renders gives us the ability to have complete control over the look of each element and how they will interact in the sequence • The amount of time it takes to render each frame is a function of 2 things – the number of computer processors we throw at it and the complexity of the scene being rendered • It can take anywhere from a few seconds to several minutes to render each frame SMM4800
Rendering • Once we those elements, we bring them into a compositing program where we finesse each layer of each shot to get just the right look • When we satisfied, we crank out the final digital composite • In the end, it’s the smiles you get from audiences that makes the hundreds of hours that went into storyboards, modelling, texturing, rigging, animating, rendering, and compositing all worthwhile SMM4800
Editing • Once the scene has been saved as a movie file, back up the scene file and the rendered movie to a secure location (an external hard drive or server, a CD, tape-drive, etc.)- then you can go back and do it all over with the next scene. • When you have all your clips rendered, you can use a video editing program and edit them together. SMM4800
Editing • This is also a good time to add any additional sounds you might want to use- music, other effects- or to replace the audio in the rendered files with higher-quality sound from the original audio files you made earlier. • Remember to save early and often, and back up your work regularly • Once your movie has been edited together at full size, you can export it out in the formats you'll want to distribute. • For DVD or video, 640 or 720x480 is a good resolution; for movies played back on the Web you'll be better off at 450x337 or smaller (320x240 works well also.) SMM4800
Case Study • The production of an animated short takes quite a bit of preparation and planning (especially when operating within the confines of a seven-week project cycle). Below is an overview of the process by to create "I Wuz Here" SMM4800
Case Study Script - Artistic achievements and technical marvels while important to a film, must still rely on the foundation of good story. • The original script for thisdigitally animated film was written by the ETC's own Matt Udvari. • With the initial concept in-hand, the group next proceeded to refine and polish the pre-existing story. • During this time, feedback and suggestions were elicited from a variety of sources including the faculty, staff, and students of the Entertainment Technology Center as well as outside sources such as Ron Tippe (the producer of Shrek). • The resulting story elements were generated by the team and were an invaluable tool entering the project. SMM4800
Case Study Concepts - During this phase members of the group sketched concepts for the various characters and environments that might possibly exist in our world. Special attention was paid to the young boy, Carver, who was to become our main character. A gallery of concept art may be found by clicking on the image below SMM4800
Case Study SMM4800
Case Study Storyboards - With the story further locked down, the group was able to make hand-drawn storyboard that would later be useful in the setting up camera shots and animations. These images look very similar to a comic strip. SMM4800
Case Study Design -After review of the early concepts, decisions on the look of the character were made. These choices were later enhanced through use of schematic and detailed drawings. In addition, color sheets were produced to identify color choices of the wardrobe and skin tones SMM4800
Case Study Animatic - Once the storyboards were finalized, the group created an animatic. An animatic is a development tool in which the story is roughly filmed so that style, pace, and look can be analyzed. During the filming of the animatic, the group took steps to quickly show the basic structure of the story utilizing the available tools. SMM4800
Case Study Music - Because the animated short contains no dialogue, the need for a quality soundtrack and effective sound effects are crucial to convey the mood and tell the story in "I Wuz Here". During the initial planning phases of the project, the group realized that a very effective soundtrack would most likely begin the story with a low urban bass beat that would transform during the course of the score and eventually wind up as a more fantastical, melodic creation. SMM4800
Case Study Modeling - This is the first use of any computer animation tools. Modeling is simply the process of building three dimensional objects from two dimensional drawings inside the computer. For this process the group used Maya and 3D Studio Max 4.2. SMM4800
Case Study SMM4800
Case Study Layout - In parallel with the modeling of the characters, the environment was also being designed. Critical tasks in creating the environment included creating an atmosphere, scaling the world to the characters, and positioning objects of importance that would be necessary to the unfolding of the story. SMM4800
Case Study Articulation - With the characters fully modeled and textured they now needed to be given the ability to move. Motion capture, Inverse Kinematics (IK), and keyframing were all employed to move the character's. For motion capture the group enlisted the aid of Morgan, the 4-year old boy SMM4800
Case Study Texturing - Once the modeling phase was completed, the group assigned textures to the model's surfaces. For the application of textures Maya, Deep Paint 3D, and 3D Studio Max were used. In addition to flat textures bump maps were also used to provide layers of depth and detail. SMM4800
Case Study Animation - During this phase the characters were brought to life. Facial expresssions and movements were carefully laid out for each character in every scene. The resulting animations were tweaked many times to create the right feel and look. SMM4800
Case Study Lighting - In order to create the proper mood and detail in the characters, effective lighting within the 3-D environment was required. Proper lighting was crucial to the animation process and occurred directly before the rendering phase. SMM4800
Case Study Rendering - The process of the computer calculating all of the attributes assigned by the animator to a particular frame is known as rendering. The rendering time for the animated short was roughly as long as the processes before. Final render scenes were transferred from Maya to Renderman; shadows added and rendering could begin. SMM4800
Case Study After rendering, the scenes will be assembled in Adobe Premiere and imported into AfterEffects for post-production. movie SMM4800
Summary • Step 1: Story-boardsThe story-boards are sketches of the action in a film and serve as a reference for the creation and animation of each 3D object in the shot sequence. Each story-board frame is scanned into the computer and a 'scratch' (draft) soundtrack is synced up to make a digital movie. All of the timing can then be checked and exact frame counts for each scene can be identified. (An average feature film will have several thousand story-boards.) SMM4800