Download
1 / 19
190 likes | 591 Vues
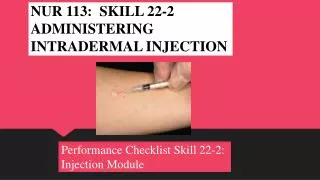
NUR 113: SKILL 22-2 ADMINISTERING INTRADERMAL INJECTION. Performance Checklist Skill 22-2: Injection Module. INTRADERMAL INJECTIONS. What is an Intradermal Injection? A nurse typically gives an Intradermal (ID) injection for skin testing (e.g., tuberculosis screening and allergy tests).

E N D
NUR 113: SKILL 22-2 ADMINISTERING INTRADERMAL INJECTION Performance Checklist Skill 22-2: Injection Module
INTRADERMAL INJECTIONS • What is an Intradermal Injection? • A nurse typically gives an Intradermal (ID) injection for skin testing (e.g., tuberculosis screening and allergy tests). • Because such medications are potent, the nurse injects them into the dermis, where blood supply is reduced and drug absorption occurs slowly. • A patient may have an anaphylactic reaction if the medications enter the circulation too rapidly. • Skin testing often requires the nurse to visually inspect the test sites; therefore they must make sure that the ID sites are free of lesions and injuries and relatively hairless. • The inner forearm and upper back are ideal locations.
INTRADERMAL INJECTIONS – CONT’D • To administer an ID injection, use a tuberculin (TB) or small syringe with a short (1/8 to 3/8 inch) fine gauge (25 to 27) needle. • The angle of insertion for an ID injection is 5 to 15 degrees. • Inject only small amount of the medication (0.01 mL to 0.1mL) intradermally. Only administer amounts up to 0.1 mL to children. • If a bleb does not appear or if the site bleeds after the needle withdrawal, the medication may have entered the subcutaneous tissue. In this situation skin tests results will not be valid.
ASSESSMENT – Intradermal Injections • Check accuracy & completeness of MAR or computer printout with prescriber’s original medication order. Check patient’s name, medication name & dosage, route of administration, and time of administration. Recopy or reprint any portion of the MAR that is difficult to read. • Review medication reference information about expected reaction when testing skin with specific allergen or medication and appropriate time to read the site. • Assess patient’s history of allergies; know type of allergens and normal allergic reaction. • Assess for contraindications to ID injections, such as reduced local tissue perfusion. Assess for history of severe adverse reactions or necrosis that happened after previous ID injection. • Assess patient’s knowledge of purpose and response to skin testing. • Check date of expiration for medication.
PLANNING – Intradermal Injections • 1. Expected outcomes following completion of procedure: • Patient experiences very mild burning sensation during injection, but no discomfort after the injection. • Small, light-colored bleb, approximately 6 mm (1/4 inch) in diameter form at site and gradually disappears. Minimal bruising may be present. • Patient is able to identify signs of skin reaction and their significance. • This demonstrates learning.
IMPLEMENTATION – Intradermal Injections • 1. Prepared medications for one patient at a time, using aseptic technique and avoiding distractions. Check label or medication carefully with MAR or computer printout 2 times when preparing medication. • 2. Take medication to patient at the correct time. Medications that require exact timing include STAT, first time or loading doses, and one time doses. • 3. Provide privacy for the patient. • 4. Identified patient using two identifiers (i.e., name & birthday or name and account number) according to agency policy. Compare identifiers in MAR / Medical record with information on patient’s identification bracelet and / or ask patient to state name.
IMPLEMENTATION – CONT’D • 5. At patient’s bedside again compare MAR or computer printout with names of medications on medication labels and patient name. Ask patient if they have any allergies. • 6. Discuss purpose of each medication, action, and possible adverse effects. Allow patient to ask any questions. Tell them that the injection will cause a slight burning or sting. • 7. Perform hand hygiene and apply clean gloves. Keep sheet or gown draped over body parts not requiring exposure. • 8. Select appropriate site. Note lesions or discolorations of skin. If possible, select site three to four finger widths below antecubital space and one hand width above the wrist.
IMPLEMENTATION – CONT’D • 9. Help patient to comfortable position. Have them extend elbow and support it and forearm on flat surface. • 10. Clean site with antiseptic swab. Apply swab at center of site and rotate outward in circular direction for about 5 cm (2 inches). Option: Use vapocoolant spray (e.g., ethyl chloride) before injection. • 11. Hold swab or gauze between third and fourth fingers of non-dominant hand. • 12. Remove needle cap from needle by pulling it straight off. • 13. Hold syringe between thumb and forefinger of dominant hand with level of needle pointing up.
IMPLEMENTATION – CONT’D • 14. Administer injection: • A. With non-dominant hand stretch skin over site with forefinger or thumb. • B. With needle almost against patient’s skin, insert it slowly at 5 to 15 degree angle until resistance is felt. • Advance needle through epidermis to approximately 3 mm (1/8 inch) below skin surface. You will see bulge of needle tip through skin. • This ensure that the needle tip is in the dermis. You will obtain inaccurate results if you do not inject needle at the correct angle and depth.
IMPLEMENTATION – CONT’D • C. Inject medication slowly. Normally you feel resistance. If not, the needle is in too deep; remove and begin again. • Clinical Decision Point: It is not necessary to aspirate because dermis is relatively avascular. • D. While injecting medication, note that a small bleb (approximately 6 mm {1/4 inch} resembling mosquito bite appears on the skin surface. • E. After withdrawing needle, apply alcohol swab or gauze gently over the site. • 15. Help patient to a comfortable position.
IMPLEMENTATION – CONT’D • 16. Discard uncapped needle or needle enclosed in a safety shield and attached syringe in puncture and leak proof receptacle. • 17. Remove gloves and perform hand hygiene. • 18. Stay with the patient for several minutes and observe for any type of allergic type of reactions. • Dyspnea, wheezing and circulatory collapse are signs of severe anaphylactic reaction.
VIDEO TO WATCH FOR THIS SKILL: • Video associated with this skill, from your book: • http://bookstie.Elsevier.com/Perry-Potter/ClinicalSkills/video27.php • Elsevier: Perry-Potter: Clinical Nursing Skills and Techniques 8e – 22.2 Administering Intradermal
EVALUATION • 1. Return to room in 15 to 30 minutes and ask if patient feels any acute pain, burning, numbness, or tingling at injection site. • 2. Ask the patient to discuss any implications of skin testing and signs of hypersensitivity. • 3. Inspect bleb:Optional: Use skin pencil and draw circle around perimeter of injection site. • Read TB test site at 48 to 72 hours; look for induration (hard, dense raised area) of skin around the injection site of: • 15 mm or more in patients with no known risk factors for tuberculosis • 10 mm or more in patients who are recent immigrants; injection drug users; residents and employees of high-risk settings; patients with certain chronic illnesses; children less than 4 years of age; and infants, children & adolescents exposed to high risk adults.
EVALUATION – CONT’D • 5 mm or more in patients who are human immunodeficiency virus (HIV) positive, have fibrotic changes on chest X-Ray film consistent with previous tuberculosis infection, have had organ transplants, or are immunosuppressed (CDC, 2011). • UNEXPECTED OUTCOMES: • Patient complains of localized pain or continued burning at injection site, indicating potential injury to nerve or vessels. • Raised, reddened, or hard zone (induration) forms around ID test site • Patient has adverse reaction with signs of urticarial, pruritus, wheezing, and dyspnea • Patient is unable to explain purpose or signs of skin testing.
RECORDING & REPORTING • Record drug, dose, route, site, time and date on MAR immediately after administration, not before. Correctly sign MAR according to agency policy. • Record area of ID injection and appearance of skin in your notes. What does it look like? • Report any undesirable effects from medication to patient’s healthcare provider and document adverse effects according to agency policy. • Record patient teaching, validation of understanding and patient’s response to medication
END OF SKILL • While you won’t be asked the signs & symptoms of TB, here is some information on this disease:
FOR SKILL 22-3: • For SKILL 22-3: Administering a Subcutaneous Injection: • Please see the next power point presentation. • Also, while I have provided you with a great deal of information on how to Administer an Intradermal Injection, if you don’t practice in the skills lab, you won’t be able to pass this skill. • Trust me, I know from experience, that this skill takes practice as well as patience. Good Luck!