
Preparing …
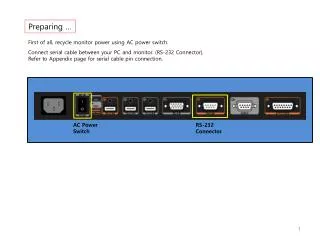
Preparing …. First of all, recycle monitor power using AC power switch. Connect serial cable between your PC and monitor. (RS-232 Connector). Refer to Appendix page for serial cable pin connection. AC Power Switch. RS-232 Connector. Starting….

Preparing …
E N D
Presentation Transcript
Preparing … First of all, recycle monitor power using AC power switch. Connect serial cable between your PC and monitor. (RS-232 Connector). Refer to Appendix page for serial cable pin connection. AC Power Switch RS-232 Connector
Starting… 1) Select your system serial COM port and monitor model. 2) Press “Connect” button 3) Current source, unit ID, signal status, firmware version will be reported. In this step, there are two possible errors after press “Connect” button. TM_Control support COM port from COM1 to COM15. Adjust you serial port configuration or check whether another program using this port. Check serial cable or monitor power status. If this message is not disappear and keep continue, it is suspected monitor failure. In this case, ask on-site service. Check serial cable or monitor power status. If this message is not disappear, then this can be monitor failure.
Default setting You need default setting on following condition. 1)) Image color is not natural. 2) No image on screen and signal status is “No Signal” 3) Input source is not HDMI1 4) After firmware update In order to restore default setting of monitor, press “Default Setting” button. It will takes about 5 seconds to finish.
Diagnostic Mode If there is no image even after default setting, then run diagnostic mode. In order to this, press “Diagnostic mode” button. This mode is available after following firmware version. FS-P6501C(65” Eagle) : V1.20 Others (Include Aquarius and SPM) : V1.00 You will encounter following message if monitor don’t support this function. In this case, update monitor firmware as final one we provided. After press button, monitor will show auto color pattern. In this mode, all function are disabled until you connect again to avoid conflict internal operation. If there is no image on screen, ask on-site service. If you can see color pattern, please check HDMI cable connection or codec output.
Start Check power & cable connection Recycle monitor power Connect serial cable Run TM_Control Yes Connection Fail ? No Execute Default setting Check signal status - No signal - No Yes Execute Diagnostic Mode Disconnect HDMI cable and then connect again. Reboot codec and camera No No image on screen Yes Yes No image on screen Ask onsite service
Appendix 1. Serial Cable : 2 options for preference DSUB9 Female (PC) DSUB9 Male (Monitor) Option 1 ( Direct Cable ) Option 2 (USB to Serial Cable)