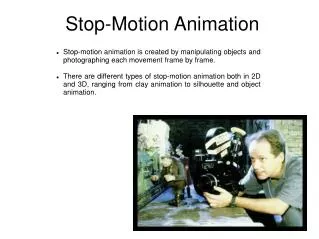
Stop Motion Creation
Stop Motion Creation. Objective Know what stop motion is Know the steps of creating a stop motion Realize the points that needs to be alerted in creation Have the experience in figuring out the problem of a simple stop motion. Sample. Student samples:

Stop Motion Creation
E N D
Presentation Transcript
Stop Motion Creation • Objective • Know what stop motion is • Know the steps of creating a stop motion • Realize the points that needs to be alerted in creation • Have the experience in figuring out the problem of a simple stop motion
Sample • Student samples: • http://www.youtube.com/watch?v=GV4Nk-8bVWM • http://www.youtube.com/watch?v=1aR4_rEaU_c&feature=fvwrel • http://www.youtube.com/watch?v=WooIlHl4hNw&feature=related
Advanced sample • game over by PES • http://www.youtube.com/watch?v=Ovvk7T8QUIU • firework • http://www.youtube.com/watch?v=7bmpFCwZbwM&feature=relmfu
What you needs an idea a digital camera Video Editing Software
What you needs • an idea • stick with something simple for your first one • split up into smaller parts works well • e.g. make an inanimate object appear as though it is alive; • a sock inching its way across the floor or • a piece of paper that crumples itself up. • remember you can expect to shoot around 10 photos for every second of film
What you needs • A digital camera • May set your camera to the lowest size image setting • Can save more images on your memory card at a time. • May need to copy the photos to your computer and erase the memory card multiple times before you are finished.
What you needs • Video editing software • Video Studio • Import photo • Edit with effect • Export the video
Steps Shoot Your Animation Download Your Photos Edit Your Photos with video editing softwware Adding Music and Sharing
Step 1 • Shoot Your Animation • make that sock move itself across the floor. • place the sock somewhere and take your first photo. • use a tripod and only moving your object • keep the object in the same general area in each frame • If move the camera along with it • make it appear as though you are traveling with the object
Step 1 Shoot Your Animation After taking the first photograph move the sock slightly in the direction you want it to travel and take another photo Move it again by the same distance, and take one more. Continue this until the sock reaches where you want it to stop.
Step 2 • Download Your Photos • Copy the photos onto your computer. • Varies from camera to camera and computer to computer. • E.g. take out the memory card and insert into computer • Use USB cable
Step 3 • Edit with video editing software • tell the software how long you want each photo to appear before showing the next one • E,g, 3 frames-per-photo • If the video play at 30 frames-per-second, a setting of 3 frames-per-photo means you’ll see 10 photos every second
Step 4 Adding Music and Sharing Add music to your short by dragging MP3s or AIFF files to the timeline E,g, 3 frames-per-photo look for “Export” or “Share” options
Step 4 • Share • Create the video • Format • WMV • Support by most of the software • DV / DVD / VCD • Video to be play by DV / DVD / VCD machine • MPEG I • Used in VCD • MPEG II • Used by DVD
Step 4 • Dimension • Larger • Higher resolution (clearer) but • Larger file size • VCD / DVD has fixed dimension • WMV • Select the one not larger than the dimension of the picture
Tips: Do • Shoot a scene in one session • Shoot more frames than you need • Try and capture things 'in camera' • Not to use computers to make the imagery things
Tips: Do • Shoot with high resolution photo as possible • more options: • Such as 'zoom in' on a part of your scene late • Test your setup before taking a shoot
Tips: Don’t • NEVER move the camera • Tying your camera's tripod down is a good way to avoid the effects of small bumps • NEVER accidentally change the exposure of the camera • NEVER accidentally change the focus of the camera • NEVER accidentally change the lighting
Exercise • Please point out the problems of the two sample animations in the e-class