Download
1 / 26
260 likes | 384 Vues
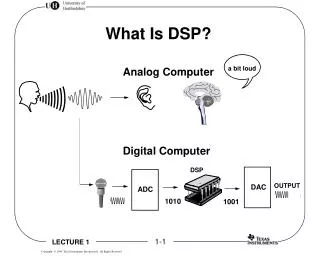
Juneau Public Library Technology Training Workshops Jonas Lamb. Get Digital: Uncrate your Vinyl Archiving and Digitizing Analog Audio Collections. Why Archive?.

E N D
Juneau Public Library Technology Training Workshops Jonas Lamb Get Digital:Uncrate your VinylArchiving and Digitizing Analog Audio Collections
Why Archive? Archiving personal media collections whether audio or visual is a good way to ensure you will be able to access these collections in the future. However it is not a guarantee, so much depends on the stability of formats, but we’ll get into that later. Look what happened with the 8 Track. Can you find a player anymore for these collections?
Why Archive? (cont) Creating digital copies of a record or cassette allows you to store multiple copies in multiple locations ensuring safety from catastrophic loss (fire, flood, mold). LOCKSS Libraries and archives use file migration, transferring content from one media (LPs) to a new media (CDs) in order to prevent loss of content due to format obsolescence.
Overview There is a variety of free and pay software available (Wavosaur, Ubuntu Studio, Cooledit, Garage Band), however today we will use Audacity by Sourceforge (http://audacity.sourceforge.net/) to import and record analog audio from a record/cassette player.
Getting Started with Audacity • At the Sourceforge website, http://audacity.sourceforge.net/ you will find a link to download Audacity 1.2.6 Windows version on the main page. • If you are using a different operating system, follow the link to other downloads, here you will find links for Mac and Linux/Unix versions. (Screenshots on next two slides)
LAME MP3 Encoder One “scary technology” note: Audacity won’t quite work “out of the box” - it needs the LAME MP3 encoder installed as well, which is linked from: http://audacity.sourceforge.net/help/faq?s=install&item=lame-mp3 Save the file to the Audacity program folder so you can find it when asked the first and only time you save a file. You won’t be asked again. That ends the “scary technology” note…
Making it happen!Archiving in Action Before we go any further, here’s a list of everything you’ll need to transfer audio from an LP to your computer to a CD. 3.5 mm (1/8’’) male to male cable Turntable connected to a stereo receiver with a magnetic phono input Or if a newer stereo/receiver is used that only has an Auxilary input, you will need to purchase a phono-preamp (20$) to boost the phono signal. PC or laptop equipped with soundcard and with Audacity or other sound editing software.
Making it happen!Archiving in Action There are USB turntables which eliminate the need for a stereo connection between the turntable and computer ($80-300) Some of these USB turntable even come with software that will automatically create filenames and tracks and sync your vinyl to your iPod.
Here we go! Connect one end of the 3.5mm cable to the headphone jack of your stereo receiver and the other to the line in slot on your computer. If your receiver only has a 6.3mm (1/4”) headphone jack you will need an additional adapter.
Setting Up (cont.) Make sure the input device (stereo, USB turntable) is connected before you open Audacity, otherwise Audacity may not recognize it. Make sure the microphone or other input device you want is selected in Audacity. Go to the Preferences menu (Mac: Audacity->Preferences; Windows: Edit->Preferences) and select the Audio I/O tab (the first one) Select the devices you want for Playback and Recording. For example, if you're using a headset with a microphone to record, be sure its name is there (e.g. Logitech USB Headset). Click OK. When everything is connected, click the red record button, then begin playing your record.
Now we’re Recording • You will want to play around with the levels of your stereo and the input levels (the meter with a microphone icon below it with red level indicators). If the levels are peaking or clipping the right side of the meter, you need to turn down your input source.
Some tutorials on the web Digitizing Vinyl Records with Audacity. http://lwn.net/Articles/304967/ Refining the Process... http://lwn.net/Articles/312663/ Ripping Vinyl Records to FLAC (Digital Audio) http://tinyurl.com/au4u6z A Guide to Using Audacity (U-Illinois iSchool) http://www.lis.uiuc.edu/itd/tutorials/Audacity/ Creating a Simple Voice and Music Podcast http://audacityteam.org/wiki/index.php?title=Creating_a_simple_voice_and_music_Podcast_with_Audacity
A Few Thoughts on Format At some point, either before you get started with your recording, or while you’re waiting for the first side of your LP to record you should take a minute to think about the format for your final digital copy. Audacity allows you to export the final recording in a variety of Lossless and lossy formates, from WAV and FLAC to MP3 and OGG. OGG and MP3 (lossy) each have several different quality (bitrate) options.
A Few Thoughts on Format Your format decision should take into consideration a few basic questions: Are you keeping/preserving your original sources (CDs, LPs, Cassettes)? Are you considering a proprietary format, will the software to play this format be available in the future? Will Windows start charging more than they already do for software? Do you have limited storage space? Will you keep multiple copies/versions of the digital file?
MP3 vs WAV MP3 is a compressed file format which has generally been accepted as a web friendly standard. This format tends to be 1/10th the size of an uncompressed file due to removing portions of the audio spectrum that are supposed to be inaudible to humans. The smaller size allows for faster transmission over the web. Audiophiles insist that MP3 just doesn’t have the quality of WAV or other lossless compressions. OGG is another compressed file type but uses a different compression process and is considered to sound better by many enthusiasts.
MP3 vs WAV cont. WAV is a Microsoft standard for uncompressed or raw audio (16bit 44100hz). This is the same format used on CDs. If you want the best quality and aren’t concerned with storage size, export your LP files in an uncompressed format such as WAV or FLAC (Open-source). If you are concerned with size, use one of the midrange compressions of MP3 (128 or 144 kbps. 196 is considered to be high quality) or OGG (quality scale 4-6). If you plan to burn your recording to CD but not backup on your computer, use WAV or FLAC.
Editing your digital audio When importing an analog recording using Audacity, you need to allow the recording to play at real time, i.e one side of the record will take ~15-26 minutes per side. You will have one large digital file and until you save this temporary file, a large portion of your computer’s RAM (temporary memory) will be committed to holding the file. I sometimes use a USB Thumb drive’s ability to increase a computer’s RAM during this process so the computer doesn’t freeze up.
Editing your digital audio The Help menu in Audacity is a good place to begin as it will explain what the features of the various “effects” and abilities of the software. Today we will do a few basic editing tasks: Filter out vinyl pops Fade in and Fade out beginning and end Remove any visible distortions Insert track titles and divide the side into songs.
Editing (cont.) Filtering out audible vinyl pops. Click edit>select> all Click effect>click removal Listen to before and after version, you can always undo (edit>undo) if you don't like the new version. If some pops weren't removed, you can usually identify these as large spike in the waveform. You can select specifically this section and run the click removal again, set the sensitivity bar higher this time.
Editing (cont.) Filtering/Removing visible distortion. Look at your waveform, or better yet, listen through the selection and identify clips (spikes in your waveform that reach the top of the meter). Select/highlight the area using the select tool. Next you can either choose generate>silence and you should see a box which creates silence the length of the highlighted section. You can always undo (edit>undo) if you don't like the new version. If the distorted section is in the middle of music it's better to highlight the area, click effect>amplify and then try reducing the volume by -3 db. You can preview the change and can always undo. More reduction may be necessary.
Editing (cont.) Fade in, fade out beginning and end of side Use the select tool, to highlight a small section of the audio before the first song begins, listen for the beautiful sound of needle on vinyl. Click effect>fade in. Listen to before and after version, you can always undo (edit>undo) if you don't like the new version. Go to the end of the side, select a short section and click effect>fade out. If you like you can fade in and out each track.
Editing (cont.) Insert track titles/names and export your tracks. Use the select tool, to highlight the first song. There will be a visible quiet spot between the songs. Click project>insert label at selection (Ctr+B). Type either track 1 or the song name. Repeat for all tracks on a side. Next you are ready to export your files. Determine if you want compressed or uncompressed (WAV/FLAC vs MP3 OGG). Click file>export multiple. This will open a new box which I will walk you through selections like file type, file name, etc.
Wrapping Up. As you begin working at home, feel free to email me with any questions and I'll see what I can do to help. jonas@juneau.org Utilize the web resources listed on slide #15 for any details I didn't cover. Have fun. If your eyes begin to cross and you're not enjoying the satisfaction of increased access to your collections and a sense of relief that these are now archived, take a break.