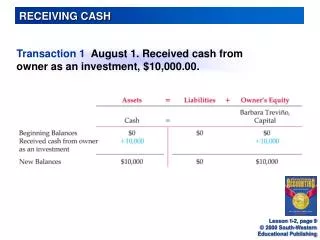
Receiving
Receiving. Step by Step. Summary of Receiving Steps. 1. WebSMARTT: Print a “Receiver” (new required step – a separate tutorial is available) 2. Count the actual quantities & write them on the form 3. Label everything with the Item ID number 4. Label food with the expiration date

Receiving
E N D
Presentation Transcript
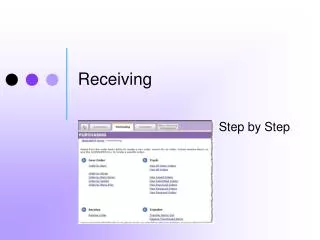
Receiving Step by Step
Summary of Receiving Steps 1. WebSMARTT: Print a “Receiver” (new required step – a separate tutorial is available) 2. Count the actual quantities & write them on the form 3. Label everything with the Item ID number 4. Label food with the expiration date 5. Rotate stock: put away new items behind older ones 6. WebSMARTT: Check / correct the Received Date 7. WebSMARTT: Enter the actual quantities 8. WebSMARTT: Enter any returns 9. WebSMARTT: Click Receive Order 10. File the receiving form until the next inventory
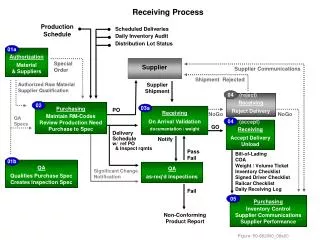
When to do receiving • Follow the entire receiving process each time you receive a delivery: • From Central Commissary • From Warehouse • From Alpenrose • Don’t wait – accuracy will suffer!
1. Print your own “Receiver.” New required step
What’s a “Receiver?” • It’s a Print View of what was shipped to you. • You will hear it called a “Receiver,” a “Receiving Form,” or other similar terms. • It is used for several purposes in the receiving and inventory process, and can be very useful during preparation of production records. • You may have printed your order when you submitted it—but the Receiver is different, in important ways.
Some ways it’s different from your order: • Substitutions may have been made: • Commodity for purchased • Purchased for commodity • Products with a short shelf life instead of similar products that have a longer life. • A new item may have been added by your supervisors or other Central Office staff. • These changes happen after your order deadline.
How it looks different from an order that was printed when you submitted it: The Receiver can only be printed when the order’s Stage or Status is:
Find Released – In Transit orders here: and A separate detailed tutorial is available on printing the “Receiver.”
2. Count what you received and record it. If the products AND quantities match, check them off under the Received Qty column.
The Receiver is an important tool. Find the correct Item ID#s here, to use when labeling products Review and check off quantities or make corrections in the Received Qty column Space to write notes if there are any changes from what is printed.
Quantity is different? If the printed quantity is different from what arrived, write the change, and call Gretta.
Wrong product arrived? If a product arrived that isn’t printed on the receiving form, write it down and call Gretta, x 63568.
3. Before you put the products away, label all items with the ID number. Your information source: The Receiver you just printed.
4. Circle the expiration date on each container of food items This will help you know what to use first, and helps with organizing your stock room and freezer.
5. Rotate your stock …put new items below or behind older ones. Oldest – serve first Newest – serve last
6. Check / correct the Received Date in WebSMARTT Enter the date the delivery actually arrived.
7. Enter the quantities actually delivered. …Your information source: the receiving form you wrote on.
Type the reason for quantity changes. If the quantity you enter is different from what was approved, a box will appear for you to type the reason :
8. Returning all or part of an item? Enter it. Occasionally, products need to be returned –damaged items or a product sent to you in error. Please contact Gretta at 63568, who will guide you through the process. You will enter the quantity in the Returned boxes, and check to see if the Unit is correct..
9. Click Receive Order. You will see a “successful” message similar to this one:
10. File the “Receiver.” Keep it until the next inventory, so you can refer to it then.
Remember to receive transferred items. …find them here:
Summary of Receiving Steps 1. WebSMARTT: Print a “Receiver” (new required step – a separate tutorial is available) 2. Count the actual quantities & write them on the form 3. Label everything with the Item ID number 4. Label food with the expiration date 5. Rotate stock: put away new items behind older ones 6. WebSMARTT: Check / correct the Received Date 7. WebSMARTT: Enter the actual quantities 8. WebSMARTT: Enter any returns 9. WebSMARTT: Click Receive Order 10. File the receiving form until the next inventory