PUBLICATIONS
This document outlines my initial research and design process for creating a membership card for an animal adoption organization. Through drafting and receiving feedback on my designs, I explored color schemes, layouts, and essential elements needed for an impactful membership card. I aimed for a professional appearance while ensuring it conveyed important information clearly. This final version incorporates lessons learned, feedback received, and my commitment to maintaining a consistent design across all materials, culminating in an effective and visually appealing final product.


PUBLICATIONS
E N D
Presentation Transcript
MEMBERSHIP CARD:Before I started.... Before I started I thought I would do some research about good and bad membership cards so I understand what is expected of my membership card and what makes a good/bad membership card. Then I did a first draft on paper to see what it may look like and I can see what looks good and what looks bad and what I should improve. I think my colour scheme may be pink and blue, I thought it would panda skin but then I realised that may be a weird so I’m doing blue and pink as they go together and they are nice together.
2nd draft Front This is my 2nd draft, from this draft I can see that the colours do not really match and there is a few mistakes with colours and general mistakes. I can learn from this to check spelling, and make sure everything matches eg. Everything that needs to be in caps needs to stay in caps etc. make sure colours match and make sure that everything is well presented before handing it in as my final draft also I think the front page should be more neater then the back page as it is the main page of the membership card and I think I need to pick a colour scheme that is nice and clear before doing my other publications. Back
Final Draft From my 2nd draft I got feedback to make my front page more central and to make a clearer front and make a better colour scheme so you can read the information easier to read and make sure 8 membership cards can fit on one A4 page. I changed my membership card for the final draft according to the feedback I got, to make it look a bit more professional. This is my final membership card, this is my colour scheme for all my publications. I think the background is plain, it’s rather simple so people can understand it and not get confused. When I printed it I realised that the colours are ugly and it doesn’t really suit so I changed it. This is my final draft before I get feedback from my test buddy.
Afterwards After I got feedback from my test buddies I realised that it may be a bit too simple and the colours may not work properly. So I changed it to make my 100% final copy, which I changed most things, and now it looks more professional and a lot more like a membership card for an animal adoption company. I’m happy I got feedback and changed my membership card as I may have lost marks if I didn’t do this. Also I realised that when checking if 8 fit on one page I had done the setting out of the page wrong so I had to change it and make sure everything fitted onto the page right and nothing was cut off the edge and not looking right before I printed it out. This is my final membership card I believe this is good but it may be hard to stick to it as the background is an animal and it may be hard to read in my leaflet, but the animal will be somewhere visible throughout the rest of my publications, however I’ll try my best to keep it consistent. Personally,I think this is a good layout as it show an animal that is endangered, so it may get their friends and family to become a member as they might like the idea of being an member. Also this membership card has all the relevant information that is usually found on a membership card.
This shows me that 8 fit on a page before I print the membership cards off, and I can see they fit in well on a page on the computer and it looks well designed and organised and not too busy looking. Also I can see now that I do not really have a colour scheme, however I will use the background images and the blue boarder and the font throughout my work. My membership card also looks well when it is printed as well as we can see from the photo on the right and my membership card looks useable but not that professional. I’m happy with the way my membership card printed and nothing cut off or anything so it is all good. My cutting skills are poor so it looks bad but it has printed well.
LEAFLET. I read the membership leaflet walkthrough on the website to see what I needed to do to get marks on the leaflet. then, I worked out which side is what and where everything is going to go, so now I need to just put the writing and to make it look nice and to do everything that the design criteria says, and I must stick to my colour scheme, to make sure I get maximum points for this section.
today I began to make my leaflets that would be given out to the members which sign up for the WildCare trust. There was 6 sections to fill out which certain information had to be included, such as contact details, some animals they can adopt and many other things. The Images I included I think are rather suitable for my leaflet as they are not random and they go with the text which is near by the image. This is my first attempt at the front and back an inside cover of leaflet, as you can see the colour outlines of my title clash a bit and I stuck to my colour scheme the best way I could, and tried to show consistence throughout my leaflet of my colour scheme which was hard but I got there in the end with this part of my leaflet, also I could make everything line up and be neater on the back cover so it looks professional. This is the inside of my leaflet as you can see there is quiet a bit of writing which could be cut down and the titles could probably all be the same front on the inside and outside of my leaflet and I could probably make everything line up together and be neater overall. Also I believe I could, neaten up the pictures. My test buddy told me that I could clean up everything and maybe have less writing and a few more pictures.
Teachers feedback. My teacher gave me feedback on how to improve my leaflet to get good marks for this publication. I read her feedback and improved on my leaflet. I think her feedback was very effective as it showed me where I went wrong and could lost mark for doing things I should of done easily. As I could only see one thing missing from my leaflet I was rather happy and improved on this aspect rather quickly.
Final leaflet. I improved my leaflet from the feedback I was given from my teacher. However by myself I thought it would be better if all the main titles on a few of the pages were the same colour to keep colour identify and not to make it look messy and untidy. Also this is my final attempt at the leaflet which will be handed out to members once they join, as I think I stuck to my colour scheme better in this draft then my first draft. This is the inside of my leaflet as you can see there is still a bit of writing which I do not really like but at least people can read more about the charity and what it has to offer, I overall think that my leaflet is good and meets the success criteria however, the pictures on the right the captions could be neater looking as at the moment the sides are cut off for some reason.
Printed version of my leaflet I realise straight away when I printed my leaflet that my broader was cut off and the title and writing near the top, were also a bit cut off. I’m a bit annoyed at this but you can still read it so its good. but as most of my leaflet is there and it is at a good standard I’m happy it prints well. There has been a few things cut off and did not print well but overall everything looks good printed, the boarder and bits of writing at the top has been cut off but overall it looks well and I did not have glue so I could not stick it together.
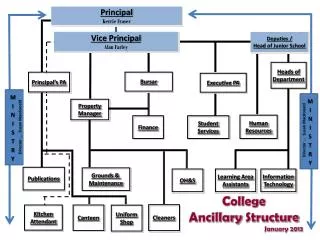
PACK FOLDER. This is my pack folder where all the publication will go into, so that the members can keep them safe easily. My front and back covers are to the left and I think, that they are well done but there could be a few improvements to make it perfect, but it is good enough to get my good marks for this section, I think my pack folder is appealing and most members will like it as its blue which is an unisex colour. Also I did not use that many pictures or big distracting things as its not informative and only needs to hold my publications. The inside of my pack folder is the right and for this I had to make sure there was space on the right to hold all the publications needed to go inside this pack. I did not want to make this too busy as it is only suppose to be a pack to hold everything inside and it does not have to be that informative like the other publications. I think I kept to my colour scheme well in the pack folder. Also before I could PDF my pack folder so the moderator could mark it using their toolkit I had to make sure it fitted the criteria and make sure there was enough space for all my publications as the idea of the pack folder was that the member knew by becoming a member and getting a pack folder that they are helping animals not become endangered.
Printed version of my pack folder From my printed version of my pack folder and most of my publications I have realised that I should stick to a size next time, as most of my boarders and tops of everything is cut off and it does not look very professional, however I did not stick it together as I had no glue but it does like well I think.
QUERIES AND REPORTS After doing all my other publications I began and finished my queries and reports from my database I have now created 3 reports and turned them into PDF’s so the moderator can mark my work using their toolkit. To make my first query which I then turned into a report I did: When I have clicked on query design, I then click add to the table because then it will allow me to work my WildCare Trust database, so then I can create my quires. When the table is added then all the field names appeared and then I had to double click each one so that they appear on a table below.
I then used the trail and error method to find a set of animals which fitted into the criteria for the reports, then I had to press run and see how many animals there was in this query and if there was too many/too less I had to try again. I kept everything ticked but I wrote in a location eg. Australia under the appropriate filed name. This is an example of having too many animals, so I had to try again. I kept using this method until I got between 5-15, as the Wildcare website said you needed between 5-15 no more or no less.
These are my three queries complete and ready to be turned into reports, I can see that my quires so far fit the criteria well.
Making a report Once I clicked on ‘’Report’’ it made an automatic report for me, however I had to adjust it and change the title and other bits and pieces so that it was understandable and attractive and I had to change the colour scheme so that it suited my colour scheme, I need to make three so that all my queries were transferred into reports so that I could get maxim marks for this part. These are my 3 final reports
Printed version of my reports I am happy with the way my reports printed however I never realised until I printed it that on one of my reports ‘’adoption cost’’ is cut off a bit and it does not look well printed but overall I think they look very good. I think my reports printed well and I’m proud at the way they turned out.
FINAL PRESENTATION (after feedback which is on the next slide) In the presentation which will be presented to many people I could only have 5 slides an I had to look at the website to see what the title and what information I should include in each slide. For each slides I had to get information, from many places to make sure that it would be interesting to be viewed and people would care. As I had to do my powerpoint on master slide I had to ensure that many things were consecutive throughout such as a logo and the same font and background. Master slide meant that whatever I put on the master slide slide will appear on all of the rest of the slides on the presentation, on my master slide I only put the wildcare trust logo which would appear in the same place on all slides and I cannot remove or move it on any slide apart from the master slide.From my speaker notes I had to put in all the extra information so the reader will not constantly be looking at the powerpoint reading off it. some of the information I got from the Wildcare Trust website and then I research on the internet, you can see the speaker notes in the printed version in two slides time and when they are printed.
Feedback I got feedback from my teacher about my presentation and I could see that everything was alright and good apart from one word on the last slide which I changed quickly I was happy there was not a lot of adjustments to make and it was easy and quick to change this so I could move on rather quickly to the next part of the work.
Printed version of my presentation I think my presentation printed very well and I printed my speaker notes to see how they turned out and it all went pretty good and I'm happy with the printed version of my presentation. I think my presentation printed well but my camera was a bit wonky so it didn’t take very well but it looks well I think.
COMAPRED AT THE END I can see overall all my publications go with my colour scheme and look good. I am proud overall my publications.