Download

1 / 123
1.23k likes | 1.43k Vues
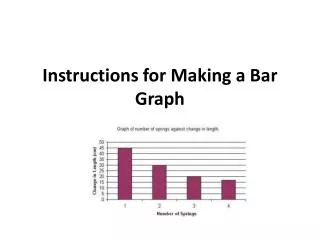
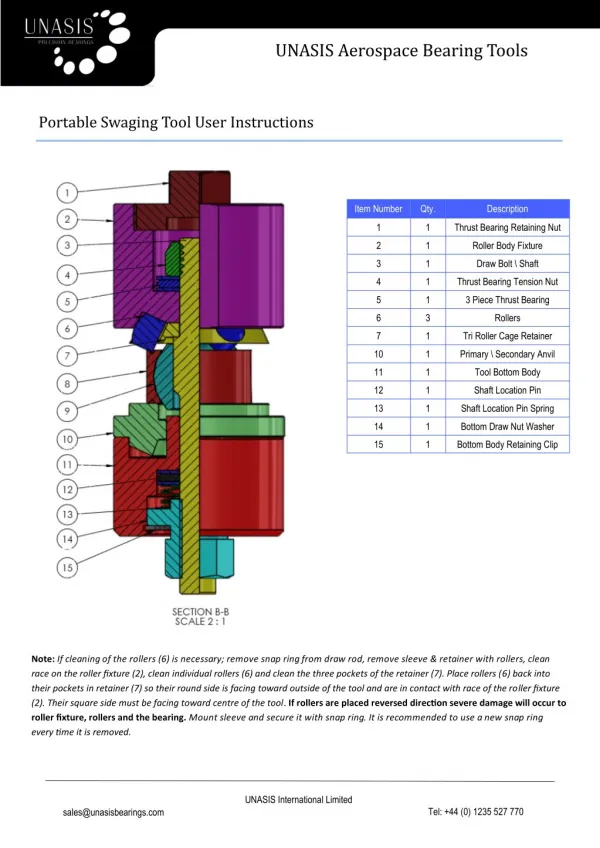
Instructions for making plunger fork tool. Drawing for the trigger assembly. 499 Parts Drawing / Ordering Information. Tools you will need to disassemble a model 499. Remove shot tube from barrel shroud. Remove forearm screw. Remove forearm. Remove top stock screw. Remove stock screws.

E N D
Using a flat screw driver compress leg on safety so the safety can be removed
Using plunger fork insert into the barrel to compress plunger spring
Line up plunger fork on sides of the plunger casing so you can compress the plunger spring forward
Holding plunger fork handle against the table push down on the barrel shroud so anchor pin will release
Using a steel rod 5/8” – ¾” in diameter put into the front of the barrel shroud to remove abutment
Tap rod with mallet until the abutment is loosened and will come out the back of the barrel shroud
You can test the magnet on the abutment before installing in the barrel by putting a bb on it to see if it will stay in place
I do this so you do not have to tear the gun apart again if the magnet is bad
Seal goes on with flat side against plug and open end to the outside
Insert abutment with seal into the barrel, put a small amount of grease on seal to help slide in easier
Insert abutment with threaded side first into the barrel shroud
Using your rod push abutment all the way into the barrel shroud until it stops
Using a pointed punch re-stake the abutment into the barrel shroud. Be sure the abutment is all the way forward in the barrel shroud.
Before staking screw in shot tube and be sure the tube is right against the muzzle of the barrel.
Stake in place with a pointed punch or nail, make sure dimple is deep enough to hold abutment in place
Steel washer can go over the plunger head to make it easier to get back together
Insert plunger head with steel washer in plunger casing and line up the holes for the plunger pin
Compress the plunger spring so you can insert the plunger pin
Rebuilding trigger instructions are for trigger pull to the left