Download
1 / 164
1.64k likes | 1.78k Vues
GCSE Graphic Products 2016 Examination. Use a black pen for answers and pencil for drawings. Read the questions carefully. Spend more time on questions worth more marks - look at how long you are advised to spend on each question and stick to it.

E N D
Spend more time on questions worth more marks - look at how long you are advised to spend on each question and stick to it.
If the question asks for colour then colour it in- if not don’t
Always give full detailed answers not just one word.If the question is worth 2 marks give more detail and include a reason.-use because or an example would be …..
Check through your answers sometimes pupils miss questions like ‘add sizes’
This is an exam against the clock if you are slow at drawing and colouring you will not have time to answer all the questions.
Make sure that you answer all the questions—If you don’t know and answer then guess!
Remember the difference between grades is only ONE mark - so you need to get every mark you can!
You will have 2 hours to do the paper, so you must remember that you should spend about a minute per mark. So if a question is worth 10 marks you need to spend about 10 minutes on it (the paper normally advises you how long you should spend on each section). Make sure you use good English. Read the questions carefully. Key words you need to note are often highlighted in bold. Be specific: don’t say knife, say craft knife! Check your answers. Keep working right to the end. You can always improve your drawing, colouring and shading. Have all the right equipment and use it! (Normally pencils, coloured pencils, rulers, erasers and sharpeners are supplied if you don’t have your own). If you don’t understand something, or don’t know the meaning of a word, put your hand up and ask. You never know, you might get an answer. Don’t just sit there giving up!
Your questions are likely to be a mixture of: Thinking and sketching ideas for products that help young children tell the time. Developing these ideas. Presenting a final solution - A fully rendered (shaded & coloured) drawing. Evaluation of your idea(s). Good and bad points. Answering a number of technical questions about graphic products. Environmental Issues - The 3 R’s (Recycling, Reuse & Reduce). Symbols
Question 1: (Usually worth 20 - 22 marks) You will be told what you are about to design and will be given a specification for it (specific points your design ideas must have). It will usually give you 4 specific points. You will then be asked to add extra specific points (usually 3). It is likely you will then be asked to give reasons why your points are important. The examiner will have a tick list to award points for doing this - simple isn’t it? When you design your ideas over the next couple of questions, you must make sure you have included all the points from the specification (the 4 points supplied and your extra 3).
Encouraging children to grow their own fruit and vegetables.
QR = Quick Response QR = Quick Response
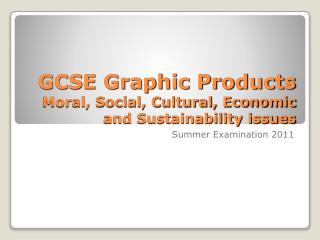
Blister Packaging Blister Packaging Clear PET Plastic
Size of thumb (to open pack) Size of thumb (to open pack) Glue area Clear Cellulose Acetate window Glue area Clear Cellulose Acetate window Glue Tab Glue Tab 3mm Bleed Tab tapers 3mm Bleed
Unusual shapes are cut out using Die Cutters as they cannot be guillotined
LithographyWorks on the principle that oil and water don’t mix.
The metal printing plate is flat Ink only sticks to certain parts It is repelled in others by water
Screen PrintingInk is forced through a fine mesh with a stencil preventing ink from being applied in certain areas.
FlexographyUsed a relief printing method with raised part laser cut in plastic cylinder plates.