Download
1 / 47
470 likes | 605 Vues
This tutorial introduces participants to the GENI (Global Environment for Network Innovations) platform, focusing on hands-on exercises that include reserving and managing resources for experiments. Designed for both new and experienced users, the tutorial covers essential topics such as creating a GENI account, understanding project roles, and executing experiments in a virtual environment. Attendees will learn to utilize the GENI Portal and Flack GUI for effectively managing their research projects within the GENI framework.

E N D
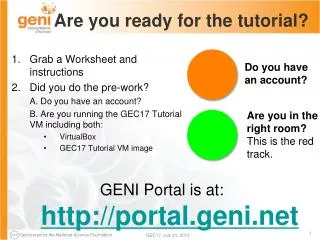
Are you ready for the tutorial? • Grab a Worksheet and instructions • Did you do the pre-work? A. Do you have an account? B. Are you running the GEC17 Tutorial VM including both: • VirtualBox • GEC17 Tutorial VM image Do you have an account? Are you in the right room? This is the red track. GENI Portal is at: • http://portal.geni.net
Tutorial: Getting Started with GENI - Part I Sarah Edwards and Niky Riga, GENI Project Office 21 July 2013
Hands On Exercise Do a Simple Layer 2 Experiment in GENI Reserve two VMs connected at Layer 2 VM VM Layer 2
Understand GENI Terminology project slice experimenter resource aggregate
Experiment Workflow • Part I: Design/Setup • Part II: Execute • Part III: Finish
The GENI Portal is… A web-based tool for experimenters to manage experimenters, projects, and slices. Includes simple tools to reserve resources. More to come in the future.
Flack is … A graphical user interface (GUI) for: • designing topologies in GENI • reserving resources in GENI
Experimenter An experimenteris a researcher who uses GENI resources Different types of experimenters have different roles and permissions: • Advisor vs Grad Student • Teacher vs TA vs Student Experimenter
Projects Project Projects organize research in GENI Projects contain both peopleand their experiments A project is led by a single responsible individual: the projectlead Lead Slice Members
Creating Projects • Only project leadscan create projects. • Project namesare public, unique and permanent • A project may contain many experimenters; an experimenter may be a member of many projects • Projects have an optional expiration (e.g. for classes, tutorials) For today’s tutorial we will all join a project which expires in about a week
Experiment Workflow • Part I: Design/Setup • Part II: Execute • Part III: Finish
Part I: Establish Management Environment 1 Pre-work: Design your experiment 2.1 Pre-work: Create a GENI account 2.2 Pre-work: Project lead adds you to project Project Name: GEC17 2.3 Generate and Download SSH Keypair Tutorial instructions: http://groups.geni.net/geni/wiki/GEC17Agenda/GettingStartedWithGENI_I/Procedure
Creating a GENI account • GENI Portal is at: https://portal.geni.net • Anyone with an account at a supported identity provider (usually your school or employer) can log in, but they will have no privileges • If you don’t have such an account, we will make you an account at the GPO Identity Provider • You must be a member of a project to do anything interesting
InCommon Leverage InCommonfor single sign-on authentication Experimenters from 304 educational and research institutions have InCommon accounts • For many experimenters: • no new passwords • familiar login screens
Using ssh with a public/private keypair Login to all GENI compute resources using ssh with a private key • The public key is loaded onto the node when you reserve resources. • You provide the private key when you log into the node. There are several ways to offer your private key to ssh. No password! You should never be prompted for a password to log into a GENI compute node. If you are, something has always gone wrong.
Expiration and renewal slice expiration time ≤ project expiration time each resource expiration time ≤ slice expiration time each resource expiration time ≤ aggregate’s max expiration project slice resource resource (optional) project expiration time resource resource expiration time slice expiration time now In general, to extend the lifetime of your resource reservation, you must renew the slice and allresources
You are here Profile Help Projects Slices Log Messages
Generate SSH Keys Login Join Project 2
In your local VM … > mv ~/Downloads/id_geni_ssh_rsa ~/.ssh/. > chmod 600 ~/.ssh/id_geni_ssh_rsa > ssh-add ~/.ssh/id_geni_ssh_rsa 2
Resource A resourceis a piece of infrastructure A resource can be real or virtual. Resource specifications are used to describe and request resources. Examples: • Compute: computer vs virtual machine (VM) • Wireline Network: VLAN or OpenFlow • Wireless: WiMAX
Aggregate InstaGENI Rack ExoGENI Rack An aggregatemanages a set of reservableresources Aggregates include: GENI racks OpenFlow WiMAX
Slice A sliceis a container of resources used in an experiment. A slice can contain resources from one or more aggregates A slice is in a single project A slice has an expiration Slice names are public, reusable and unique
Putting it all together Member: project Lead: Experimenter slice Experimenter aggregate resource resource Layer 2
Part Icontinued:Obtain Resources slice 3.1 Create a slice 3.2 (optional) Renew your slice 3.3 Reserve two VMs at on aggregate 3.4 Check Whether VMs are Ready to be Used VM VM Layer 2
Create Slice 3.1
Extend slice expiration Extend resource expiration Launch Flack 3.3
username slice name all available aggregates 3.3 Launch Flack
Change names of VMs If using ExoGENI resources, set size of VM to small 3.3
3.3 Reserve resources
Experiment Workflow • Part I: Design/Setup • Part II: Execute • Part III: Finish
Part II: Execute Experiment Internet ssh 4.1 Login to nodes (two nodes: client & server) 4.2 Download and compile experiment software 5 Execute experiment 5.1 Send IP Traffic 5.2 Disable IP and send Layer 2 (non-IP) Traffic 6.1 Logout of nodes Control Interfaces client server Layer 2 Data Interfaces Experimenter
Login 4.1
4.2 5.1 $ wget …/pingPlus-0.2.tar.gz $ tar xvfz pingPlus-0.2.tar.gz $ apt-get update $ apt-get install build-essential $ cd pingPlus-0.2 $ make $ setenvPATH $PATH\:/sbin $ ifconfig client $ wget…/pingPlus-0.2.tar.gz $ tar xvfz pingPlus-0.2.tar.gz $ apt-get update $ apt-get install build-essential $ cd pingPlus-0.2 $ make $ setenv PATH $PATH\:/sbin $ ifconfig server
Worksheet 5.1 Project Name: GEC17 Slice Name: igeni01 Client Server Control Interface Name eth ___ IP Address __ . __ . __ . __ Data Interface Name eth ___ Des IP Addr 10 . 19 . 1 . 2 /24 MAC Address __ : __ : __ : __ : __ : __ Control Interface Name eth ___ IP Address __ . __ . __ . __ Data Interface Name eth ___ Des IP Addr 10 . 19 . 1 . 1 /24 EtherType: 19001
# disable IP on your nodes $ service neucastop $ sudoifconfigeth1726 0.0.0.0 # start L2 server $ sudopingPlusListener19001 $ exit 5.1 5.2 6.1 # should SUCCEED $ ping 10.19.1.2 –c 5 # disable IP on your nodes $ service neucastop $ sudoifconfigeth1726 0.0.0.0 # should FAIL $ ping 10.19.1.2 –c 5 # start L2 client $ sudopingPlus01:02:03:04:05:06 eth1726 19001 $ exit client server
Experiment Workflow • Part I: Design/Setup • Part II: Execute • Part III: Finish
Part III: Finish Experiment When your experiment is done, you should always release your resources. • Normally this is when you would archive your data • Delete your resources at each aggregate project resource experimenter aggregate slice
7 Delete Resources
Congratulations! You have… • Run your first GENI Experiment! • Exercised your knowledge of GENI terminology • Used the GENI Portal and Flack
What’s Next? • (If needed) Request a permanent account • Are you a Professor or PI? • Ask to be a Project Lead so you can create projects • Invite students to join your project • Are you a Student? • Ask your professor to create a project • Request to join that project Keep experimenting!
Coming up • In Part II • Automate the process of reserving topologies with the software already configured • Learn how to use another tool for reserving resources (omni) • Differences and strengths of the two flavors of GENI rack • In Part III • Learn how to instrument your experiment to automatically collect measurements • Later at GEC • Beginner and Advanced OpenFlow • WiMax • Get one-on-one assistance • Experimenter Drop In on Mon Afternoon • Coding Sprint, Experimenter and Operations Tutoring on Tues Afternoon
Welcome to GENI!