Step-by-Step Guide to Insert Hyphens in a Document
This guide provides clear, step-by-step instructions on how to insert hyphens in a document using Microsoft Word. It covers various methods such as automatic hyphenation, manual hyphenation, and adjusting hyphenation options for optimal layout. Learn how to control where words are hyphenated, set limits on consecutive hyphens, and save your document correctly. Follow the prompts to ensure the best formatting results in your text, enhancing readability and visual appeal.

Step-by-Step Guide to Insert Hyphens in a Document
E N D
Presentation Transcript
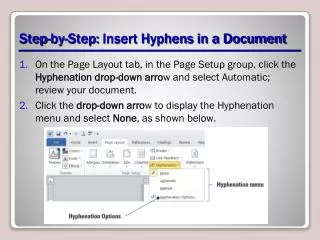
Step-by-Step: Insert Hyphens in a Document • On the Page Layout tab, in the Page Setup group, click the Hyphenation drop-down arrow and select Automatic; review your document. • Click the drop-down arrow to display the Hyphenation menu and select None, as shown below.
Step-by-Step: Insert Hyphens in a Document • Click the Hyphenation drop-down arrow again, and select Manual. The Manual Hyphenation dialog box stops at the first suggested text for hyphenation (headquarter), as shown below. Click Yes. Manual Hyphenation will allow you to determine where to hyphenate the word by clicking Yes, No, or Cancel, and you can decide where to position the insertion point.
Step-by-Step: Insert Hyphens in a Document • Click Yes to headquarters. Click No to issue and ample. Click Yes to technology and location. When Word stops at transportation, move the insertion point to the third hyphen (after “ta”) and click Yes. Click No to proximity and Yes to business. The Hyphenation prompt will appear when Word has completed the process of searching for words to hyphenate within the document. Click OK. • SAVEthe document as relocation1_proposal in the lesson folder on your USB flash drive.
Step-by-Step: Insert Hyphens in a Document • Click the Hyphenation drop-down arrow and select Hyphenation Options to open the Hyphenation dialog box, as shown below. Click the check box to Automatically hyphenate document. Click OK.
Step-by-Step: Insert Hyphens in a Document • Click the Hyphenation drop-down arrow and select Hyphenation Options. Then, in the Hyphenation dialog box, key .75” in the Hyphenation zone. The Hyphenation zone is the distance from the right margin in which Word is allowed to hyphenate words. The default is set at 0.25”. As the zone is increased, fewer words will require hyphenation. • Click the up arrow to set the Limit Consecutive Hyphens to 2. Click OK. The number of hyphens in the document is restricted once the default is changed from No Limit. • SAVEthe document as relocation2_proposal in the lesson folder on your USB flash drive, then CLOSE the file. • LEAVEWord open to use in the next exercise.