Download
1 / 8
80 likes | 106 Vues
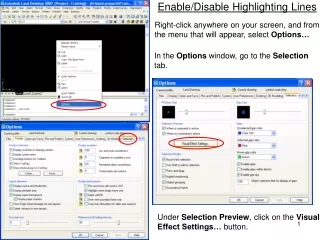
Enable/Disable Highlighting Lines. Right-click anywhere on your screen, and from the menu that will appear, select Options…. In the Options window, go to the Selection tab. Under Selection Preview , click on the Visual Effect Settings… button.

E N D
Enable/Disable Highlighting Lines Right-click anywhere on your screen, and from the menu that will appear, select Options… In the Options window, go to the Selection tab. Under Selection Preview, click on the Visual Effect Settings… button.
In the Visual Effect Settings window, toggle between the Selection Preview Effect options until you reach the one you like. The different options are as follows: When finished, Click OK in the Visual Effect Settings window, then once more in the Options window.
Automatic Leaders for Points This will help avoid moving points (along with their data) when only attempting to move the text. 1. Go to the Points menu – Edit Points – Display Properties. 2. Type “A” for all when prompted in the command line. 3. Check the box for Automatic Leaders.
Now, when you have points clustered together… Drag your text to where you want to move it. The text will move, but the point will remain in the same place. A leader will indicate the location of the text’s point.
In the Point Display Properties Window (Points menu – Edit Points – Display Properties), you can also change other settings. The text color for each component of your points. Under the Marker tab, you can change the marker symbol. What components of your points are visible. The text style and size.
Adjusting Precision for Dimensions Go to the Dimension Style Manager window (Format menu – Dimension Style…). Select the Dimension Style you will be using, and click Modify…
Go to the Primary Units tab. Select the precision you want from the drop-down menu. The preview screen will change accordingly to reflect your changes.
Setting Units for Dimensions If you would like units to show with your dimensions, you can type the format you prefer in the Suffix field. If you are working in feet, you can type ft, ’, or whatever suits your needs.