Download
1 / 16
160 likes | 334 Vues
Dimensioning part 2 with SolidWorks. ENGR 1182 SolidWorks 09. Today’s Objectives. Review Basic Rules of Dimensioning Extend Basic Rules for more Clarity SW09 In-Class Activity SW09 Out-of-Class Homework Assignment. Formal Drawings.

E N D
Dimensioning part 2 with SolidWorks ENGR 1182 SolidWorks 09
Today’s Objectives • Review Basic Rules of Dimensioning • Extend Basic Rules for more Clarity • SW09 In-Class Activity • SW09 Out-of-Class Homework Assignment
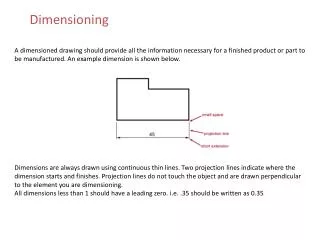
Formal Drawings Definition: Detailed multi-view representations of a finished part Formal Drawing Components: Dimensioning Size and Type of Features Good Practices
Review of Basic Dimensioning Dimensioning is used to define an object so that it could be manufactured and must: • Define the overall size of the part in all 3 dimensions. • Define the size and location of the features of the part in all 3 dimensions.
Review of Basic Dimensioning .75 .5 2 .25 1 R1 1 2 Ø1 1.Overall Size 2.Features Size and Location 1.Overall Size 2.Features Size and Location
Rule 1: Appropriate View Each dimension should be placed in a descriptive or characteristic view without dimensioning to hidden lines
Rule 2: Clarity Dimensions should be located outside the boundaries of the object whenever possible and should be spaced far enough apart to be read clearly
Rule 3: Location of Dimensions • Dimensions that are shared between two views should be located between those views
Rule 4: Cylinders • Positive cylinder (e.g. a rod) – dimension in a view where the side of the cylinder appears as a rectangle. • Negative cylinder (e.g. a hole) – dimension in the view where the cylinder appears as a circle. • A diameter symbol is always required before a numerical value.
Rule 5: Amount of Dimensions • Do not over-dimension or under-dimension an object
Solid Modeling Dimensioning • Hole and Arc Details • Circular features of 360° - include the diameter symbol followed by a numerical value, e.g. ø5.0 • Circular features of < 360° - include the radius symbol followed by a numerical value, e.g. R5.0 • A centermark represents the center of an arc or circle and is used for dimensioning feature locations • Centerlines are used in the view where the circular feature appears as a rectangle Symmetry When symmetry is used to reduce complexity a note must be added Options include: Symmetrical from left to right, front to back, top to bottom
Dimensions can be added using the “Smart Dimension” feature SolidWorks: Adding Dimensions Notes can be added to reduce the number of dimensions by stating symmetry or identifying fillet radii
Dimensions Wrap Up Rules of Dimensioning • Appropriate View • Clarity • Location of Dimensions • Cylinders • Amount of Dimensions Homework Assignment Now dimension the part that was created for Extracted Drawings HW. (Hint: Use Notes for Symmetry and fillet radii)
In-Class Activity Now complete the drawing started previously by adding all necessary dimensions and notes. (Hint: Notice Symmetry)
Important Takeaways • Dimensioning is used to define an object, including the overall size with 3 dimensions and the location and size of part features. • There are important rules for common features of parts including circular features
What’s Next? • Due Next Class: SW09 Out of Class HW • Before next class, you will read about advanced modeling techniques and rapid prototyping. • Take SolidWorks 10 Quiz on readings