Advanced Telephony Applications
Advanced Telephony Applications. Fidelity Call Center Solution. Fidelity. Technical Presentation. www.jusan.es. Overview. Fidelity is based on a the Jusan CTI Server and 6 modules which interact with a Windows 2000/2003 server and an SQL database.


Advanced Telephony Applications
E N D
Presentation Transcript
Advanced Telephony Applications Fidelity Call Center Solution Fidelity Technical Presentation www.jusan.es
Overview Fidelity is based on a the Jusan CTI Server and 6 modules which interact with a Windows 2000/2003 server and an SQL database Setup Module: enables the setup of call routing and distribution, as well as all system users, positions and groups. Supervisor Module: interface through which a supervisor is able to monitor and control the activity of one or several queues, and the corresponding agents. Agent Module: interface by which an agent logs on to the system, visualizes call data and controls the phone from the PC. Statistics Module: enables the evaluation of resources, production and performance by means of a wide variety of statistics and graphs Call Recording Module (optional): enables call recording and the posterior management of the data. Message / Music Uploader: enables upload and instantaneous update of system messages.
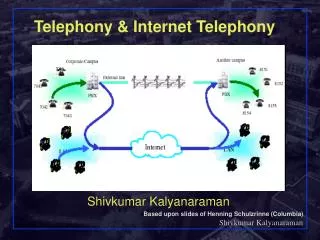
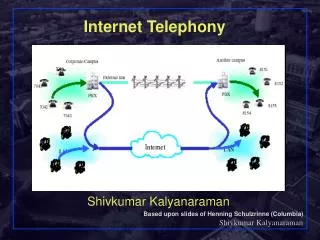
Hardware Fidelity Software Fidelity Server PBX LAN System Administrator Call Recording Module (optional) Supervisor Agent Agent Architecture
Requirements Fidelity system requirements: • Server PC: 3Ghz processor Win2000/Win2003 operating system 1Gb RAM (< 20 agentes) 2Gb RAM (> 20 agentes) • Client PCs: W98, W2000, XP, W2003 • If the telemarketing module is included in the system, it is ESSENTIAL to install Internet information server (IIS) on the server PC before beginning the installation of Fidelity. • Corresponding CTI protocol drivers and/or licenses (CSTA, TAPI, TSAPI) MUST be installed and running on server PC.
Fidelity Server The “Fidelity Server” program is made up of four services: • Jusan Streamline Server • Jusan ICR • Jusan IJA Servicial • Jusan CallLog Servicial Jusan Streamline Server This is the application’s “CTI server”. It is in charge of the coordination of events and methods between the different clients (other applications or services) and the PBX, by means of the selected CTI protocol. Physically it is made of two parts: The CTIServer2 program is basically a “Proxy” in charge of communications between the rest of the clients and the PBX. It resends the events received from the PBX to the clients that have requested “monitoring” of the port, and sends the methods received from the clients to the PBX. In order not to be PBX-dependent, a specific Jusan format is used for the events and methods. The program communicates with a DLL, specific for each protocol (CSTA, TAPI, TSAPI, etc) and for each PBX, interfacing between the specific Jusan format and the format for eachPBX. • CTIserver2.exe • CTIAL_protocolo_pbx.DLL
Fidelity Server Jusan ICR This is the “brain” of the Fidelity application. It receives information from all the components and decides how each call should be handled by the system. It is a Java (.jar) application that runs as a service and requires the Java 1.5.0 environment to be installed (supplied with the installation Kit). Jusan IJA Servicial This “service” is in charge of maintaining communications between the voice server or servers (FonoMails) and the other modules of the Fidelity application. Jusan CallLog Servicial This “service” is in charge of writing all information regarding “Fidelity calls” to the database. It receives information from the other services and writes in the calls database, allowing a variety of statistical reports to be obtained at a later stage.
Fidelity Log Files Log files may be accessed from the “Help” menu of each interface module. • CTIserver2_0.log • CTIAL_0.log • IJAService_0.log • etc • logICRO.csv • ctiLinkx.csv • fmLinkx.txt • wrapper.log • etc Log file paths are as follows“ C:\Archives de Programa\Jusan\Streamline Server C:\Archives de Programa\Jusan\Streamline ICR\logs
FonoMail • Connect the FonoMail unit or units to the LAN. • Connect each FonoMail port to an analog port of the PBX. • Connect first FonoMail to the server PC by serial port. FonoMail units must be assigned consecutive IP addresses. • Install theFonoMail 2000 configuration software in the server PC. • After reboot open “FonoMail 2000” program from the “FonoMail 2000” program group.. • Open the “COM Port” combo box, select the port to be used.
FonoMail • In the main screen, select “Maintenance” menu. • Click the “System Parameters” option and the “IP & Email Settings” tab Enter the IP address and subnet mask for the FonoMail unit. Ignore the rest of the parameters This process must be carried out for each FonoMail unit
Software Installation - Server PC • Check if “Java Runtime Environment” is already installed. • Type in “java –version” & click Enter key • If system returns the Java version, it is already installed, and system administrator must be consulted before proceeding. • If it is NOT installed, continue
Software Installation - Server PC • Check if “MSSQL Server” service is installed. • If it is already installed, consult the system administrator before proceeding. • If it is NOT installed, install from the Server / MSDE directory and this service will appear in the list of services. • Install Server. Follow on-screen instructions. • Install message uploader in server PC “FonoMail Uploader Install.exe”
Software Installation - Server PC • Install Streamline Setup in server PC. Follow on-screen instructions. For database enter (local). • Install ACD Agent in server PC. Follow on-screen instructions. For database enter (local). • Select “Local Installation …”. This enables installation of ACD Agent via LAN, and automatic version updates.
SMTP Configuration Each Fidelity call queue permits an individual “Exit to mailbox” message to be setup for callers who do not wish to continue waiting. These messages are sent by e-mail to the address setup for the corresponding group. • Setup e-mail account from which these e-mails will be sent, in the organization’s e-mail server. • To setup this account information in the server PCfind and edit the following file: “Program Files/Jusan/Streamline server/IjaSmtp.ini”. [Settings] 67=192.168.0.321 68=admin 69=1234 70=0 71=fidelity@company.com Where 67 = Mail server (SMTP) 68 = Account user name 69 = Password 70 = Authentification type AUTH_NONE = 0 AUTH_CRAM_MD5 = 1 AUTH_LOGIN = 2 AUTH_PLAIN = 3 AUTH_NTLM = 4 71 = SMTP address
System Configuration • Start “Streamline Setup” from “Streamline” program group. Password “admin” • Click “Settings” Streamline Setup main screen
System Configuration - Settings (PABX) PBX and CTI protocol: TAPI, TSAPI, CSTA Inbound / Outbound prefix data General PBX settings Default settings Ctrl & J keys: PBX specific Advanced settings Apply Settings after making changes
System Configuration - Settings (Ports) FonoMail IP address: In the event of multiple units, the assigned IP addresses must be consecutive. Enter the lowest IP address in this field Enable ports Match FonoMail ports to PBX analog extensions Maintain default settings in first instance Apply Settings after making changes
System Configuration - Settings (Services/Advanced) Server connection test: Checks that the database exists and that there is CTI connection to PBX After changes to PBX parameters, appropriate services MUST be restarted Advanced tab is used for specific PBX settings
System Configuration - Groups (ACD call queues) A Fidelity ACD Group (one or more agents) is one possible destination for inbound calls. Each group may be setup individually Group name and disribution type within the group Calls distributed to this group: Caller and called number may be complete number or part of IVR and group contacts may be used as filters If no parameters are configured all calls may be sent to this group Optional feature, PBX dependant E-mail address for voice mail left by client exiting queue Associated URL (web page or web based CRM application) Group priority in event that 2 groups may receive same call. If no priority is setup, distribution is random Max. time for call in queue. When exceeded, supervisor receives an alarm
System Configuration - Groups (ACD call queues) At any moment each ACD Group in the system will fulfill one of the following conditions. Each condition may be setup with a different action. • Condition 1: Group Closed (setup by schedule and bank holidays). • Condition 2: Group Open with no active agents. (Active means registered and NOT on break). • Condition 3a: Group Open with active agents and the number of queued calls does not exceed the threshold limit. • Condition 3b: Group Open with active agents and the number of queued calls is equal to the threshold limit. “Threshold” = Number of active agents X configurable variable(factor)
System Configuration - Groups (ACD call queues) By default all groups are open ALL the time Click to create the group´s schedule Click to create open / closed schedule0 Click to create holidays schedule
System Configuration - Groups (ACD call queues) Once group schedule is defined, setup the appropriate action for condition 1 • Busy: Caller hears engaged tone. • No action: Phone rings continuously. • Queue: call placed in queue and subject to “settings” configured for condition 3a. • Message + Transfer: Define extension to which transfer is made and name of the message to be played to the caller.
System Configuration - Groups (ACD call queues) For condition 2 (Group open but without registered agents that are not on break) the same parameters are available • Busy: Caller hears engaged tone • No action: Phone rings continuously • Queue: call placed in queue and subject to “settings” configured for condition 3a. • Message + Transfer: Define extension to which transfer is made and name of the message to be played to the caller.
System Configuration - Groups (ACD call queues) For condition 3 (Group open with registered agents not on break) a welcome message may be used, and depending if the threshold is reached different configurations may be applied Factor: The factor multiplied by number of active agents = Threshold Example: A group has 4 agents registered, 1 is currently on break. The factor is 1 so at this moment the threshold is 3. In this example when 3 calls are queued the next call will be handled according to the setup for “Threshold exceeded”. 1 Note: Welcome messages in format HELLO&T will work as IVR messages. E.g: The message HELLO is played and system will react to DTMF digits.
1 System Configuration - Groups (ACD call queues) For condition 3a (Threshold not exceeded). Queue messages & music-on-hold parameters must be setup In this example for group SOUTH EAST: • Caller hears WAIT. • 20 seconds MUSIC_1. • Caller hears PATIENCE1 if first in queue, PATIENCE2 if second etc. • 20 seconds MUSIC_1. • Caller hears WAIT_ which gives option to leave a message by pressing 2. • 20 seconds MUSIC_1. • ……. and so on. • When maximum queue time is reached (300 secs) the call is transferred to extension 262.
1 System Configuration - Groups (ACD call queues) For condition 3b. If threshold is 3 and currently 3 callsarequeued the next call is handled according to the parameters configured for “Threshold exceeded • Options available are the same as for conditions 1 and 2 • If “Queue” is selected, alternative messages and music-on-hold may be configured
System Configuration- Positions Once positions have been created, the next step is Users. Fidelity is a free seating solution which allows any agent or supervisor to log-on in any position • Each position comprises a PBX extension and the associated PC (Computer Id). • Check button may be used for LAN validation of PC’s “Computer Id”. • Multiple positions may be created. Default setting. Change only in event that one PC is assigned to various extensions. Creates positions for extensions 221 to 235 without Computer Id and creates Users 221 to 235 assigned to the group SOUTH WEST
System Configuration- Users Once positions have been created, the next step is Users. Each user record may contain a variety of data. Only 5 fields are essential. • Name as seen on supervisor’s screen • Full name • Check the “Agent” box • Assign User’s PIN. Alphanumeric, no spaces, max. 20 characters. • Assign a wrap-up time. This is time made available to the user for administration tasks between calls. (Often a trade union-defined parameter).
System Configuration- Users User must then be assigned to a group or groups and permission to use PC telephony functions may be granted Select group on the left and click arrow to pass to the right. Example shows a user currently assigned to “SOUTH WEST” and “ORDERS”. By default no on-screen telephony functions are assigned. Recording feature is optional and PBX dependent
System Configuration - Users (Supervisors) If the user is a supervisor 2 other parameters must be setup Check the “Supervisor” box. Click “Supervisor…” button. Select group to be supervised on the left and click arrow to pass to the right. Example shows the groups “NORTH” and “SOUTH EAST” assigned to supervisor Suzanna Lewis.
Setup Module - Groups Management The list of groups enables the management of agents between groups and the creation of sub-groups (cells). To copy or move agents, drag and drop over the relevant group. To assign agent priority within the group, right click the agent, click priority and select from options available. “Cells” allow for sub-group specialization. E.g: all calls to 914560110 go to Group A, but some calls may be automatically directed to sub-groups according to contact details configuration. To create a cell right click the group and press “New cell”. Assign specialists and apply the cell name in appropriate contact records. Note: Agents in the “Unassigned” group will not be seen by any supervisor.
Setup Module - Types of Break Various break types may be setup so that when an agent clicks the “break” button on his/her PC, the different options will appear. Break description as appears on agent’s PC screen Time limit after which an alarm is sounded on Supervisor’s PC Check commentary field to allow agent to leave further information regarding the break
Setup Module - Contacts Contacts may be imported from Outlook, Excel, Access, … (see next slide) … orregistered manually Contacts may be assignedto one or moregroups. For copying and moving contacts, drag and drop over relevant group. When using Cells (sub-groups),the “Organization” field is used to enter the cell name. Eg Group SOUTH EAST has a cell called “Promo A”. A call from Rachel Jarvis distributed to this group will be sent to the “Promo A” cell agents. If none are available, it will go to another member of SOUTH EAST by agent priority.
Setup Module - Import Contacts Import from Excel Select OLE DB Data Source & Click Browse Browse to excel file then Click All tab Double click Microsoft Jet 4.0 OLE DB provider
Setup Module - Import Contacts Import from Excel (II) Double click Extended properties Enter Excel 8.0;HDR=YES Click OK, OK, then Next Select relevant Excel Sheet as the Source table Map fields to be imported by dragging from the Table Field column and dropping in the Destination field column. Finally assign a group and click Finish
Contacts Setup Module - Import Contacts Import from Outlook Select Outlook as data source and click Next. Select Contacts as the Source table Map fields to be imported by dragging from the Table Field column and dropping in the Destination field column. Finally assign a group and click Finish
Setup Module - Outbound campaigns Create new Campaign Group assigned. Only one group may be assigned to each campaign. Automatic dialing type: Preview, progressive. Personalized result codes may be added to default codes available Default codes include: No answer, Ansaphone, Fax, Engaged, Postponed, (Personal), Invalid, Processed
Setup Module - Outbound campaigns Create new Form Assign to a campaign Each field is individually designed and may be writable or read only
Setup Module - Outbound campaigns Preview the created Form Form as seen on agent’s screen Agent will be able to write in all fields except “telephone” which will be imported before campaign is launched.
Setup Module - Outbound campaigns Import the campaign contacts For import of contacts follow same procedure as seen in a previous slide for general contacts import. Finally, activate the campaign
Setup Module - General Default properties and general parameters Uncheck parameter to allow supervisors without assigned extension.
Setup Module - General For database backup and restoration, click and create or navigate to corresponding file.
Messages and Music Uploader Run “FonoMail Uploader” from the FonoMail 2000 V3 program group Setup FonoMail IP address. Message and music files may be dragged and dropped into right hand window for instantaneous upload
Software Installation - Clients • Install Fidelity ACD Agent in each position. From the relevant client PC search the network for the “Server” PC. Open the “Executables” directory and double click “ACDAgentInstall.exe” Any updates to the ACD Agent program will now be automatically updated in this client • Install Fidelity Supervisor (ICR Monitor) in the relevant PCs. • Install Fidelity Reports in the relevant PCs. • Install “Recording Manager” application software in the relevant PCs.
Supervisor Module - ICR Monitor (Alarms) • Visual Alarms: • Max. queue time exceeded - Alarm icon flashes. • Max. call time exceeded - Agent cell flashes red. • Pause time exceeded - Pause icon flashes red. • Server disconnected - Server icon flashes. • Configurable Audio Alarms / Controls: • Max. queue time exceeded • Max. call time exceeded • Pause time exceeded • Agent on break • Agent returns from break • Agent log-in • Agent log-out
Supervisor Module - ICR Monitor • For overload situations: • Supervisor is able to force transfer of calls to inactive or on-break agents by dragging and dropping the calls over the relevant agent’s cell. • Supervisor may log-on as an agent Via the Agent menu supervisor is able to: • Activate / Deactivate agent in a group • Change the agent’s priority • Send a text message “chat” to the agent • Intervene in a call (According to PBX) • Free up an extension (For PC crashes etc) • Record a call in progress
Supervisor Module - ICR Monitor Groups may be opened and closed and campaigns activated or deactivated from the calls list menu The “Group Recordings” option automatically opens the recordings management application software giving access to the calls recorded for this particular group.
Call Recording Module - Software • Supervisor may access an individual agents’ call recordings or the complete recordings of a group, directly from the supervisor interface. • Report may then be filtered according to information required • Supervisor is able to listen to and delete recordings as well as send them by e-mail • 16 hours of recorded calls require +/- 1Gb of disk space
Reports Module • Supervisor are able to access the reports module directly from the supervisor interface. • The majority of reports are available in summary or detailed version, and may be filtered by date, time, group, call type, duration, etc • Reports may be displayed on screen, printed, sent by e-mail or exported in one of the following formats: excel, pdf, html, txt.