Blood Collection
680 likes | 1.14k Vues
Blood Collection. Blood. Hematology: Is defined as the study of blood. Everybody is familiar with the sight of blood - the red fluid that oozes out of your body when you've sustained a cut or a deep injury, which is slightly denser and approximately 3-4 times more viscous than water.

Blood Collection
E N D
Presentation Transcript
Blood Hematology: Is defined as the study of blood. Everybody is familiar with the sight of blood - the red fluid that oozes out of your body when you've sustained a cut or a deep injury, which is slightly denser and approximately 3-4 times more viscous than water. • Blood volume: Blood volume is variable, but tends to be about 8% of body weight. Factors such as body size, amount of adipose tissue, and electrolyte concentrations all affect volume. The average adult has about 5 liters of blood.
Blood composition • Blood consists of cells which are suspended in a liquid. • The components of blood can be separated by filtration, however, the most common method of separating blood is to centrifuge (spin) it. • Three layers are visible in centrifuged blood. • The straw-colored liquid portion, called plasma, forms at the top (~55%). • A thin cream-colored layer, called the buffy coat, forms below the plasma. The buffy coat consists of white blood cells and platelets. • The red blood cells form the heavy bottom portion of the separated mixture (~45%).
Blood composition • The plasma: • Plasma is a straw colored liquid, most of which is water. It makes up 55% of the blood and serves as a transport medium for blood cells and platelets. • By far the greatest constituent of plasma is water, which accounts approximately 90% of the total volume. • Other constituents (10%) fall into the following main categories: • Ions (Na+, CL-, etc) • Plasma proteins (albumins, globulins, fibrinogen, etc) • Dissolved gases (O2, CO2).
Circulating Nutrients (glucose, amino acids, etc) • Circulating Tissue products (urea, creatinine, lactate, etc) • Circulating Hormones (insulin, adrenaline, etc) • The water in the plasma is an important solvent for ions such as Na+, CL-, K+, etc. It also dissolves nutrients like simple sugar, lipids, amino acids and vitamins. Sometimes, it would help transport enzymes and hormones, but that depends on the activities of the body. • Serum:Plasma differs slightly from what is termed serum, which is generally taken to mean the fluid part of the blood which remains after the blood has coagulated (clotted).
The red blood cells: The red blood cells form a major part of the blood. These are the familiar discoticshaped cells which make up 99% of the cells in the blood. They are the principal carriers of the red colored hemoglobin molecules. Hemoglobin is an iron containing protein and binds about 97% of all oxygen in the body; hence, the most principled function of red blood cells is to carry oxygen gas around the body. Although they do carry a little carbon dioxide sometimes, most of this unwanted gas is transported by the plasma
The white blood cells: • The white blood (leukocytes) cells are a vital source of defense against external organisms. • White blood cells also serve as 'sanitary engineers' cleaning up dead cells and tissue debris that would otherwise accumulate to and lead to problems. • There are five classes of leukocytes: Neutrophil, Eosinophil, Basophil, Monocyte and Lymphocytes. • The platelets: • These are not true cells but fragments of cytoplasm from certain bone marrow cells. They play a part in the clotting of blood.
Role of plasma and platelets in clotting • If damage occurs to a blood vessel, circulating platelets immediately get trapped at the injury site. On accumulating the platelets 'plug' the leak in the vessel providing a first step in damage control. • This mechanism is supplemented by 'blood coagulation', or clotting, which is the most important means of defense against bleeding.
As mentioned plasma contains several dissolved proteins. Fibrinogen is a rod shaped soluble protein which in the presence of a catalyst thrombin gets converted to an insolubleprotein fibrin. • The combined action of the platelets and 'fibrin web' is sufficient to prevent a dangerous loss of blood. • In cases where the formation of fibrin and hence formation of a clot is impaired due to some reason (e.g. a genetic disorder as in hemophilia) a person is at great risk of bleeding to death.
Common Sites for Venipuncture Venipuncture • Venipuncture or phlebotomy:is a procedure done to have an access to a vein (Blood collection, IV). • There are three veins most commonly used in venipuncture, or phlebotomy: • The cephalic • The median cubital • The basilic veins • These three veins are found in the antecubital area.
The median cubital vein is the preferred vein for phlebotomy because: • It is usually larger than the other veins. • Best anchored vein (More stationary(. • Median Cubital – First Choice • Well anchored vein, usually large and prominent. • Very few problems. Offering the best chance for a close to painless puncture, as there are few nerve endings close to this vein. • Cephalic Vein – Second Choice: The cephalic vein may lie close to the surface. • Basilic Vein – Third Choice • In many patients this vein may not be well anchored and will roll, making it difficult to access with the needle. • Additionally, this area is often more sensitive, thus a stick is slightly more painful for the patient
Hand Veins • At times, none of the veins of the antecubitalfossa will be felt or not be able to be used due to intravenous placement or injury, hand veins may be used. • Veins of the hand and wrist are usually close to the surface, but they are prone to movement and rolling. • Using these veins tends to be more painful for the patient, since there are nerves running through the hand as well. • If using these veins, it is important to anchor the vein with your hand, holding it in place, when you are drawing the blood.
Venipuncture, why? • Intravenous therapy • Venous blood sample • Treatment of certain diseases (hemochromatosis) • Parenteral nutrition
Perform the Venipuncture process including • Proper patient identification procedures. • Proper equipment selection and use. • Proper labeling procedures and completion of laboratory requisitions. • Preferred venous access sites, and factors to consider in site selection, and ability to differentiate between the feel of a vein, tendon and artery. • Patient care following completion of venipucture. • Safety and infection control procedures.
Venipuncture Procedure • Identify the patient. • Check the requisition form for requested tests, patient information, and any special requirements. • Select a suitable site for venipuncture. • Prepare the equipment, the patient and the puncture site. • Perform the venipucture. • Collect the sample in the appropriate container. • Recognize complications associated with the phlebotomy procedure. • Assess the need for sample recollection and/or rejection. • Label the collection tubes at the bedside or drawing area. • Promptly send the specimens with the requisition to the laboratory
Type of fluid Order form / Requisition
Labeling the Sample • Patient's name, first and middle. • Patient's ID number. • NOTE: Both of the above MUST match the same on the requisition form. • Date, time and initials of the phlebotomist must be on the label of EACH tube.
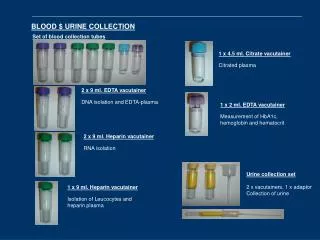
Equipment • Needles (Smaller gauge numbers indicate larger outer diameters.) • Syringes • Cotton • Alcohol • Tourniquet • Collection tubes • Adhesive bandages • Gloves • Sharp box
Needle and Syringes Components Butterfly Needle
Procedural Issues • Proper patient identification is MANDATORY match with that on the request form • Ask for a full name • An outpatient must provide identification other than the verbal statement of a name. • Speak with the patient during the process
Venipucture Site Selection • Median cubital then cephalic veins of the arm are used most frequently • Avoid • Extensive scars from burns and surgery • Hematom. • Intravenous therapy (IV) / blood transfusions • Turn off the IV for at least 2 minutes before venipuncture. • Apply the tourniquet below the IV site. Select a vein other than the one with the IV. • Perform the venipuncture. Draw 5 ml of blood and discard before drawing the specimen tubes for testing.
Procedure for Vein Selection • Palpate and trace the path of veins with the index finger. Arteries pulsate, are most elastic, and have a thick wall. • If superficial veins are not readily apparent, you can force blood into the vein by massaging the arm from wrist to elbow, tap the site with index and second finger, apply a warm, damp washcloth to the site for 5 minutes. Median basalic Median Cephalic Cephalic vein
Performance of a Venipucture • Position the patient. The patient should either sit in a chair, lie down or sit up in bed. • Apply the tourniquet 3-4 inches above the selected puncture site. Do not place too tightly or leave on more than 2 minutes. • The patient should make a fist without pumping the hand. • Select the venipuncture site. • Prepare the patient's arm using an alcohol prep. • Cleanse in a circular fashion, beginning at the site and working outward. • Allow to air dry. • Grasp the patient's arm firmly using your thumb to draw the skin taut and anchor the vein. The needle should form a 15 to 30 degree angle with the surface of the arm. Swiftly insert the needle through the skin and into the lumen of the vein. Avoid trauma and excessive probing.
Venipuncture Procedure after Tracing the Vein • When the blood is drawn is , remove the tourniquet. • Remove the needle from the patient's arm using a swift backward motion. • Press down on the gauze once the needle is out of the arm, applying adequate pressure to avoid formation of a hematoma. • Dispose of contaminated materials/supplies in designated containers. • Mix and label all appropriate tubes at the patient bedside. • Deliver specimens promptly to the laboratory.
Blood won’ t flow • If you do not see blood flow, the tip of the needle: • May not yet be within the vein. • May have already passed through the vein. • May have missed the vein entirely. • May be pushed up against the inside wall of the vein.
Move forward Move backward If An Incomplete Collection Or No Blood Is Obtained A hematoma forms under the skin adjacent to the puncture site - release the tourniquet immediately and withdraw the needle. Apply firm pressure. Adjust the angle Loosen the tourniquet Withdraw and pressure for 5 min
Performance of a fingerstick • The best locations for fingersticks are the 3rd (middle) and 4th (ring) fingers of the non-dominant hand. • Do not use the tip of the finger or the center of the finger. • Avoid the side of the finger where there is less soft tissue, where vessels and nerves are located, and where the bone is closer to the surface. • The 2nd (index) finger tends to have thicker, callused skin. • The fifth finger tends to have less soft tissue overlying the bone. • Avoid puncturing a finger that is cold or cyanotic, swollen, scarred, or covered with a rash.
Using a sterile lancet, make a skin puncture just off the center of the finger pad. • The puncture should be made perpendicular to the ridges of the fingerprint so that the drop of blood does not run down the ridges. • Wipe away the first drop of blood, which tends to contain excess tissue fluid. • Collect drops of blood into the collection device by gently massaging the finger. • Avoid excessive pressure that may squeeze tissue fluid into the drop of blood.
Blood Collection on Babies • Prewarming the infant's heel is important. • Clean the site to be punctured with an alcohol sponge. Dry the cleaned area with a dry cotton sponge. • Hold the baby's foot firmly to avoid sudden movement. • Do not use the central portion of the heel because • you might injure the underlying bone, which is closeto the skin surface.
Do not use a previous puncture site. • Make the cut across the heel print lines so that a drop • of blood can well up and not run down along the • lines. • The recommended location for blood collection on a newborn baby or infant is the heel. • The diagram below indicates ingreen the proper area to use for heel punctures for blood collection:
To prevent a hematoma • Puncture only the uppermost wall of the vein. • Remove the tourniquet before removing the needle. • Use the major superficial veins. • Make sure the needle fully penetrates the upper most wall of the vein. (Partial penetration may allow blood to leak into the soft tissue surrounding the vein by way of the needle bevel). • Apply pressure to the venipucture site.
To prevent hemolysis • Mix tubes with anticoagulant additives gently 5-10 times. • Avoid drawing blood from a hematoma. • Avoid drawing the plunger back too forcefully, if using a needle and syringe. • Make sure the venipucture site is dry. • Avoid a probing, traumatic venipuncture.
Hemoconcentration • An increased concentration of larger molecules and formed elements in the blood may be due to several factors: • Prolonged tourniquet application (no more than 2 minutes). • Massaging, squeezing, or probing a site. • Long-term IV therapy.
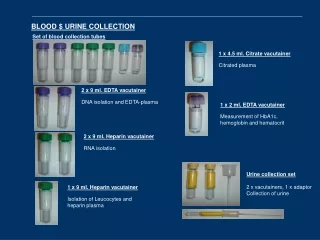
Anticoagulants • The blood is withdrawn from the patient, it is mixed with an anticoagulant to prevent coagulation. • The three most commonly used anticoagulants in the hematology laboratory are discussed below: 1- EDTA: • Is generally available as the sodium, dipotassium or tripotassium salt of ethylene diamine tetra acetic acid. It is used in concentration of (1.5±.25). • EDTA prevents coagulation by binding the calcium in the blood (calcium is required for blood coagulation).
Excessive concentration of EDTA cause: • Shrinkage of the red blood cells leading to decreased hematocrit increased MCHC, falsely low ESR. • Degenerative changes in the white cells and the platelets will swill and break up causing a falsely increased in platelet counts.
2- Sodium citrate: • Used for coagulation studies in a concentration of 1 part 0.109M sodium citrate (tri sodium citrate dehydrate) to 9 part whole blood. • Sodium citrate prevents coagulation by binding the calcium of the blood in a soluble complex. 3- Heparin: • May be used in concentration of 15 to 30 units/ml of whole blood. its may cause clumping of platelets and white cells. • Coagulation is prevented by interaction with anti thrombin III and subsequent inhibition of thrombin.