Download

1 / 57
630 likes | 956 Vues
Vacuum Blood Collection . Terry Kotrla, MS, MT(ASCP)BB Fall 2005. Introduction. The vacuum blood collection system consists of a double-pointed needle, a plastic holder or adapter, and a series of vacuum tubes with rubber stoppers of various colors.

E N D
Vacuum Blood Collection Terry Kotrla, MS, MT(ASCP)BB Fall 2005
Introduction • The vacuum blood collection system consists of a double-pointed needle, a plastic holder or adapter, and a series of vacuum tubes with rubber stoppers of various colors. • The evacuated tube collection system will produce the best blood samples for analysis. • The blood goes directly from the patient vein into the appropriate test tube.
Multi-Sample Needle • The bevel is the slanted opening at the end of the needle. • Needle length (shaft) ranges from 1 to 1 ½ inches. • Threaded hub screws into needle holder • The rubber sheath makes it possible to draw several tubes of blood by preventing leakage of blood as tubes are changed.
Bevel • Bevel is slanted opening at end of needle. • Needle must be oriented so that bevel faces up prior to insertion.
Needle Gauge • The gauge of a needle is a number that indicates the diameter of its lumen. • The lumen, also called the bore, is the circular hollow space inside the needle. • The higher the gauge, the smaller the lumen. • The most frequently used gauges for phlebotomy are 20, 21 and 22
Holder • The holder for vacuum blood collection is a plastic sleeve into which the phlebotomist screws the double pointed needle. • The most current guidelines require that all holders are for single use only.
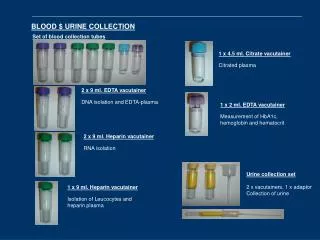
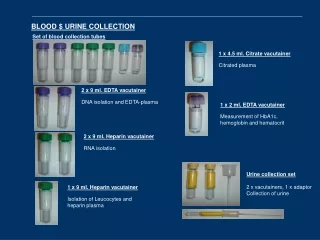
Vacuum Collection Tubes • Vacuum collection tubes are glass or plastic tubes sealed with a partial vacuum inside by rubber stoppers. • The air pressure inside the tube is negative, less than the normal environment. • After inserting the longer needle into the vein, the phlebotomist pushes the tube into the holder so that the shorter needle pierces the stopper. • The difference in pressure between the inside of the tube and the vein causes blood to fill the tube. • The tubes are available in various sizes for adult and pediatric phlebotomies
Additives • Different blood tests requires different types of blood specimens. • Most tubes have additives called anticoagulants which prevent clotting/coagulation of the blood. • Plastic tubes may have an additive to enhance clotting of the blood
Anticoagulants • Anticoagulants are already in the tubes in the precise amount needed to mix with the amount of blood that will fill the tube. • The color of the stopper on each tube indicates what, if any, anticoagulant the tube contains. • It is important to completely fill each tube so that the proportion of blood to chemical additive is correct, otherwise, the test results may not be accurate or the specimen will be rejected and will need to be recollected. • It is also important to thoroughly mix the blood with the additive by gentle inversion
Red • http://www.austincc.edu/kotrla/phb_red • No additive in glass tube • Clot activator in plastic tube • No anticoagulant present • Tests using serum which include: most blood chemistries, AIDS antibody, viral studies, serology tests, Blood Bank testing.
Red and black mottled (SST)Hemogard = Gold • SST = Serum Separator Tube • silicone/gel (serum separating material) • All tests using serum except Blood Bank
Red and black mottled (SST) • Using BD SST Tubes • http://tinyurl.com/8jznm • Purpose of gel is to separate serum from cells permanently
(Light) Blue • http://www.austincc.edu/kotrla/phb_ltblue • Additive - Sodium Citrate • Tests drawn: Coagulation studies: PT, PTT and fibrinogen • MUST BE FILLED COMPLETELY!!! NO EXCEPTIONS
Lavender Top Tube • http://www.austincc.edu/kotrla/phb_purple • Additive = EDTA (ethylenediaminetetraacetic) • Hematology studies: CBC, WBC count, Hemoglobin, Hematocrit, Platelet count, Reticulocyte count, differential.
Green • http://www.austincc.edu/kotrla/phb_green • One of the following: sodium heparin, lithium heparin or ammonium heparin. • STAT blood chemistries utilizing plasma.
Green PST • Additive is heparin • PST = Plasma Separator Tube • Has gel which, after centrifugation, permanently separates plasma from red blood cells
Gray • http://www.austincc.edu/kotrla/phb_gray • Additive (read label): • Potassium oxalate and sodium fluoride, • or lithium iodacetate and heparin • Glucose, Blood Alcohol (ethanol) levels, lactic acid
Black • Buffered Sodium Citrate • Westergren sedimentation rate determination • MUST BE FILLED COMPLETELY!!! NO EXCEPTIONS
Royal Blue • Color of tube label indicates additive, if any: • purple - EDTA • green - heparin • red – none • Trace metal analysis, nutrients and toxicology studies. • Antimony Arsenic, Cadmium, Calcium, Chromium, Copper, Iron, Lead, Magnesium, Manganese, and Zinc are examples.
Brown/Tan • Additive = Sodium Heparin or K2 EDTA • Specifically for lead analysis although royal blue can be used.
Yellow • Sodium polyanethol sulfonate (SPS) • SPS for blood culture specimen collections in microbiology. • Tube inversions prevent clotting. • Acid citrate dextrose additives (ACD) • ACD for use in blood bank studies, HLA phenotyping, DNA and paternity testing.
Blood Cultures • Not for laboratory analysis, special collection to detect bacteria growing in blood. • Site preparation VERY important. • Will be covered later.
Order of the Draw • 1. Sterile/Blood cultures • 2. Blue coagulation tube • 3. Red • 4. Other additives • Green • Lavender • Gray
Patient Identification • It is vitally important that the phlebotomist correctly identifies the patient. • Do not offer the patient a name to respond to. • All hospitalized patients have an identification arm band with their name, hospital identification number and other pertinent information. • Alwayscompare the laboratory test request slip name and ID number with the name and ID number on the patient's hospital arm band. • If there is anydiscrepancy, do not draw the patient's blood. • For an out-patient, verify the patient's identity by having the patient give you additional identifying information such as a social security number, date of birth or address.
Preparation • wash or disinfect his or her hands • Identify patient • Introduce yourself, state your mission • "Have you ever had your blood drawn before?" • If no, explain the procedure • Choose the appropriate tubes for the tests requested
Tourniquet Application • Apply approximately 3-5 inches above antecubital fossa. • If the skin appears blanched above and below the tourniquet it is too tight. • If your finger can be inserted between the tourniquet and the patient's skin it is too loose.
Palpate • After tourniquet application have patient clench fist. • Feel for a vein that rebounds (bounces) when pushed or tapped on. • PALPATE any potential vein to help determine size, direction and depth. A slight rotation of the arm may help to better expose a vein that may otherwise be hidden.
Vein Selection • Choose the veins that are large and accessible. • Large veins that are not well anchored in tissue frequently roll, so if you choose one, be sure to secure it with the thumb of your nondominant hand when you penetrate it with the needle. • Avoid bruised and scarred areas.
Can’t Feel the Vein? • Tricks to Help Distend Veins: • Have the patient "pump" the hand 3 times. • Don't overdue it because over-pumping can create hemoconcentration • Have the patient dangle arm below the heart level for 1-3 minutes. • Warm the area with a hot pack or warm, moist cloth heated to approximately 42°C. • If all else fails, consult another technician for their opinion and/or intervention.
Veins used for drawing blood • Median cubital vein - first choice, well supported, least apt to roll • Cephalic vein - second choice • Basilic vein - third choice, often the most prominent vein, but it tends to roll easily and makes venipuncture difficult
Median Cubital – first choice • This vein is located in the antecubital fossa. (the area of the arm in front of the elbow) • Well anchored vein, usually large and prominent. • Very few problems. Offering the best chance for a close to painless puncture, as there are few nerve endings close to this vein.
Cephalic Vein-Second Choice • Cephalic vein which is located on the upper or shoulder side of the arm. • This vein is usually well anchored. • The cephalic vein may lie close to the surface. A low angle of needle insertion must be used to avoid possible spurting or blood forming a drop at the puncture site. (15°)
Basilic Vein-Third Choice • Located on the under side of the arm. • In many patients this vein may not be well anchored and will roll, making it difficult to access with the needle. • Syringe draw should be considered as it gives the phlebotomist more control over a rolling vein. Pooling of blood and hematoma formation possible. • The basilic vein is close to the brachial artery so there is more risk of hitting an artery. Exercise caution when drawing from this area. Additionally, this area is often more sensitive, thus a stick is slightly more painful for the patient
Cleansing the Site • After selecting a vein, clean the puncture site with a cotton ball saturated with 70% isopropyl alcohol or prepackage alcohol swabs. Rub the alcohol swab in a circular motion moving outward from the site Use enough pressure to remove all perspiration and dirt from the puncture site. • Discreetly look at the swab when finished, if it appears excessively dirty repeat the cleansing process with a fresh alcohol swab. After cleansing do not touch the site, if the vein must be repalpated the area must be cleansed again. Some experts allow cleansing of the index finger before repalpating but this technique is debatable.
Assemble Equipment • Twist needle into holder. • Select appropriate tubes and insert first tube into holder. • DO NOT remove cap until right before you are ready to stick.
Performing the Stick • Hold the prepared holder with the bevel up. • Use the thumb of the nondominant hand below the puncture site to anchor the vein and pull the skin taut. • The needle entering the site should nottouch the thumb of the phlebotomist. • Position the needle in the same direction as the vein, enter the skin and penetrate the vein at a 15 degree angle in one swift, smooth motion to decrease the patient's discomfort. • If you enter to slowly blood will leak out at the puncture site creating a biological hazard as well as obstructing your view of the puncture site. The bevel of the needle should enter and remain in the center of the vein.
Ending Draw - Release Tourniquet • Tourniquet cannot be in place more than 1 minute. • Release the tourniquet as the last tube is filling. • Use one handed method of release.
Ending Draw • Release last tube from needle. • Hold gauze sponge or biowipe above needle. • Swiftly withdraw needle. • As soon as needle is withdrawn apply pressure to puncture site. • If possible, have patient continue to apply pressure.
Activating Safety Device • As soon as you remove needle and apply pressure activate the safety device. • DO NOT USE YOUR OTHER HAND TO SNAP DEVICE INTO PLACE…EVER!
Needle Disposal • As soon as needle safety device is activated dispose of entire assembly in a biohazard sharps container.
Labeling Tubes • Label all tubes appropriately at the patient’s side. • Do not take unlabeled tubes from the patient’s presence. • Minimum information: • Patient’s full name, last name first • ID number • Date, time and your initials
Checking Site • Gently remove gauze or biowipe. • Inspect area for continued bleeding or swelling. • If all ok place bandaid over site. • Tell patient to remove in 10-15 minutes. • If patient still bleeding DO NOT leave, continue to apply pressure.
Leaving • Discard all used materials – hint- place all wrappers, alcohol swab, needle cap in palm of gloved hand, remove glove. • Thank patient. • Wash hands. • Leave
BD Eclipse • The BD Vacutainer® Eclipse™ Blood Collection Needle is a safety-engineered multi-sample blood collection needle. • It features a patented safety shield that allows for one-handed activation to cover the needle immediately upon withdrawal from the vein and confirms proper activation with an audible click • We will use this device next week.