Download
1 / 118
1.18k likes | 1.49k Vues
Curriculum Verification AND results reporting portal ( cvr ). Louisiana Department of Education. User Guide 2011-2012. John White State Superintendent. Table of contents. Section 1: General Introduction Section 2: Registering User Account-all users (slides 3-16)

E N D
Curriculum Verification AND results reporting portal (cvr) Louisiana Department of Education User Guide 2011-2012 John White State Superintendent
Table of contents • Section 1: General Introduction • Section 2: Registering User Account-all users (slides 3-16) • Section 3: CVR for Superintendents (slides 17-33) • Section 4: CVR for Principals (slides 34-59) • Section 5: CVR for Teachers (slides 60-75) • Section 6: Individual Score Reports (slides 76-87) • Section 7: School-wide Reports (slides 88-95) • Section 8: CVR for Data Managers (slides 96-114)
What is the cvr? • A secure web portal that has multiple functions: • Collects data to fulfill requirements of Act 54 • Annual roster verification process • Gathers more accurate information for use in Value-Added assessment • Reports Value-Added scores to appropriate personnel • It provides user groups with differing capabilities (e.g., Principals have certain access that teachers don’t; CVR data managers have certain access that principals don’t)
Cvr schedule *Roster Verification dates will change annually, as it will always follow testing*
Cvr registration • Who should/can register? • Current year superintendents • Current year district CVR data managers • Current year principals • Current year teachers of core content courses in grades 3-8; 9th grade teachers of Algebra 1 &/or Geometry (3rd and 9th are new for the 2011-2012 school year) • Current year is defined by data submitted to the State through the Profile of Educational Personnel (PEP) database. • Core content courses are defined by state course codes that are aligned with content tested on state assessments.
Cvr registration—how to • To access the CVR… https://leads13.doe.louisiana.gov/cvr • This first page is a welcome page; any important notices will be in red. • Click ‘Continue to Registration/Login Page’
Cvr registration—how to (con’t) • On your first visit, PLEASE review the User Guide, then click on the “Register” button on the right-hand side of the screen • Once you have already registered, you will use your ‘Personal Login Code’ and ‘Password’ on the left-hand side (remember: password IS case-sensitive)
Cvr registration—how to (con’t) • First, select your school district from the drop-down box. • You will have three options to choose from: • 1) you may register using the last four digits of your SSN, first name AND last name, or; • 2) you may register by entering your entire SSN and your first name, or; • 3) you may email the Department at LDOECVR@la.gov; a form will be emailed to you to fill out, and registration will be done in-house.
Cvr registration—how to (con’t) Once you have completed your choice of options, click ‘Submit’ to continue
Cvr registration—how to (con’t) • You will then be asked to create a ‘Personal Login Code’. Choose one that you will remember. See the restrictions/requirements for your login code on the right side of the screen. -Keep your ‘Personal Login Code’ confidential, as you are responsible for it. We can reset your account if you forget, but we do not store login codes. • This is the ‘Personal Login Code’ you must use each time you wish to access the portal.
Cvr registration—how to (con’t) • Click ‘Submit’ to continue
Cvr registration—how to (con’t) • Next you will be asked to create a ‘Password’. Choose one you will remember. See the restrictions/requirements for your ‘Password’ on the right side of the screen. -Keep your password confidential as you are responsible for it. We can reset your account if you forget, but we do not store passwords. • This is the ‘Password’ you must use each time you wish to access the portal. Click “Save Changes” to continue
Cvr registration—how to (con’t) • You will be asked to create two ‘Security Questions’. Make sure to record the answers you provide to these two questions; you will be asked to provide these answers if you forget your login code/password. • Click ‘Submit’ to continue.
Cvr registration—how to (con’t) • The final step in the registration process is to provide an email address. *This email address will be used only to notify you of any changes made to your account. *If you do not have an email, or choose not to provide it, simply check the box below the ‘Submit’ button. • Click “Submit” to continue
Accessing the Cvr • After you have registered, you will be able to access the portal at any time by going to https://leads13.doe.louisiana.gov/cvr • You will need to enter your ‘Personal Login Code’ and ‘Password’ to enter the portal. • If you forget your ‘Personal Login Code’, click on the “I forgot my code” button and follow the directions for creating a new login code. • If you forget your ‘Password’, click on the “I forgot my Password” button and follow the directions for creating a new password.
Cvr for superintendents If a superintendent wishes to name a ‘designee’ to access the CVR, they MUST register their OWN account, and then provide that designee with the appropriate login code and password information.
Cvr for superintendentsVerification progress reports • Click on the ‘Verified Data’ tab at top of page; then ‘Report’, and then ‘Verification Status’. • Make sure the appropriate school year is selected in the drop-down menu for ‘School Year’ • NOTE: verification progress reports are only available beginning with the 2010-2011 school year • Make sure the appropriate ‘School District’ is selected in the drop-down menu for ‘District’ • NOTE: you will only have access to your own district
Cvr for superintendentsVerification progress reports You may select an individual school, or “ALL” to see the whole district. Click “Run Report” button to generate the report.
Cvr for superintendentsVerification progress reports • Reports will be broken down alphabetically by individual schools who verify data within your district. • The report will inform you which teachers in each school have not yet verified rosters, and the date for those who have completed the process. • At the bottom of each school’s report will be the Number of Teachers Verified; the Number of Teachers Not Verified, and Total Number of Teachers.
Cvr for superintendentsVerification progress reports • You can also view the counts of teachers and principals who have/have not verified rosters. • Click on the ‘Verified Data’ tab at top of page; then ‘Report’, and then ‘Verification Counts’. • Make sure the appropriate school year is selected in the drop-down menu for ‘School Year’ • NOTE: verification progress reports are only available beginning with the 2010-2011 school year • Make sure the appropriate ‘School District’ is selected in the drop-down menu for ‘District’ • NOTE: you will only have access to your own district
Cvr for superintendentsVerification progress reports Click “Run Report” button to generate the report. It will be in a PDF Format and can be printed and/or saved.
Cvr for superintendentsVerification progress reports • Reports will be broken down by individual schools who verify data within your district. • The report will inform you of the total number of principals and teachers who have data to verify at each school; the number of principals and teachers who HAVE verified data, and the number of principals and teachers who HAVE NOT verified data within the school. • *Counts are based upon data submitted through PEP; some assistant principals MAY be included with principals, depending upon how they are listed in the Profile of Educational Personnel database
Cvr for superintendentsteacher results reports • Superintendents will have access to all of the teachers within their district, and only their district, who receive a Value-Added result. • Results may be viewed in two separate formats: • Results may be viewed by individual teacher, or • Results may be viewed by entire school
Cvr for superintendentsindividual teacher reports • Click on the ‘Teacher Results Report’ tab at the top of the page. • Click on the ‘View by Teacher’ tab. • Select the appropriate school year in the drop-down box for ‘School Year’. • Select the appropriate district, if necessary, in the drop-down box for ‘School District’. • Select the appropriate school in the drop-down box for the ‘School’ of the teacher whose results you wish to view. • Select the teacher’s name you wish to view, from the drop-down box for ‘Teacher’.
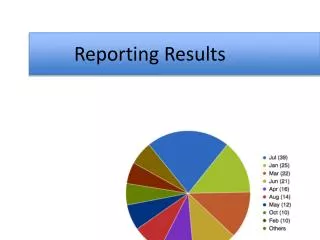
Cvr for superintendentsindividual teacher reports • Select the result category you would like to view for that teacher in the drop-down box directly above the results table • You have the option to view results by ‘Overall Composite Rating’, by ‘Overall Achievement Results’ in each content area, and broken down by content for the following: • Achievement Groups • Students with Disabilities • Lunch Status • Limited English Proficiency Status
Cvr for superintendentsindividual teacher reports You can print each individual teacher’s report, or the reports of all teachers. There are two ‘print’ tabs below the report that will cause a PDF file to pop up; the file can then either be saved or printed.
Cvr for superintendentsall teachers reports • Click on the ‘Teacher Results Report’ tab at the top of the page. • Click on the ‘View All Teachers’ tab. • Select the appropriate school year in the drop-down box for ‘School Year’. • Select the appropriate district, if necessary, in the drop-down box for ‘School District’. • Select the appropriate school in the drop-down box for the ‘School’ you wish to view.
Cvr for superintendentsall teachers reports • Select the result category you would like to view for teachers in the drop-down box directly above the results table. • You will have the option to view school-wide results by ‘Overall Value-Added Composite Rating’ and a summary report of ‘Overall Achievement Results’. Results are also broken down, by content area, for the following categories: • Achievement Groups • Students with Disabilities • Lunch Status • Limited English Proficiency Status • NOTE: If there are small numbers at the bottom of the table, this means there are multiple pages of results. Click on the next page number to view the next table of results.
Cvr for superintendentsall teachers reports • You will have the option to print the school-level teacher report. • Click on the ‘Print Category’ button below the table • A PDF document will be generated that you can save and/or print.
Cvr for superintendentsall teachers reports • You will have the option to print the school-level teacher report. • Click on the ‘Print Category’ button below the table • A PDF document will be generated that you can save and/or print.
Cvr for principals If a principal wishes to name a ‘designee’ to access the CVR, they MUST register their OWN account, and then provide that designee with the appropriate login code and password information.
Cvr for principalsRoster Verification-by teacher • If need be, principals can view each teacher’s roster, and make any changes necessary. • Select ‘Student List’ tab at top of page, then select the ‘Update’ tab below that. • This will give the option to view individual teacher rosters. • Select the appropriate year from the drop-down box for ‘School Year’. • Select the appropriate district, if necessary, from the drop-down box for ‘School District’. • Select the appropriate school, if necessary, from the drop-down box for ‘School’. • Select the teacher name of the roster(s) you wish to view, from the drop-down box for ‘Teacher’.
Cvr for principalsRoster Verification-by teacher • That teacher’s course list will appear in a table on the left side of the page. • NOTE: if there are small numbers at the bottom of the table, that means there are multiple pages of courses. Click on the next number to view the next table of classes. • Click on the ‘Select’ text next to the class code to display the roster. The roster will appear on the right side of the screen.
Cvr for principalsRoster Verification-by teacher Look through the roster and determine if: 1) The student was in class from Oct. 1 2011 to April 6, 2012—do nothing. 2) The student’s name needs to be removed from the roster, for any reason, click the “Remove From List” button. 3) A student’s name is missing from the roster, click the “Add Student” button….
Cvr for principalsRoster Verification-by teacher Type in the student’s first and/or last name, then ‘Go!’ A list of names that meet those criteria will appear. Click the “Add-Student” text next to the correct name. When you have added ALL students necessary, click ‘Return To Student Update List’…. *NOTE: Only students from within your district can be added by the principal or teacher. Out-of-district students CANNOT be added to a roster. Please create a list of these students, send it to LDOECVR@la.gov, and they will be added for you.
Cvr for principalsRoster Verification-by teacher And now your roster includes those students you just added. Their names will appear in green. Continue this process for each of the classes listed on the roster.
Cvr for principalsRoster Verification-viewing changes • Select ‘student list’ tab at top of page • Select ‘update (changes only)’ tab below that. • Select the appropriate school year, district, and school (if necessary) from the drop-down boxes.
Cvr for principalsRoster Verification-viewing changes • All changes made by teachers in that school will be listed. Those students added will have a “Y” under the ‘Student Added’ column; those to be removed from the roster will have the ‘Not In Class’ box checked. Small numerals at the bottom of the table would indicate multiple pages.
Cvr for principalsRoster Verification-viewing changes • As principal, you can override changes teachers have made to their rosters. • These changes can either be made in the teacher’s individual roster, or when viewing all changes made by all teachers. • If a student was added incorrectly, simply click the ‘Not In Class’ box. • If a student was incorrectly marked to be removed, simply uncheck the ‘Not In Class’ or ‘Remove From List’ box. • If a student was NOT added, but should have been, you can add that student, as well.
Cvr for principalsRoster Verification Once all rosters, of all teachers, have been verified, the principal must certify that he/she has checked that all necessary adjustments have been made. • Select ‘Student List’ tab. • Select the ‘Complete Verification’ tab under that. • Check the box. • Click the ‘Verification Completed’ button.
Cvr for principalsviewing verified data • Select the ‘Verified Data’ tab at top of screen. • Select the ‘View’ tab on the left. • This will allow you to see the data that the teacher will be submitting/has submitted for the portal. • Select the appropriate district, school and year from the drop-down boxes, if necessary. • Select the teacher’s name from the drop-down box for ‘Teacher’ whose verified rosters you would like to view. • That teacher’s classes will then appear in a table at the bottom. • NOTE: small numerals at the bottom of the table indicate multiple pages. Click on the next page number to view the next table of classes.
Cvr for principalsviewing verified data Click on the ‘Select’ text next to the class you wish to view. The roster for that class will appear here, on the right-hand side of the screen.
Cvr for principalsviewing verified data Changes made to roster will be reflected. Students’ names to be removed will be marked ‘Not in Class’; students’ names added will be noted in green, and those for whom no changes were necessary will have no marks, and will be noted in black.
Cvr for principalsVerification progress reports • Click on the ‘Verified Data’ tab at top of page; then ‘Report’, and then ‘Verification Status’. • Make sure the appropriate school year is selected in the drop-down menu for ‘School Year’ • NOTE: verification progress reports are only available beginning with the 2010-2011 school year • Make sure the appropriate ‘School’ is selected in the drop-down menu. • NOTE: you will only have access to your own school
Cvr for principalsVerification progress reports Click “Run Report” button to generate the report. The report will be in a PDF format, which can be saved to your computer, or printed.
Cvr for PRINCIPALSviewing individual teacher reports • Click on the ‘Teacher Results Report’ tab at the top of the page. • Click on the ‘View by Teacher’ tab. • Select the appropriate school year in the drop-down box for ‘School Year’. • Select the appropriate district, if necessary, in the drop-down box for ‘School District’. • Select the appropriate school, if necessary, in the drop-down box for the ‘School’ of the teacher whose results you wish to view. • Select the teacher’s name you wish to view, from the drop-down box for ‘Teacher’.