Download
1 / 29
290 likes | 424 Vues
Go to the Roseville City School District Website and pull down the Employees menu. Then click Online Services. Scroll down until you see Global Scholar- Pinnacle Instruction. Click on the words: Global Scholar- Pinnacle Instruction. Teacher ID number. Teacher ID number.

E N D
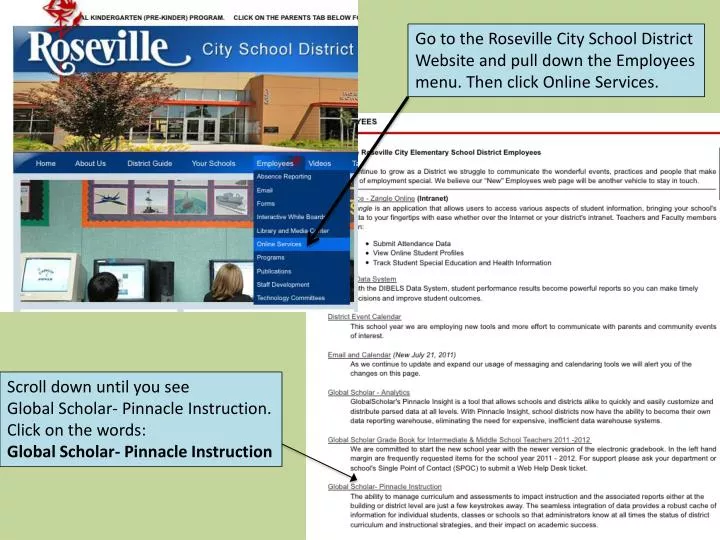
Go to the Roseville City School District Website and pull down the Employees menu. Then click Online Services. Scroll down until you see Global Scholar- Pinnacle Instruction. Click on the words: Global Scholar- Pinnacle Instruction
Teacher ID number Teacher ID number Log into Instruction using your teacher ID and your password.
1 To be able to see all of the left side of the screen, Click here, hold and drag to the right. Click on Math. 2
To Expand Content Standards & Formative Assessments, click the Plus sign in the box. 1 2 Click on the Plus sign next to Algebra/Functions.
2 Click New. 3 Click on Assessment. 1 Highlight Trimester 1.
Give your assessment a title. 1 2 Choose the Assessment Type.
1 Choose the amount of points. 2 If you do not put any time in the Duration field, it will default to 30 minutes. This does not change anything. You can leave it blank or give it a time. 3 If you want to give a description of the assessment, type it here.
You have a couple of choices when creating questions for your assessment. These are the directions for building an assessment using questions of your own. 2 Choose Multiple Choice… 1 Pull down the Add Items Menu.
You can type your question directly into this box. Or you can copy and paste questions into this box from an older assessment
Decide which Answer will be the correct choice. Make sure you click the circle below the answer choice to designate which answer is correct. Type your answer choice in this box. Scroll down after each answer you type to fill out the next answer choice.
Click the box next to which standard your question relates to.
When you are finished, click Add to continue adding more questions. Or click Add & Close to view your question(s).
Review your assessment and then click “Next”.
If you are not ready to schedule a test, you can click “Finished”. Or if you are ready to Schedule, click “Finished & Schedule”. For this example, we are going to click “Finished & Schedule”.
Choose the type of assessment: a) Paper b) Online
If you chose Paper test, you need to fill out the Scheduling options.
Be sure to consider the print layout of your test. You have three options.
Choose your Print format, by deciding either a Combined Booklet that includes both questions and bubbles or Separate question and response sheets.
When you are finished with the Scheduling Options, click Preview to see what your assessment looks like. Your Preview will automatically download using either Preview or Adobe Reader.
When this window appears, change the Save File to Open with. Then click “Choose”. You will have to choose the application that you want to open the preview in.
If you chose to open the file using Preview, then click Preview and then Open. Then click OK. If you chose to open the file using Adobe Reader, then click Adobe Reader and then Open. Then click OK.
Now you are ready to Schedule your assessment. Click Schedule.
1 Your assessment is now Scheduled. 2 Now click At A Glance.
You now can see your assessment under Lesson Plan. Click on the assessment.
2 Click Print assessments 1 Click through each of the tabs to review your assessment.