Perspective Projection Sample
Learn to draw given projections, produce a perspective view of a trophy, locate vanishing points, draw height lines, and apply dimensions effectively.


Perspective Projection Sample
E N D
Presentation Transcript
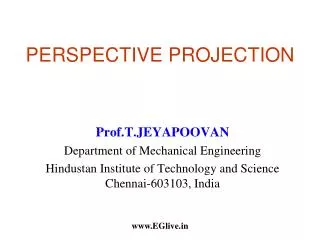
A We are given the projection of a trophy. We must; Draw the given projections. Produce a perspective projection of the trophy when the spectator is located 100mm from the point A and the horizon line is 100mm above the ground line. The picture plane passes through point A
Locating Auxiliary Vanishing Points. Height Lines. Locating the Picture Plane Drawing Perspective Views. Picture Plane The height of the solid cannot yet be applied, a height line will be constructed in order apply heights and dimensions given. Auxiliary Vanishings Points are found by drawing a line from the spectator parallel to the slope that need vanishing. Join the extremities of the solid to the spectator, bisect this angle to locate centre line of vision, the picture plane will be perpendicular to this line. Aux VP1 For points in front of picture plane lines of vision go from the spectator to the solid and back to pierce the picture plane. Horizon Line For points behind the picture plane lines of vision go from the spectator to the solid, piercing the picture plane on the way. 25o Extend a plane from the centre of the solid till it hits the picture plane, heights can be applied where they intersects. If the slope is moving upwards as it goes away from the spectator, then aux V.p. is above the horizon line. If slope is going downward then aux V.p. is below the horizon line. VP1 VP2 Draw the ground line, the horizon line is above this at the spectators eye level. Complete the straight section of trophy, use heights from drawing. Aux VP2 Locating Vanishing Points. Where the lines of vision pierce the picture plane vanish back to the V.p’s to outline the base. Apply heights of the cut out sections onto the height lines, then use auxiliary V.p’s to complete sections. Vanishing points are found by drawing a line from the spectator parallel to the principal axes of the object. Ground Line Point on curve. Points on Picture Plane The sloping surfaces are vanished back to the auxiliary V.p’s. Where the line intersect gives a point that can be vanished back. Curves in Perspective Use construction lines on the solid to locate points on the curve. Spectator Repeat process to locate more points on curve then complete perspective. Note; Only one point shown for each curve, for an accurate curve at least four points on each section must be found. As the picture plane passes through the object it will need to be extended below the ground line.
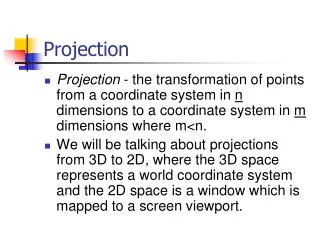
Locate picture plane and vanishing point as shown previously Point a is on the picture plane, drop to ground line and apply heights from drawing. Picture Plane Join the extremities of the solid to the spectator, bisect this angle to locate centre line of vision, the picture plane will be perpendicular to this line. Locate auxiliary vanishing points by extending a line from spectator that is the same angle of the slope, to locate height H. a b c A Draw the ground line parallel to picture plane and locate the horizon above it. Horizon Line VP2 25o S GroundLine Aux VP d Point b: extend a line from b till it hits edge of the solid, bring back to picture plane then drop to perspective as shown. d b a c c b VP1 Point d: is on picture plane so heights can be applied as shown. Repeat to locate point c. Aux VP
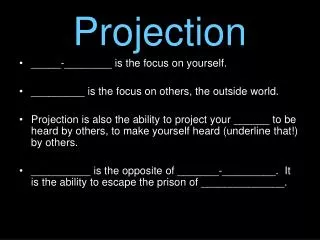
The height of the solid cannot yet be applied, a height line will be constructed in order apply heights and dimensions given. Divide the front view into sections as shown, these lines will enable us to find the cut out sections and points on the curve. Begin with the curve. Repeat the process with height lines 3 & 4 to locate more points on curve. Picture Plane Once curve is completed located heights 5&6 on the height line and vanish back. Extend a line from the centre of the solid till it hits the picture plane Apply height 2 to the height line. Next we will located the cut out sections. Drop the widths from the plan. Where this crosses the centre line vanish back, the point on the curve will cross vanished line. Where this line intersect the PP drop to ground line. True height can now be applied to this line and vanished back where required. Horizon Line VP2 1 2 Locate point on curve in plan. Drop to perspective. 3 S 5 Ground Line 1 4 2 Aux VP 6 3 5 4 6 VP1 Vanish the points along the centreline of face back to the auxiliary vanishing points to complete the cut out sections as shown. Point on curve. Aux VP
DCG Solutions • We hope you enjoyed your free sample • For more information on the Teaching Package or the Student Study Guide contact me at kora@dcgsolution.org