Peripheral Devices For ML310 Board
340 likes | 469 Vues
Project name :. Peripheral Devices For ML310 Board. Spring Semester 2005 Final Presentation. Presenting :. Erez Cohen & Shay Yosef. Supervisor :. Inna Rivkin. Contents. Project Goals Tools & design ’ s main flow Drivers & supported peripherals Accessed Peripherals Project website.

Peripheral Devices For ML310 Board
E N D
Presentation Transcript
Project name : Peripheral Devices For ML310 Board Spring Semester 2005 Final Presentation Presenting : Erez Cohen & Shay Yosef Supervisor : Inna Rivkin Part B Final Presentation
Contents • Project Goals • Tools & design’s main flow • Drivers & supported peripherals • Accessed Peripherals • Project website Part B Final Presentation
Project Main Goal The ML310 evaluation board is one of the major hardware platform for projects in the High Speed Digital System Lab, therefore our main project goal is : • Creating comfortable Platform for future projects on the ML310 Board In order to allow students to focus on their specific project modules and not to waste valuable time understanding how to operate the board and its peripherals. Part B Final Presentation
Part A Goals Standalone • Collect information about the peripherals of the ML310 Board. • Operate the peripherals of the ML310 Board in Standalone mode. • Arrange all collected information about the ML310’s peripherals and the way to operate them, into a simple & comfortable html format. Part B Final Presentation
Part B Goals • Learn Xilinx’s & Montavista’s tools in order to work with Linux operating system on the board. • Operate the board and it’s peripherals using Montavista Linux. • Add all collected information & examples to the project’s website. Part B Final Presentation
Part A Achievements • We collected a lot of information about the ML310 Board and it’s peripherals. • We operated the following peripherals of the ML310 Board in Standalone mode:LEDs - LCD - DDR Memory - UART - Parallel Port - • We researched the ALI south bridge and understood how to operate the peripherals connected to it. • We implemented the basic protocols of the Parallel Port, and printed text using a printer connected to the port. • We arranged all the collected information into a simple & comfortable html format. Part B Final Presentation
Contents • Project Goals • Tools & design’s main flow • Drivers & supported peripherals • Accessed Peripherals • Project website Part B Final Presentation
Xilinx - EDK • Generate & configure the HW: • Create Basic project. • Add additional modules. • Resource allocation & SW setting. • Generate netlist & bitstream files. • Generate .ace file (root file system) after configuration of the kernel with montavista’s tools. Part B Final Presentation
Montavista - DevRocket • Create & Configure the kernel. • Add user additional software/drivers. • Compile the kernel. • Generate the zImage.elf file. Part B Final Presentation
Design main flow Phase 1: Determine system structure (EDK) • Download basic design from Xilinx new disk. • Open the .xmp file with Xilinx Platform Studio tool (EDK). • Generate netlist & bitstream files. Part B Final Presentation
Design main flow Part B Final Presentation
Design main flow Phase 1: Determine system structure (EDK) • Change SW setting for Linux BSP. • Set the appropriate parameters of the target(memory size, clock freq. etc…). • Generate the libraries. Part B Final Presentation
Design main flow Part B Final Presentation
Design main flow (continue) Phase 2: create the kernel (DevRocket) • Create new kernel project. • Download Linux configuration file (pci compatible) from Xilinx new disk. • Change the basic configuration using the configuration interface: Part B Final Presentation
Configuration window (example) It is possible to compile the drivers as a part of the kernel ([*]) or as a module (<M>) which would be accessed and changed later. A <driver>.o file will be generated. Part B Final Presentation
Design main flow (continue) Phase 3: Build Root Filesystem (EDK) • Copy the zImage.elf file to the edk project. • Use the Xygwin shell to create .ace file. • Copy the ace file to cf6 or cf7 in the Flash disk. Part B Final Presentation
Design main flow (continue) Part B Final Presentation
Design main flow (continue) Phase 4: set up debug/boot configuration • Connect the flash disk to the board and Set the Dip Switches on the board to 000 (where the boot loader is): • Use TeraTerm to connect between the PC and the board through serial cable. • Reset the board, choose the number of the folder where the kernel is located and Login. Part B Final Presentation
Contents • Project Goals • Tools & design’s main flow • Drivers & supported peripherals • Accessed Peripherals • Project website Part B Final Presentation
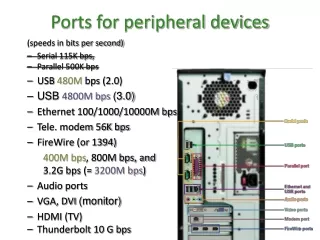
Drivers & supported Peripherals • SysAce Driver: The driver for the System Advanced Configuration Environment (ACE) controller supports the Compact Flash solution - The driver provides a user the ability to access the Compact Flash through the System ACE device. • UART Driver: The driver support the features of XILINX 16450/16550 compatible UART. • PCI Driver: The driver provides full bridge functionality between the local bus and a 32 bit V2.2 compliant PCI bus. Part B Final Presentation
Drivers & supported Peripherals • PLB to OPB Bridge Driver: This driver allows the user to access the Bridge registers to support the handling of bus errors and other access errors and determine an appropriate solution if possible. • PLB Arbiter Driver: This driver allows the user to access the PLB Arbiter registers to support the handling of bus errors and other access errors and determine an appropriate solution if possible. Part B Final Presentation
Drivers & supported Peripherals • Ethernet Driver: supports 100 Mbit ethernet. • Video card Driver: Full support only to Matrox Millennium video card (other cards require additional drivers). • Mice Driver: full support. • Keyboard Driver: full support. • Sound Driver: supports several sound drivers. The ALI south bridge contains audio HW which can be used. • IDE Driver: supports IDE connection through the ALI south bridge (PCI). Part B Final Presentation
Drivers & supported Peripherals • Parallel Port Driver: supports parallel port drivers & IEEE 1284 protocols. It is possible to print text files.For advanced printing or for using other devices connected to the parallel port, additional drivers are required. • USB Driver: supports many devices connected through the USB port. Mass Storage devices are fully supported using mount system. Part B Final Presentation
Contents • Project Goals • Tools & design’s main flow • Drivers & supported peripherals • Accessed Peripherals • Project website Part B Final Presentation
Accessed Peripherals • Sound: To play an audio file, use the command:cat <path to the audio file> > /dev/dsp. • UART: We connected the board to the PC through the COM1 connector. • Ethernet: We used the mount system to mount shared folders in the PC to the Linux using the Ethernet connection.PC IP – 192.168.10.1 , Board IP – 192.168.10.2 • USB: We connected a USB mass storage device (Disk on Key) and mounted its folders to the Linux system. Part B Final Presentation
Accessed Peripherals • PCI – video card: We connected the board to a screen using PCI Matrox Millennium video card, and started a Linux Graphical Environment. • Mouse / Keyboard: We usedthe Mouse and the Keyboard while working in the Graphical Environment. • Parallel Port: We printed text files through the parallel port after applying the necessary kernel configurations. • IDE: We connected Hard drive to IDE connector, and mounted it through the Linux. Part B Final Presentation
Contents • Project Goals • Tools & design’s main flow • Drivers & supported peripherals • Accessed Peripherals • Project website Part B Final Presentation
Project Website The following items will be added to the project website: • All the steps needed in order to create & configure a basic kernel using Xilinx’s and Montavista’s tools. • The necessary setup and connections needed to work with the Linux on the board. • How to use the USB port. • How to mount folders from the PC to the Linux system using the NFS system. • How to setup the graphical environment. • How to configure the kernel to print files through the parallel port,And how to print files. • Basic configurations when working with the kernel. • How to compile example c program (driver) and execute it in Linux. • Useful information on Linux & the tools (docs, links, Howto’s etc..). Part B Final Presentation
Project Website - Overview Part B Final Presentation
Project Website - Overview Part B Final Presentation
Project Website - Overview Part B Final Presentation
Project Website - Overview Part B Final Presentation
Project Website - Overview Part B Final Presentation
Thank You ! Part B Final Presentation