WebTA Timekeeper User Guide
Manage employee profiles, validate T&A records, delegate tasks, search for employees, and correct timesheets in WebTA. Full instructions with screenshots.

WebTA Timekeeper User Guide
E N D
Presentation Transcript
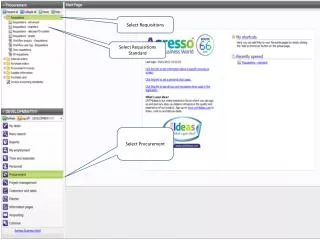
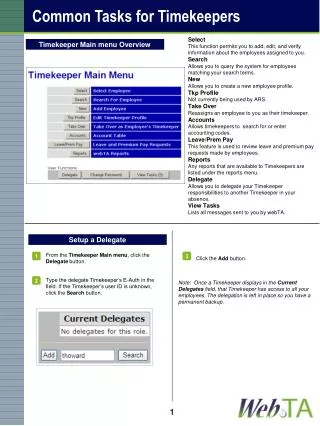
Select This function permits you to add, edit, and verify information about the employees assigned to you. Search Allows you to query the system for employees matching your search terms. New Allows you to create a new employee profile. Tkp Profile Not currently being used by ARS. Take Over Reassigns an employee to you as their timekeeper. Accounts Allows timekeepers to search for or enter accounting codes. Leave/Prem Pay This feature is used to review leave and premium pay requests made by employees. Reports Any reports that are available to Timekeepers are listed under the reports menu. Delegate Allows you to delegate your Timekeeper responsibilities to another Timekeeper in your absence. View Tasks Lists all messages sent to you by webTA. Timekeeper Main menu Overview Setup a Delegate From the Timekeeper Main menu, click the Delegate button. 3 1 Click the Add button. Type the delegate Timekeeper’s E-Auth in the field. If the Timekeeper’s user ID is unknown, click the Search button. 2 Note: Once a Timekeeper displays in the Current Delegates field, that Timekeeper has access to all your employees. The delegation is left in place so you have a permanent backup. 1
Use the Select Employee Tool Use the Search for Employee Tool From the Timekeeper Main menu, click the Select button. From the Timekeeper Main menu, click the Search button. 1 1 Enter some or all of the employee’s first or last name in the designated field. 2 2 Click the radio button preceding the employee’s name. Click the Search button. 3 4 Click the radio button preceding the employee’s name. Click an option from the Selected T&A or Selected Employee buttons. 3 Click an option from the Selected T&A or Selected Employee buttons. 5 2
Add a New Transaction Code Validate a T&A Record Access the employee’s T&A Data page. Access the employee’s T&A Data page. 1 1 Are you entering leave hours? 2 Click the Validate button. 2 Yes - Click the New button in the Leave and Other Time table. If you received any errors or warnings, make the appropriate corrections to the employee’s T&A record and validate the record again. Or, if you did not receive any errors or warnings click OK on the confirmation box. 3 No - Click the New button in the Work Time table. Click the drop-down arrow in the Transaction Code field and select a transaction code. 3 Click the drop-down arrow in the Account field and select an account. 4 Click Save. 5 Note: A T&A record cannot validate while errors are present. You must correct all errors. Note: Employees can record their own T&A data, and cab validate their own time as well. There are cases where Timekeepers for employees may be required to validate. Timekeepers are required to record their employee time and to validate as well. Type the number of hours in each day cell that corresponds to the new leave code. 6 Click the Save/Return button. 7 3
Enter a Corrected T&A Record (historical data that does not exist in webTA) 6 Complete the employee’s T&A Profile. From the Timekeeper Main menu, click the Select button. 1 Click the radio button preceding the employee’s name then click the Correction button. 2 3 Click the radio button preceding the pay period you want to correct. Click Save. 7 Click the Correction button. 4 Note: webTA returns to the Search Results screen. ‘No Data’ displays in the Status column for the record. Select the record and click the Edit T&A button. Click the Add Record button. 8 5 9 Enter the hours in the timesheet. 10 Click Save/Return. Note: An additional row is added to the employee table for the employee with the corrected record. A (C) displays in the Pay Period column to identify the corrected record. 4
Enter a Corrected T&A Record (historical data that exists in webTA) Log out of webTA Click the Logout link in the upper-right corner of any page. 1 From the Timekeeper Main menu, click the Select button. 1 Click the radio button preceding the employee’s name then click the Correction button. 2 Click the ‘X’ in the upper-right corner to close the window. 2 3 Click the radio button preceding the pay period you want to correct. Click the Correction button. 4 Make any necessary edits to the employees timesheet. 5 6 Click the Save/Return button. Note: An additional row is added to the employee table for the employee with the corrected record. A (C) displays in the Pay Period column to identify the corrected record. 5