Download
1 / 6
60 likes | 145 Vues
Explore the detailed build and benefits of a robust swim grid design for boats. Learn how this elevated grid enhances usability and safety, complying with CCG regulations. Discover construction insights for a durable finish.

E N D
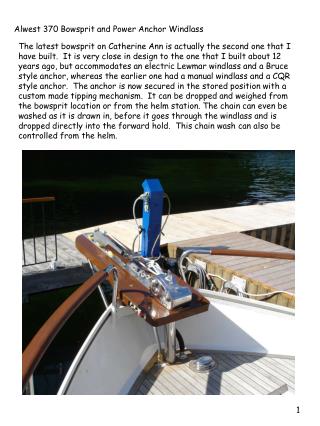
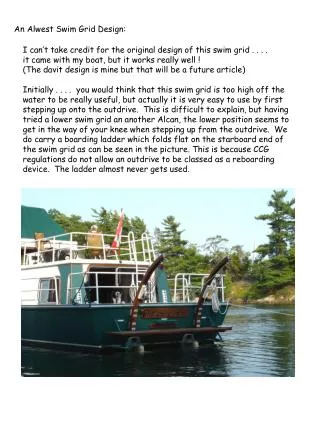
An Alwest Swim Grid Design: I can’t take credit for the original design of this swim grid . . . . it came with my boat, but it works really well ! (The davit design is mine but that will be a future article) Initially . . . . you would think that this swim grid is too high off the water to be really useful, but actually it is very easy to use by first stepping up onto the outdrive. This is difficult to explain, but having tried a lower swim grid an another Alcan, the lower position seems to get in the way of your knee when stepping up from the outdrive. We do carry a boarding ladder which folds flat on the starboard end of the swim grid as can be seen in the picture. This is because CCG regulations do not allow an outdrive to be classed as a reboarding device. The ladder almost never gets used.
The other big plus with this location is that the outdrives can be tipped fully up – without interfering with the swim grid (this is a 1993 “pre-restoration” picture of our boat). The swim grid is supported on 4 pairs of aluminum angles - the inner two with legs down to the hull. - the outer two on each side of centre bars of the outdrive protectors.
When it came time to build a new swim grid a few years ago, (the original had some rotted areas) I tried to think of how I could improve the design . . . . and ended up reproducing it exactly. Both old and new are constructed of alternating strips of Ash/Oak and Mahogany. The original had threaded rod through-bolts and unknown glue. The new one does not have through-bolts and is bonded together with West System Epoxy. It seems to be just as strong as the original. Teak would be a preferred material , but would be many times more expensive. The dimensions are roughly 2” thick x 21” wide x 11’ long I chose a teak stain finish, with about 6 coats of Marine Cetol. Silica sand is sprinkled on the last coat of Cetol while it is still wet, which provides excellent non-slip.
The swim grid is actually two pieces, divided along the seam indicated below, so that the inner piece can be slid in behind the uprights of the outdrive protectors. Angled holes, as shown by the red arrows , allow these uprights to pass through the swim grid. Attachment to the support brackets is by 1 ½” stainless steel screws from the underside.
32” For really heavy use, such as SCUBA diving with lots of people and equipment out on the swim grid, I would increase the sizes of the angles and legs. The wooden swim grid is more than strong enough. On Catherine Ann, a 1972 Alwest 370, the swim grid is 32” above the deepest part of the V bottom. If your outdrives are other than original Volvo 270/280s, I would suggest checking them in the up position before deciding on final swim grid location. This will also have an affect on the width of each piece of the swim grid, and the location of the pass through holes for the outdrive protector uprights.
This gives you a better idea of the construction details and actual distance above the water. Rob Farrow Catherine Ann February 2007