Attachment Selection
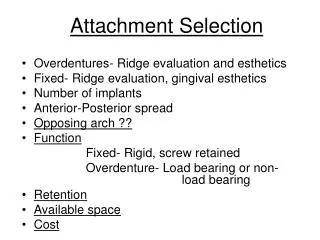
Attachment Selection. Overdentures- Ridge evaluation and esthetics Fixed- Ridge evaluation, gingival esthetics Number of implants Anterior-Posterior spread Opposing arch ?? Function Fixed- Rigid, screw retained Overdenture- Load bearing or non- load bearing Retention

Attachment Selection
E N D
Presentation Transcript
Attachment Selection • Overdentures- Ridge evaluation and esthetics • Fixed- Ridge evaluation, gingival esthetics • Number of implants • Anterior-Posterior spread • Opposing arch ?? • Function Fixed- Rigid, screw retained Overdenture- Load bearing or non- load bearing • Retention • Available space • Cost
Patient Considerations • Parallel attachments for easier path of insertion • Less attachments – better • Patient dexterity • Hygiene – Stannous Fluoride rinses • 3 month recall
Anterior/Posterior Spread A line from the center of the most anterior implant to a line joining the distal aspects of the two most distal implants Indicates the amount of cantilever that can be reasonably placed Usually, 2.5 times the A/P spread
A/P Spread Actual Length of Cantilever Depends on: • Stress factors • Parafunctional Habits • Crown heights • Implant width • Number of implants • Opposing teeth or denture
Controlling Stress Stress=Force/Area Force Stress Area
Torque= Force x Perpendicular distance from the line of force to the center of rotation
Treatment Plan Options Fixed Removable Implant Supported Soft Tissue Supported Implant Retained
Treatment Plan Option 1 Lower Edentulous Fixed 5-6 Implants
Prosthetic Options-Lower5-6 Implants • Hybrid Denture • Fixed Crown and Bridge • Cantilever 10-15mm
6 Implants-Fixed Implant Supported 24 25 23 26 27 22 X X X X
5 Implants- Fixed Implant Supported C D B E A X X X X
Treatment Plan Option 2 Lower Edentulous Removable 5 Implants
Gold Bar w/ O Rings Distalized O Rings Cantilever 10-20mm Gold Bar with Hader Clips Distalized ERA’S Cantilever 10-20mm Prosthetic Options- RemovableOverdenture-Implant Supported C C B D B D A E A E
Treatment Plan Option 3 Lower Edentulous Removable 4 Implants
Gold Bar with O Rings Cantilever 5-10mm Gold Bar with Hader Clips and ERA’S Cantilever 5-10mm Prosthetic Options- RemovableImplant and Tissue Supported b c b c d a d a
Treatment Plan Option 4 Lower Edentulous Removable 3 Implants
Prosthetic Options- Removable Overdenture-LowerImplant and Tissue Supported • Gold Bar w/ 2- O Rings-Overdenture • No Cantilevers
3 Implants- Removable Overdenture Implant and Tissue Supported C D B
Treatment Plan Option 5 Lower Edentulous Removable 2 Implants
Prosthetic Options Removable Overdenture-LowerTissue Supported • Gold Bar w/ Hader Clip • O Ring on each implant • ERA attachment on each implant
2 Implants-Removable Tissue Supported B D
Treatment Plans Upper Edentulous Four Options
Treatment Plan Option 1 Upper Edentulous Fixed 8 Implants
Prosthetic Options Fixed- UpperImplant Supported • Fixed Crown and Bridge • Hybrid Denture • No Cantilevers Necessary
8 Implants- Fixed Implant Supported X X 7 10 6 11 X X 4 13 3 14
Treatment Plan Option 2 Upper Edentulous Removable 8 Implants
Prosthetic Options- 8 Implants Removable- UpperImplant Supported • Gold Bar w/ O Rings- Overdenture • Gold Bar w/ 3 Hader Clips Overdenture- No Palate • Cantilevers-Optional
Gold Bar Overdenture w/ O Rings Gold Bar Overdenture w/ Hader Bar / Clips 8 Implants- Removable Implant Supported 7 10 7 10 6 11 6 11 4 13 4 13 3 14 3 14 Palate No Palate
Treatment Plan Option 3 Upper Edentulous Removable 6 Implants
Prosthetic Options Removable- UpperImplant Supported • Gold Bar w/ 4- O Rings and distal to #s 4 and 13 • Gold Bar w/ Hader Clip- ERAS distal on #4 and 13- Overdenture-No Palate • Cantilever 5-10mm
Gold Bar w/ O Rings 5-10mm Cantilever Gold Bar w/ Hader clips and ERA’s 5-10mm Cantilever 6 Implants- RemovableImplant Supported 7 10 7 10 5 12 5 12 4 13 4 13
Treatment Plan Option 4 Upper Edentulous Removable 4 Implants
Prosthetic Options Removable- UpperTissue Supported • Gold Bar w/4 O Rings- Overdenture w/ No Palate • Gold Bar w/ Hader Clip and 2 distalized ERA attachments w/ Overdenture- No Palate • No Cantilever
Square Arch Tapered Arch Arch Form4 Implants-Tissue Supported 6 11 6 11 5 12 4 13 Maximum contact with tissue – No contact with Bar Attachments are for retention ONLY
Treatment Planning • Design sensibility and flexibility in the treatment plan • Design and implant concepts will vary • Plan ahead for success • Have a disaster plan • In most cases, less attachments are better