Data Director Tutorial for Teachers
Learn how to navigate Data Director after logging in, select teaching periods, create reports, and modify columns for student data analysis. Follow step-by-step instructions to generate student reports efficiently.

Data Director Tutorial for Teachers
E N D
Presentation Transcript
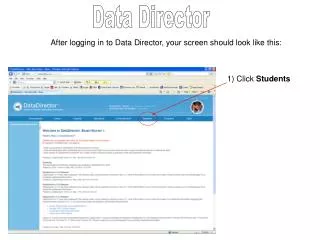
Data Director After logging in to Data Director, your screen should look like this: 1) Click Students
Data Director Your screen should look like this: • Select all the periods you are teaching this year. • Click Go.
Data Director Your screen should look like this: • Click Make This a Report (it will seem as though nothing happened, but it did). The screen will change slightly. • Click Modify Columns. • Please not that all names have been covered up to protect student privacy
Data Director Your screen should look like this: 1) Click Add Another report column.
Data Director Your screen should look like this: • Click Demographics • Your screen should look like this 3) Click Language Fluency
Data Director Your screen should look like this: • Click Primary Language box. • Click Language Fluency box. • Click Proficiency Level box. • Click REFP Date box. • Click Next Step.
Data Director Your screen should look like this: • Click Modify Columns. • Your screen should look like this. Select Add Another Report Column.
Data Director • Click General Demographics. Your screen should look like this. • Scroll down to the bottom of the page.
Data Director Your screen should look like this: • Click GATE. • Click 504 Program. • Click Special Education. • Click Special Education Type. • Click Primary Disability. • Click Next Step.
Data Director 1) Click Modify Columns.
Data Director • Click the Delete box for the following items: • Student ID • Academic Year 2) Scroll to the bottom of the screen and click Save and Return to Results. 3) When prompted select, Yes, Please Delete These Columns.
Data Director Your screen should look like this: 1) Click PDF. 2) You can now save this file to your desktop or select Open to view and/or print your data