Download
1 / 18
180 likes | 255 Vues
Learn about blood composition, antigens, antibodies, and compatibility. Understand blood typing and its importance in transfusions. Discover the relationship between antigens and antibodies.

E N D
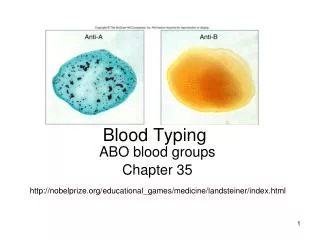
Inheritance and Blood Typing Vanderbilt Student Volunteers for Science Spring 2019 Training Presentation
Important!!! • Please make sure that the students understand that there is no real blood in this lesson. • All solutions are made from chemicals.
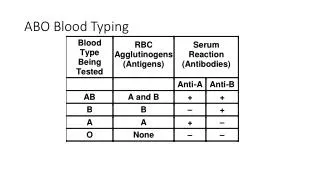
I. Introduction Learning Goals: Students describe the composition of blood, including how antigens and antibodies determine blood type in different individuals. Students understand the relationship between antigens and antibodies, and identify which blood types are compatible as donors and receivers. • How much blood is in the human body? • About 5 liters What is in blood? • Red blood cells (RBC) • White blood cells (WBC) • Plasma • Platelets • What is blood type? • A way to characterize what kind of proteins are present on someone’s red blood cells. • It is determined by the type of antigen that is present on the surface of the red blood cells
II. Red Blood Cell Demo • Show students the bags of blood cells. Tell students that the red donut shape is a model for a red blood cell. The pegs are the antigens (blue is the “A” antigen, yellow is the “B” antigen). The Y-shapes are the antibodies. • Show students the bag containing blood cells that have the blue pegs attached – this red blood cell now has an “A” antigen. It is an Type A blood cell. It also contains a yellow Y-shaped -B antibodies present in the plasma.
II. Red Blood Cell Demo cont. Show students the remaining bags containing blood cells with antigens and antibodies (see lesson).. Type B blood cell with A antibodies Type AB blood cell with no antibodies Type O blood cell with A and B antibodies
ANTIBODIES • If a person’s RBC have one type of antigen (A or B), then their blood contains antibodies to the missing antigen. • eg. If the persons RBC has “A” antigens, then they will have antibodies against the “B” antigen. • Tell students to look at the Table 1 in the handout. • Antibodies help in removing unwanted things from the body. • Antibodies will attack and destroy any transfused or transplanted blood cells with that antigen. • People need to have their blood tested before receiving someone else’s blood. • When blood is donated, the plasma and the RBCs are separated. This ensures that the antibodies (in the plasma) don’t get transferred during the transfusion.
ANTIBODIES cont. • If a person has blood type A, he cannot receive Type B or Type AB blood because the Anti-B antibodies in the recipient’s blood will bind to the B antigen in the donor’s blood and destroy these cells. • Ask students if they can determine what types of blood a person with Type B blood can receive?O and B. • Ask students if they can determine what types of blood a person with Type AB blood can receive?A, B, AB, O. This person is called a universal recipient. • Ask students if they can determine what types of blood a person with Type O blood can receive? • Only O. But this person can give blood to anyone and is called a universal donor.
III. The Kidney Problem Learning Goals: Students understand the relationship between antigens and antibodies, and identify which blood types are compatible as donors and receivers. With support, students identify a method for determining blood type. • Read the kidney scenario in the manual. • Remind the students that the blood samples are not really blood. • In order to donate a kidney (or blood), there must be a match of blood types between the donor and the recipient to prevent the recipient’s antibodies from attacking the donor cells. There is a simple test to determine blood type of the recipient and possible donor. • Antisera are made containing either A antibodies or B antibodies. Serum is a “purified” form of plasma that contains the antibodies. • When the antiserum is added to each blood sample it can react with the blood sample and cause the red blood cells to clump together – this is called agglutination. This would eventually result in clogged blood vessels and cause kidney failure.
III. The Kidney Problem cont. • Show student s the two red blood cell models that are labelled Type “A”. Connect the two blue antigens on the cells with the blue anti-A serum Y- shape. This represents the reaction of clumping or agglutination. • Similarly, show the students to two the red blood cell models that are labelled Type “B”. Connect the two yellow antigens on the cells with the yellow anti-B serum Y- shape. • These results are summarized on the handout in Table 1 and the “Clumping” picture.
III. The Kidney Problem cont. • Students will test the presence of antibodies by adding Anti-A and Anti-B serum to each person’s blood sample. • A sample is positive for an antigen by observing whether agglutination (clumping) occurs. • If the blood clumps for the anti-A serum and not the anti-B serum, then the blood type is A. • If it clumps for the anti-B and not for the anti-A, then the blood type is B. • If it clumps for both, the blood type is AB. • If there is no clumping, then the blood type is O.
III. The Kidney Problem (cont.) • Divide the students into pairs. Pass out safety goggles to each student and one set of materials to each pair of students. • Have students add a squirt of Mrs. Sanderson’s samples to the first two wells in column 1. Add a 2-3 drops of anti-A (blue) to the first well in 1A. Observe whether a precipitate (or cloudiness) occurs - record a “+” if it does, or a “-” if it does not. Add a 2-3 drops of anti-B (yellow) to the 2nd well in column 1 (1B) and record the results. • Repeat with Mr. Sanderson’s samples to the first two wells in column 2, with Jill’s samples to the first two rows in column 3 and with Jack’s samples to the first two rows in column 4 • Tell the students to determine the blood type of each person.
IV. Analysis Learning Goals: Students understand the relationship between antigens and antibodies, and identify which blood types are compatible as donors and receivers. • The data tables show that Mrs. Sanderson has type A. • This means that she has antibodies that attack B antigens. • The family member who donates to her must not have B antigens in order to avoid this. • Therefore, Jack, with blood type O, can donate a kidney to his mother.
V. Blood Genetics and Punnett Squares -Optional Learning Goals: Students use Punnett squares and basic genetics to construct an explanation for why people have certain blood types. • Antigens and thus, blood type, are determined by the genes that get passed on from someone’s parents. • Explain that each parent (and each person) has two blood type alleles. This is what’s known as a genotype, or what genes are in someone’s body. Each parent will pass on one of these genes to their child. • These genes are for the A antigen, B antigen or no antigen (O). • The combination of two of these genes will result in blood type. • Punnett squares can be used to help figure out the possible inherited genetic trait combinations, like blood type (see example on next slide). • Review the terms dominant, recessive and co-dominant
Punnett Square (Optional) • Filling in the Punnett Square: • The mother’s genes(AA) are placed on top of the Punnett square with each gene situated over one column. • The father’s genes (AB) are placed to the side with each gene next to its own row. • One of the mother’s A genes is written in each square below it; similarly, the other A gene is placed in the squares below it. • The father’s A gene is written in both squares to the right of it, as is the B gene. • This process is a simulation of genotypes their children could inherit. • In other words, there is a 50% chance a child will be AA and a 50% chance a child will be AB.
Dominant and Recessive Genes • In the case of blood, the A and B genes are co-dominant. This means that if a child inherits both an A gene and a B gene, both A and B antigens will be found on the surface of an RBC and the phenotype will be AB. • Individuals who have an AO genotype will have an A phenotype. • People who are type O have OO genotypes. In other words, they inherited a recessive O allele from both parents.
Possible Genotypes • Ask students what each family member’s possible genotype is. Write these answers on the board and/or share with the class.
Dominant and Recessive Genes cont. Ask students: If Jack has type O blood, what are the genotypes for his mother and father? Have the students fill out their Punnett square using all the possible genotypes for Mr. and Mrs. Sanderson.
Clean-Up • Empty all the liquids from the well plates and rinse out with water (into a sink). • Return all items to the kit and bring back to the lab