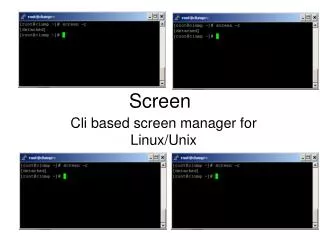
Screen
Screen. ศุภโชค สุขเกษม รหัสนักศึกษา 4322062. Screen. full-screen window manager ทำให้สามารถใช้งานหลายๆ windows (virtual VT100 terminals) พร้อมๆ กันได้


Screen
E N D
Presentation Transcript
Screen ศุภโชค สุขเกษม รหัสนักศึกษา 4322062
Screen • full-screen window manager ทำให้สามารถใช้งานหลายๆ windows (virtual VT100 terminals) พร้อมๆ กันได้ • DEC VT100 terminal และมี control function จากมาตราฐาน ANSI X3.64 (ISO 6429) และ ISO 2022 เพิ่มเติม (เช่น เพิ่ม/ลบ บรรทัด และสนับสนุนสำหรับหลายๆ ชุดตัวอักษร) • มี history buffer สำหรับแต่ละ virtual terminal และ กลไกการ copy /paste สำหรับผู้ใช้ในการย้ายส่วนของข้อความระหว่าง windows ได้
Screen • เมื่อมีการเรียกใช้โปรแกรม Screen มันจะสร้าง window หนึ่งพร้อมกับ shell (หรือ คำสั่งที่ระบุไว้)ใน window • ทุกสิ่งที่ผู้ใช้พิมพ์และส่งไปยังโปรแกรมที่กำลังทำงานอยู่ใน window ปัจจุบัน • ข้อยกเว้นคือจะมีการกำหนดการกดแป้นพิมพ์ไว้ 1 คีย์ที่ถูกใช้เป็นการเริ่มต้นคำสั่งของ window manager ซึ่งโดยปกติแล้วแต่ละคำสั่งจะเริ่มต้นด้วย Ctrl-a (ย่อด้วย C-a)และตามด้วยการกดแป้นพิมพ์อื่นๆ
เริ่มต้นการทำงาน • การเรียกใช้โปรแกรมโดยพิมพ์คำสั่ง screen [-opts] [n] [cmd [args]] เช่น $ screen vi prog.c หรือ $ screen • ทุกๆ คำสั่งของ screen เริ่มต้นด้วย C-a และกด C-a ? เพื่อแสดงคำสั่งของ screen
เริ่มต้นการทำงาน • คำสั่งที่ใช้กันมากสำหรับผู้เริ่มต้นใช้งาน C-ac create new window (shell) C-a k kill the current window C-a w list all windows (the current window is marked with “*”) C-a 0-9 goto window numbered 0-9 C-a n go to next window
เริ่มต้นการทำงาน • คำสั่งที่ใช้กันมากสำหรับผู้เริ่มต้นใช้งาน (ต่อ) C-a C-a toggle between the current and previous window C-a [ start copy mode C-a ] paste copy text C-a ? help (display list of command) C-a \ quit screen
เริ่มต้นการทำงาน • คู่มือรายละเอียดการใช้งาน $ man screen
COMMAND-LINE OPTIONS -c file ใช้ fileที่ระบุเป็น configuration file ของผู้ใช้ แทนที่จะใช้ default คือไฟล์ "$HOME/.screenrc” -d [pid.sessionname] -D [pid.sessionname] เป็นการตัด (detach)การทำงานของ screen ที่กำลังกำลังทำงานอยู่ *** ควรตรวจสอบสถานะของ session โดยคำสั่ง "screen -list" ก่อนใช้ option นี้
COMMAND-LINE OPTIONS -h num ระบุจำนวนบรรทัดเพื่อเก็บใน buffer เพื่อดูย้อนหลัง -ls -list แสดงรายการข้อความในการระบุ session (มักอยู่ในรูปแบบของ pid.tty.host ) ของ screen
COMMAND-LINE OPTIONS -m บังคับให้สร้าง session ของ screen ใหม่เสมอโดยไม่สนใจตัวแปรสิ่งแวดล้อม $STY และไม่คำนึงว่า screen นั้นกำลังถูกเรียกใช้งานจาก session ของ screen อื่นหรือไม่ -r [pid.tty.host] -r [pid.sessionname] ย้อนกลับไปยัง session ของ screen ที่ถูกปลดออก โดย option –d หรือ –D
COMMAND-LINE OPTIONS -sprogram กำหนดค่า default ของ shell ให้กับ programที่ระบุ แทนที่ค่าของตัวแปรสิ่งแวดล้อม $SHELL -S sessionname กำหนดชื่อให้กับ session ใหม่ที่สร้างขึ้นเป็น sessionname -t name กำหนดชื่อของ title สำหรับ shell หรือ โปรแกรมที่ระบุ
COMMAND-LINE OPTIONS -v พิมพ์หมายเลข Version ของโปรแกรม screen -wipe แสดงรายชื่อ screens ที่มีอยู่เหมือนกับ “screen -ls แต่จะลบ session ที่ถูกทำลายแทนที่การทำเครื่องหมาย “dead”
Customizing Screen ผู้ใช้สามารถปรับเปลี่ยนค่า default ในการกำหนดการทำงานของ screen ได้ โดยใช้ไฟล์ .screenrc ซึ่งเก็บคำสั่งที่ทำงานเมื่อเริ่มต้นทำงานของโปรแกรม screen หรือ กำหนดในขณะที่กำลังใช้งานโปรแกรมอยู่โดยใช้คำสั่ง : (colon)
Customizing Screen • ไฟล์ “.screenrc” 1. "/etc/screenrc” 2. ".screenrc" ใน HOME directory ของผู้ใช้ 3. ใช้ option -c การกำหนด options, ผูกการทำงานกับการกดแป้นพิมพ์และกำหนด windows ที่จะสร้างขึ้นโดยอัตโนมัติเมื่อตอนเริ่มต้น session ของ screen
Customizing Screen • Colon การปรับเปลี่ยนของผู้ใช้ยังสามารถทำได้ขณะที่กำลังใช้โปรแกรม screen โดยไปยังโหมดคำสั่ง โดยการกด “C-a: “ โดยคำสั่งที่ขึ้นต้นด้วย "def"เป็นการเปลี่ยนค่า default ขณะที่คำสั่งอื่นๆ ใช้เปลี่ยนที่กำหนดไว้ในปัจจุบัน
New Window การสร้าง windows ใหม่สำหรับใช้ในการทำงานโปรแกรม เมื่อwindow ใหม่ถูกสร้าง จะมีหมายเลขระบุตั้งแต่ 0-9 ให้กับแต่ละ window
Chdir Command: chdir[directory] Key : none เปลี่ยน directory ปัจจุบันของ screen ไปยัง directory ที่ระบุ • Screen command Command : screen[opts] [n] [cmd [args]] Key : C-a c, C-a C-c เป็นการสร้าง window ใหม่ # example for .screenrc: screen 1 screen -t ratree2 telnet ratree
Shell Command : shellcommand Key : none กำหนดคำสั่งที่ใช้ในการสร้าง shell ใหม่ โดยทับค่าของตัวแปร สิ่งแวดล้อม $SHELL Command : shelltitletitle Key : none กำหนด title สำหรับทุก shell ที่ถูกสร้างระหว่างการเริ่มต้นทำงาน
Selecting window อธิบายถึงคำสั่งสำหรับการสลับการทำงานไปยัง windows ต่างๆ ใน session ของ screen • Moving Back and Forth Command : next Key : C-a space, C-a n, C-a C-n สลับไปยังหน้าต่างถัดไป
Command : prev Key : C-a p, C-a C-p, C-a C-h สลับไปยังหน้าต่างก่อนหน้า • Other window Command : other Key : C-a C-a สลับไปยัง window ล่าสุดที่ได้แสดง • Select Command : select[n] Key : C-a n, C-a ‘, C-a “ สลับไปยัง window ตามหมายเลขที่ระบุไว้
Session Management Commands • Detach Command : autodetachstate Key : none กำหนดว่าโปรแกรมจะปลดการทำงานโดยอัตโนมัติเมื่อขาดการติดต่อ ย้อนกลับมาใหม่ด้วยคำสั่ง screen –r , default : on Command : detach Key : C-a d, C-a C-d ปลด session ของ screen
Power detach Command : pow_detach Key : C-a D โดยหลักการทำงานจะเหมือนกับ detach แต่จะส่งสัญญาณ HANGUP ไปยัง parent process ของ screen ด้วย • Lock Command : lockscreen Key : C-a x, C-a C-x) ล็อคการแสดงผล โดยการเรียกใช้โปรแกรม screenlock เพื่อล็อคการแสดงผล ( /local/bin/lck หรือ /usr/bin/lock หรือ builtin )
Session Name Command : sessionname[name] Key : none เปลี่ยนชื่อของ session ปัจจุบัน • Suspend Command : suspend Key : C-a z, C-a C-z หยุดการทำงานของ screen ชั่วคราว โดย windows จะอยู่ในสถานะถูก detach ไว้
Quit Command : quit Key : C-a \ เป็นการจบการทำงานของโปรแกรม screen โดย kill ทุก windows และ จบการทำงาน
Window Setting อธิบายคำสั่งที่ใช้ในการควบคุมแนวทางที่ screen ทำงานในแต่ละ windows ใน session • Naming Window (Titles) Title command Command : title[windowtitle] Key : C-a A กำหนดชื่อของ window ปัจจุบันเป็นชื่อ windowtitle ที่ระบุ
Kill Command : kill Key : C-a k, C-a C-k จบการทำงานของ window ปัจจุบัน และสลับไปยัง window ที่แสดงก่อนหน้านั้น • Windows Command : windows Key : C-a w, C-a C-w แสดงรายการ windows ทั้งหมด โดยแต่ละ window จะมีหมายเลขและชื่อของโปรแกรมที่กำลังทำงานใน window นั้น
Virtual Terminal Command : clear Key : C-a C เคลียร์ข้อมูลที่ได้แสดงบนจอภาพและบันทึกข้อมูลลงใน scrollback buffer Command : redisplay Key : C-a l, C-a C-L แสดงข้อมูลใน window ปัจจุบันใหม่ Command : info Key : C-a i แสดงข้อมูลของ window ปัจจุบัน
Copy and Paste อธิบายคำสั่งที่ใช้ในการ copy และ paste • Copying Command : copy Key : C-a [, C-a C-[ เข้าสู่โหมดการ copy โดยสามารถเลือก copy ข้อมูลจาก window ปัจจุบันและใน scrollback buffer ไปยัง paste buffer ในโหมด copy นี้จะเหมือนกับการทำงานบน vi editor
Movement keys: • h, j, k, l ใช้ในการเลื่อน cursor ทีละบรรทัด หรือ ทีละคอลัมน์ • 0, ^ และ$ ใช้ย้ายไปยังคอลัมน์ซ้ายสุด, ไปที่ตัวอักษรแรกและตัวอักษรสุดท้ายของบรรทัด • Marking: • ช่วงของการ copy ถูกกำหนดทำโดยการทำเครื่องหมายไว้ระหว่าง 2 จุด การทำเครื่องหมายทำได้โดยกด space เพื่อกำหนดจุดที่หนึ่งและจุดที่สองตามลำดับ • Y และ y ใช้สำหรับการทำเครื่องหมายทั้ง 1 บรรทัดหรือจากต้นบรรทัด • W ใช้สำหรับการทำเครื่องหมายคำ 1 คำ
Specials: มีบาง keys ที่ทำงานต่างจาก vi เช่น ใน vi ไม่สามารถทำเครื่องหมายเป็นบล็อคสี่เหลี่ยมของข้อความได้ แต่ใน screen สามารถทำได้โดยการกด c และ C เพื่อกำหนดขอบซ้ายและขวาของการ copy ตามลำดับ
CR/LF Command : crlf[on|off] Key : none ส่วนนี้จะมีผลในการ copy ข้อความด้วยคำสั่ง “C-a [“ โดยถ้ากำหนดเป็น “on” แต่ละบรรทัดจะแยกกันด้วย ”CR” และ “LF” นอกจากนี้ (default) ใช้ “LF” • Scrollback Command : scrollback num Key : none กำหนดขนาดของ scrollback buffer สำหรับ window ปัจจุบัน เป็นจำนวนบรรทัดที่ระบุ(num) โดยค่า default คือ 100 บรรทัด
Command : defscrollbacknum Key : none การทำงานเหมือนกับคำสั่ง scrollback แต่เป็นการกำหนดค่า default สำหรับ window ใหม่ • Paste Command : paste[registers] Key : C-a ], C-a C-] เขียนข้อมูลที่อยู่ใน registers ที่ระบุไปยัง stdin stream ของ window ปัจจุบัน ซึ่ง register “.” ถูกใช้เป็น paste buffer
Command : slowpastemsec Key : none กำหนดความเร็วของข้อความที่แทรกเข้าไปยัง window ปัจจุบันโดยคำสั่ง paste ("C-a ]") • Registers Command : copy_reg[key] Key : none เก็บข้อความที่อยู่ใน copy buffer ปัจจุบันลงใน register ที่อ้างโดย key
Command : ins_reg[key] Key : none Paste ข้อความที่อยู่ใน register key ไปยัง input stream ของ window ปัจจุบัน Command : registerkey string Key : none บันทึกข้อความที่ระบุลงใน register key
Screen-Exchange Command : bufferfile[exchange-file] Key : none เปลี่ยนชื่อไฟล์ที่ใช้สำหรับการอ่านและเขียนโดย copy buffer ถ้าไม่ระบุพารามิเตอร์ exchange-file จะใช้ค่า default ("/tmp/screen-exchange") เช่น C-a : bufferfile /etc/passwd C-a < C-a ]
Command : readbuf Key : C-a < อ่านข้อมูลของไฟล์ screen-exchange ปัจจุบันไปยัง copy buffer Command : removebuf Key : C-a = ไม่ใช้งานไฟล์ screen-exchange Command : writebuf Key : C-a > เขียนข้อมูลที่อยู่ใน paste buffer ไปยังไฟล์ screen-exchange
History Command : history Key : C-a { การเรียกใช้คำสั่งที่ขึ้นต้นด้วย …": โดยพิมพ์ตัวอักษรตัวแรกของคำสั่ง แล้วกด “C-a {“ และ screen จะหาบรรทัดก่อนหน้าที่ตรงกับตัวอักษรที่ระบุไปทางด้านซ้ายของ cursor แล้วบรรทัดนั้นก็จะถูก paste ไปยัง input queue ของ window
Key Binding • The bind command Command : bindkey [command [args]] Key : none เป็นการผูกการกดแป้นพิมพ์เข้ากับคำสั่ง สำหรับนิยามการผูกขึ้นมาใหม่ โดยที่ key argument เป็นตัวอักษรตัวเดียว, 2 ตัว ในรูปแบบ "^x" ("C-x") ถ้าไม่มี argument แป้นพิมพ์ที่กำหนดไว้สำหรับปุ่มนั้นคำสั่งที่กำหนดไว้จะถูกลบออกไป
เช่น bind ' ' windows bind ^k bind k bind K kill bind ^f screen telnet foobar
Logging การอธิบายคำสั่งสำหรับการเก็บบันทึกของ session • hardcopy Command : hardcopy Key : C-a h, C-a C-h เขียนข้อความที่แสดง ณ ปัจจุบัน ไปเก็บที่ไฟล์ hardcopy.n ใน default directory ของ window โดยที่ n คือหมายเลขของ window ปัจจุบัน
Command : hardcopy_appendstate Key : none ถ้ากำหนด stateเป็น on โปรแกรม screen จะเพิ่มต่อท้ายไฟล์ "hardcopy.n" ที่สร้างโดยคำสั่ง "C-a h" ค่าDefault คือ “off” Command : hardcopydirdirectory Key : none กำหนด directory ที่จะใช้เก็บไฟล์ hardcopy
Command : logstate Key : C-a H เริ่มต้น/หยุดการเขียนข้อความที่แสดงของ window ปัจจุบันไปยังไฟล์ "screenlog.n" (append)ใน default directory ของ window โดยที่ n คือหมายเลขของ window ปัจจุบันถ้าไม่ระบุพารามิเตอร์ สถานะของการ logging ก็จะสลับไปมาระหว่าง on และ off ค่า Default คือ “off” Command : logdirdirectory Key : none กำหนด directory ที่จะใช้เก็บ logfiles
สรุป Screen เป็นโปรแกรมบน Unix ที่เป็น full-screen window manager ทำให้สามารถใช้งานหลายๆ windows (virtual VT100 terminals) พร้อมๆ กันได้
Advantages • ถ้าเครื่องที่ใช้ที่ติดต่อกับเครื่องที่ให้บริการได้ขาดการติดต่อ แต่ process และ login session ที่ทำงานผ่าน screen ยังอยู่ ซึ่งสามารถย้อนกลับไปยัง screen session นั้นโดยใช้คำสั่ง screen –r • Screen สร้างหลาย processes แทนการสร้างหลาย login session ซึ่งทำให้มีการใช้ทรัพยากรของระบบอย่างมีประสิทธิภาพ • สามารถ cut และ paste ระหว่าง windowsได้โดยไม่ต้องใช้เมาส์ • มีความสามารถในการ copy ลักษณะ block ได้ • สามารถ copy และ paste ได้มากกว่า 1 หน้า ณ เวลาหนึ่ง
Advantages • ใช้ความสามารถ detach ในการเก็บ screen processes เมื่อ logout และย้อนกลับไปใช้ใหม่ได้ ลดปัญหาในการเริ่มทำงานของ processes เหล่านั้นได้
Reference • URL: http://kb.indiana.edu/data/acuy.html, Indiana University Knowledge Base , visited :30/01/00 • URL: http://www.cslab.vt.edu/manuals/screen/screen_toc.htmlVirginia Tech Computer Science Undergraduate Lab, visited : 31/01/00