Pruning School
Objective: To select proper pruning techniques and demonstrate their use in the landscape. Pruning School. What you will learn. the five (5) reasons for pruning To describe the four (4) types of pruning To demonstrate pruning a stem at the proper angle

Pruning School
E N D
Presentation Transcript
Objective: To select proper pruning techniques and demonstrate their use in the landscape. Pruning School
What you will learn • the five (5) reasons for pruning • To describe the four (4) types of pruning • To demonstrate pruning a stem at the proper angle • To explain how the correct time to prne is determined
Why Plants are Pruned • To remove dead, diseased, insect-infested, or broken branches. • Keeps plants healthy by removing parts that might hinder further growth and stimulates new growth. • Change the size or proportion of the plant. • Develop a special form or shape. • Hedge pruning, topiary, and espalier work are examples this type of this type of pruning. • Remove wilted or dead flowers and seed pods. • Wilted or dead flowers give plants an unattractive appearance and should be removed.
Why Plants are Pruned • Rejuvenate a declining shrub. • New growth is stimulated by pruning older wood.
Pruning Procedures to Maintain Landscape Plants • When to Prune Winter- * Branches can be seen on deciduous plants. * Most plants are not flowering and are dormant. * Examples of plants to prune include Crape Myrtle, Glossy Abelia, and broadleaf evergreens.
Spring: • Swelling buds indicate live branches. • There is not much foliage to block shape of the plant. • Provides maximum time for cuts to heal. • New leaves hide fresh cuts. • Early spring flowering plants produce flower buds for next year's flowers on summer growth. • Examples of plants to prune in spring include Azalea, Forsythia, conifers, and broadleaf evergreens.
Summer: • Allows time for wounds to heal before winter. • Branches are difficult to see because of leaves. • Examples of plants to prune in summer include Ligustrum, Boxwoods, and other broadleaf evergreens.
Fall: • Small branches can be pruned in early fall if there is enough time for new growth to harden and the wound to heal before winter • Early spring flowering plants should NOT be pruned in the fall. • Examples of plants to prune in the fall include summer flowering plants and broadleaf evergreens.
Decide the Type of Pruning Required • Thinning: • Remove an entire branch back to the trunk or main stem. • Examples: all deciduous trees – Redbud, Red Maple, River Birch, Crape Myrtle
Heading Back • Shorten the length of the branch. • Examples: several broadleaf evergreen shrubs – Eleagnus, Carmellias, Wax Myrtles, Laurels
Rejuvenation (renewal) • Remove extensive amounts of mature branches to promote new growth of unkept and or damaged shrubs. In some cases removing entire branches to the ground. • Examples: Spireas
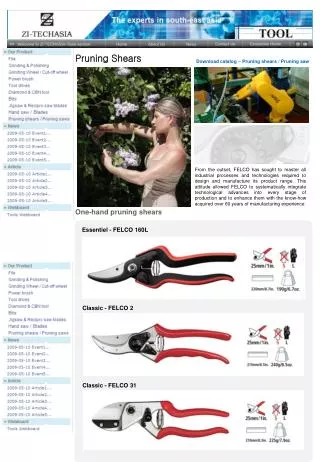
Select Tools Needed Based on Materials to be Pruned • Size of branch > Less than ½” diameter - Use hand shears - Use hedge shears to shape shrubs > ½’ to 1 1/2” diameter - Use loppers > Over 1 1/2” diameter - Use pruning saw or chain saw
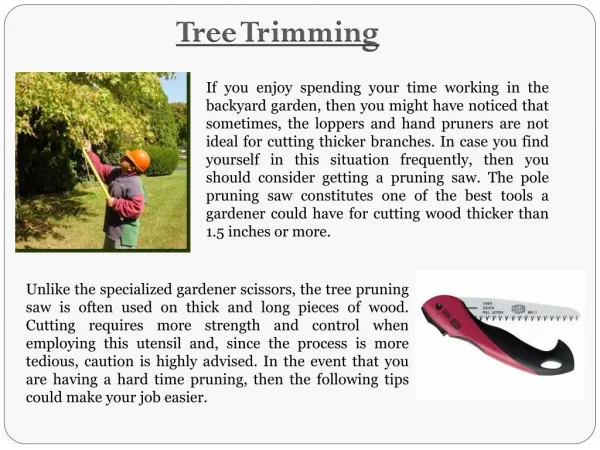
Location of branches to be pruned: Low enough to be reached standing on the ground * Use any of tools listed above High enough NOT to be reached standing on the ground using tools listed above * Use pole pruner or power pole pruner
Use Proper Safety Including Personal Protective Equipment (PPE) • When pruning, make sure you know where your non-cutting hand is at all times to prevent injury. • Look for electrical lines to prevent injury or damage to property. • Look for dead or hanging branches when positioning your ladder to prevent bodily injury.
Tie extension ladder to the tree and have a spotter on the ground. • Drink plenty of liquids to prevent dehydration. • Take short frequent breaks to stay focused • Use proper lifting techniques to prevent back and other injuries. • Decide the safety hazard if any.
Choose appropriate personal protective equipment (PPE). - Goggles (eyewear) – use to prevent damage to eyes due to dust and debris. - Chaps – (American Version) use protective covering for legs, typically made of kevlar, worn while using a chain saw. (British Version) use male friends to warn you of impending danger while using a chain saw.
Gloves – wear to reduce injury from sharp blades and chains. • Boots – wear to protect feet not only from pruning tools but also falling debris or dropped tools and equipment. • Snug fitting clothing- wear to prevent clothing from being caught in moving equipment.
Hard Hat – wear to prevent injury from falling tree limbs, branches, etc. May include face shield and ear muffs. • Ear protection- wear to protect from hearing loss as most small engines produce over 90 decibels (db) which is the level at which sound waves can damage human hearing.
Prune Twigs and Small Branches • Decide safety procedures and (PPE) that are needed. • Choose and use the correct (PPE). • Cut back to a vigorous bud or intersecting branch. • Make cuts that do not leave a stub or that do not cut too close to the bud. • Make slanting cuts when removing limbs that grow upward (prevents water collection and expedites healing).
Prune Thick Heavy (Large) Branches • Decide safety procedures and (PPE) that are needed. • Choose and use the correct (PPE). • Remove just outside the branch collar (not flush with the trunk) • Avoid using paint or wound dressing to seal the cut (this may trap moisture and increase disease problems).
Use a 3-part cut when cutting branches over 1 ½” in diameter. * 1st cut - saw the bottom of the branch 6” – 12” out from trunk and about 1/3 of the way through branch. * 2nd cut – saw down from the top about 3” farther out than the 1st cut, until the branch falls. * 3rd cut – saw the stub back to the collar.
Fertilization Procedures to Maintain Landscape Plants • Woody Ornamentals: * Decide if ornamental plant is woody or herbaceous. * Decide the frequency of application depending on the type of plant, plant vigor, desired growth rates and season of the year.
* Take a soil sample to get recommended fertilizer ratio and rate of application. * Apply fertilizer according to soil sample report recommendations, or use 3 – 5 pounds of nitrogen per 1,000 square feet. * Apply fertilizer by broadcasting under canopy of trees, shrubs and climbing vines or over-the-top of ground covers.
Herbaceous Ornamentals • Decide if ornamental plant is woody or herbaceous. • Decide the frequency and time of application based on type of plant. * Fertilize annuals at planting and 6-8 week intervals during the growing season. * Fertilize perennials at planting and once a year during growing season * Fertilize bulbs at planting and when they start to produce foliage.
Calculate how much fertilizer is required to get a specific amount of nitrogen applied to ornamentals. (objective 2.01) • Use ordinary green fertilizer such as 10-10-10 or slow release fertilizer.
Mulching Procedures to Maintain Landscape Plants • Decide the correct mulching material depending on desired appearance and availability and cost of materials. • Purchase correct mulching material depending on desired appearance and availability and cost of materials. • Take out about 2” of old mulch before spreading new mulch if total depth of old mulch is over 4”
Spread evenly about one inch of the same type of mulching material on top of the old mulch to maintain appearance (aesthetic) if plants were mulched when installed • Spread evenly about 2”- 3” of mulch if it was not done when plants were installed. • Keep mulch 3” – 5” away from young trees and shrubs 8”-12” to prevent diseases.