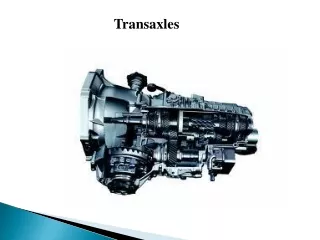
Automatic Transmission and Transaxles
39. Automatic Transmission and Transaxles. FIGURE 39.1 A cutaway of a Chrysler Power Flight 2-speed automatic transmission used in the 1950s. FIGURE 39.2 A torque converter looks like a metal doughnut and takes the place of a clutch in an automatic transmission or transaxle.


Automatic Transmission and Transaxles
E N D
Presentation Transcript
39 Automatic Transmissionand Transaxles
FIGURE 39.1 A cutaway of a Chrysler Power Flight 2-speed automatic transmission used in the 1950s.
FIGURE 39.2 A torque converter looks like a metal doughnut and takes the place of a clutch in an automatic transmission or transaxle.
FIGURE 39.3 A torque converter is made from three parts: The impeller is located at the transmission end, attached to the housing, and is driven by the engine. The turbine is located at the engine side and is driven by the fluid flow from the impeller and drives the input shaft of the transmission. The stator redirects the flow to improve efficiency and multiply torque.
FIGURE 39.4 Two fans can be used to show how fluid, or air in the case of fans instead of automatic transmission fluid, can be used to transfer energy. If one fan is operating, the blades of a second fan will be rotated by the flow of air past the fan that is unplugged, causing the blades to rotate.
FIGURE 39.5 A torque converter is bolted to the flexplate, which is attached and rotates with the engine crankshaft (TCC).
FIGURE 39.6 An expanded view of a typical torque converter assembly showing the torque converter clutch (TCC).
FIGURE 39.7 The gear selector is often called the “PRNDL,” pronounced “prindle,” regardless of the actual letters or numbers used.
FIGURE 39.8 A typical planetary gear set showing the terms that are used to describe each member.
FIGURE 39.9 A typical automatic transmission dipstick (fluid level indicator). Many use a clip to keep it from being forced upward due to pressure changes inside the automatic transmission. A firm seal also helps keep water from getting into the fluid, which can cause severe damage to the clutches and bands.
FIGURE 39.10 The “add” mark on most automatic transmission dipsticks indicates the level is down 0.5 quart (0.5 liter). Always follow the instructions stamped or printed on the dipstick.
FIGURE 39.11 Sometimes the location of a transmission fluid leak is easy to see, but with others it can be difficult to find the exact location. Look closely at places where O-rings seals or gaskets are used, as these are the most common areas where fluid leaks occur.
FIGURE 39.12 A black light being used to locate the source of an automatic transmission fluid leak.
FIGURE 39.13 Draining the fluid from an automatic transaxle by allowing the fluid to flow into a container after most of the retaining bolts have been removed.
FIGURE 39.14 This is a normal amount of wear material in the bottom of an automatic transmission pan. Use a magnet and check for any steel particles which could indicate serious transmission wear or damage.
FIGURE 39.15 Always check that the filter is secured by a clip or other fastener to keep it from dropping out of location.
FIGURE 39.16 In this case, the cork-rubber gasket is glued to the pan and is ready to be installed. The retaining bolts need to be tightened in sequence, but be aware that overtightening will cause a leak. Also, some manufacturers recommend using only an RTV sealer, but never use an RTV sealer and a gasket together.