Digital Video and User Interface
Digital Video and User Interface. EECS150 Fall 2007 – Lab Lecture #7 Allen Lee Greg Gibeling. Today. Checkpoint 1 Comments Digital Video Administrative Info ITU-R BT.601 ITU-R BT.656 Video Encoder I 2 C Bus Video Display Module. Checkpoint 1 Comments (1).

Digital Video and User Interface
E N D
Presentation Transcript
Digital Video and User Interface EECS150 Fall 2007 – Lab Lecture #7 Allen Lee Greg Gibeling EECS150 Lab Lecture #7
Today • Checkpoint 1 Comments • Digital Video • Administrative Info • ITU-R BT.601 • ITU-R BT.656 • Video Encoder • I2C Bus • Video Display Module EECS150 Lab Lecture #7
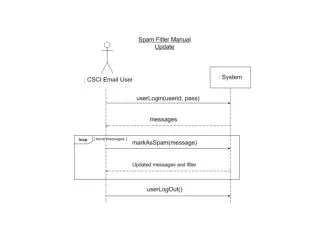
Checkpoint 1 Comments (1) • You need to implement the audio buffer • This is needed for record and playback • Don’t be afraid to modify FPGA_TOP! • You need to change the audio sampling and output rate to 4kHz • Default is 48kHz. At this rate, the FIFO we gave you can hold less than a second of data. • You need to set the VRA register before you can change the audio rate (see p. 24 of datasheet). EECS150 Lab Lecture #7
Checkpoint 1 Comments (2) • There’s been a minor update to the documentation • We removed some obsolete information regarding the origin of PCM_DIn. • This does not affect the checkpoint. • A solution bit file is under way • Useful for testing that your mic works. EECS150 Lab Lecture #7
Digital Video (1) • Pixel Array • A digital image is represented by a matrix of pixels which include color information. • Frames • Motion is created by flashing a series of still frames EECS150 Lab Lecture #7
Digital Video (2) • Scanning • Images are generated on the screen by scanning pixel lines, left to right, top to bottom • Early CRTs required time to get from the end of a line to the beginning of the next. Therefore each line of video consists of active video portion and a horizontal blanking interval. Even more time is needed for the CRT gun to transition from the end of the last line to the start of the first, requiring each frame to have a vertical blanking interval. • To reduce flicker, each frame is divided into two fields: odd and even EECS150 Lab Lecture #7
Digital Video (3) • Colors • Usually represented as red, green and blue • In the digital domain we could transmit 8 bits for each RGB component. • Transition from Black & White • Kept compatible with old TV sets • Added separate color or “Chroma” signals • Y: Luma (Traditional Black and White) • Cr: Chroma Red (New color signal) • Cb: Chroma Blue (New color signal) EECS150 Lab Lecture #7
Digital Video (4) • Chroma Subsampling • Human eye is more sensitive to Luma than Chroma; use this to save space and bandwidth EECS150 Lab Lecture #7
Checkpoint 2 (1) • Video Encoder • Sets up NTSC framing • Blanking, Start of Active Video (SAV), End of Active Video (EAV) • Request Data & Display it EECS150 Lab Lecture #7
Checkpoint 2 (2) • Video Display Module • Replaces the test ROM EECS150 Lab Lecture #7
Checkpoint 2 (3) • Nintendo 64 game controller • Black box handles communication between FPGA and the controller • Your task is to give meaning to the button presses. • Controllers will be handed out in lab next week EECS150 Lab Lecture #7
Administrative Info (1) • Design Review Policy Clarification • Please come prepared • We can’t help you if you haven’t taken a good look at the spec and datasheet. • Turn in a copy of design documents at beginning of lab • Do not use diagrams provided in the spec • Use Visio to make your diagrams • Lenient grading this time, but not for future checkpoints. EECS150 Lab Lecture #7
Administrative Info (2) • Design Review Process • Walk YOUR LAB TA through your module • Schematic • Bubble-and-arc • Top-down design with interconnections • Timing diagrams when appropriate • Errors will be pointed out, but corrections are left up to you • Ideal duration: 10 minutes • Convince us you know what you’re doing! EECS150 Lab Lecture #7
Administrative Info (3) • Pick up a mic after lab lecture if you didn’t get one in lab this week. • Choose a team name (no more than 8 characters). EECS150 Lab Lecture #7
ITU-R BT.601 • Formerly, CCIR-601. • Designed for digitizing broadcast NTSC • National Television System Committee • Variations: • 4:2:0 Chroma Subsampling • PAL (European) version • Component streaming: • line i: CB Y CR Y CB Y CR Y • line i+1: CB Y CR Y CB Y CRY • Effective Bits/Pixel: • 4 components / 2 pixels = 32/2 = 16 bits/pixel EECS150 Lab Lecture #7
ITU-R BT.656 (1) • Details • Pixels/Line: 858 • Lines/Frame:525 • Frames/S: 29.97 • Pixels/S: 13.5M • Active • Pixels/Line: 720 • Lines/Frame:507 • Blanking • SAV/EAV: 4B/4B • Black filler EECS150 Lab Lecture #7
ITU-R BT.656 (2) • Odd Field (262 Lines) • Total: 262 Lines • 6 Vertical Blanking • 254 Active • 2 Vertical Blanking • Even Field • Total: 263 Lines • 7 Vertical Blanking • 253 Active • 3 Vertical Blanking EECS150 Lab Lecture #7
ITU-R BT.656 (3) • SAV Header • F: Field Select (0: Odd, 1: Even) • V: Vertical Blanking Flag • H: EAV/SAV Flag (0: SAV, 1: EAV) • E[3]=V^H, E[2]=F^H, E[1]=F^V, E[0]=F^V^H EECS150 Lab Lecture #7
Video Encoder (1) • Analog Devices ADV7194 • Supports ITU-R BT.601/656 • S-Video and Composite Outputs • I2C Control (We will give this to you) EECS150 Lab Lecture #7
Video Encoder (2) EECS150 Lab Lecture #7
Video Encoder (3) EECS150 Lab Lecture #7
Video Encoder (4) EECS150 Lab Lecture #7
Video Encoder (5) • Basic Design • Stream EAV, Blank, SAV, Active Lines • Generate EAV/SAV/Blank using a mux • Register output data (Timing reasons) • Request Incoming Data • Request it the cycle before you need it • Must be clipped • Minimum data is 0x10 • Maximum data is 0xF0 • Otherwise it will appear to be blanking signals EECS150 Lab Lecture #7
Video Encoder (6) • Testing • Test thoroughly • Simulation is difficult with test ROM • Try using values which count, so you can see it • Design your testbench early • Perhaps one partner should design the module, one should design the testbench • Ensure that you test corner cases • First and last lines • Off-by-one errors in counters EECS150 Lab Lecture #7
I2C (1) • ADV7194 Initialization using I2C • Requires only 2 wires • Serial Data (Bidirectional) • Clock (Driven by master) • Runs at up to 400kHz • Bidirectional Communication • Given to you • Complicated to get right • Hard to debug EECS150 Lab Lecture #7
I2C (2) • Physical Protocol • Data • Open collector bidirectional bus • Driven by sender • Clock • Open collector unidirectional bus • Driven by master • May be pulled low to stall transmission EECS150 Lab Lecture #7
I2C (3) • Protocol • Start Condition • Address • Address Acknowledge • Data Transfer • Data Acknowledge • Stop Condition EECS150 Lab Lecture #7
I2C (4) • Arbitration • Anyone can drive bus at any time • No central arbiter • No short circuits (Impossible in open collector) • Decentralized Arbitration • Check data bus against value you’re sending • Mismatch means someone else is transmitting • So let them finish, and then try again • Inherently gives preferences to accesses with more 1’b1s in them EECS150 Lab Lecture #7
Video Display (1) EECS150 Lab Lecture #7
Video Display (2) • Replaces test ROM • Defines the “look and feel” of the project • Do not start this part until you have completed the video encoder! • Must be able to display text EECS150 Lab Lecture #7
CharROM.v • Character ROM • Takes an encoded ASCII character and outputs a dot matrix • Your responsibility to figure out how to convert dot matrix to video data EECS150 Lab Lecture #7
RAM.v • Synchronous 256-byte memory module. • Use this to store characters. • No reset signal. EECS150 Lab Lecture #7
User Input Parser • We’re giving you a module that tells you which buttons are pressed. • Use buttons to determine: • Speaker volume • Speaker mute • Mic volume • Mic mute • Wireless channel • Region focus • More! (In a later checkpoint) • Keep module clean and extensible. You will need add to it later. EECS150 Lab Lecture #7
Tasks for Video Display (1) • Split screen into three distinct regions • One for users in the channel • One for users you’re connected with • One for console output • When determining the width and height of these regions, keep in mind the following restrictions: • No more than 8 users displayed in region 0. • No more than 8 users displayed in region 1. • User names are no more than 8 characters long. EECS150 Lab Lecture #7
Tasks for Video Display (2) • Graphically display speaker and mic volume at the bottom of the screen. • Handle mute • Display wireless channel at lower right hand corner of the screen. • Highlight appropriate region based on the Focus value. EECS150 Lab Lecture #7
Tasks for Video Display (3) • Display your team name (no more than 8 characters) at the top of the screen. • Store and display 8 other user names of your choice in region 0. • Registry of users should be robust enough to handle adding/dropping users. • Choice of colors and aspect ratio up to you. EECS150 Lab Lecture #7
More Information • Documents Page of the Website • Video in a Nutshell • ADV7194 Datasheet • Complete ADV7194 reference • ITU-R BT.656 & ITU-R BT.601 Standards • Complete video standards • I2C Bus Specification • READ THE DATASHEETS! EECS150 Lab Lecture #7
Questions? EECS150 Lab Lecture #7