Download
1 / 2
20 likes | 127 Vues
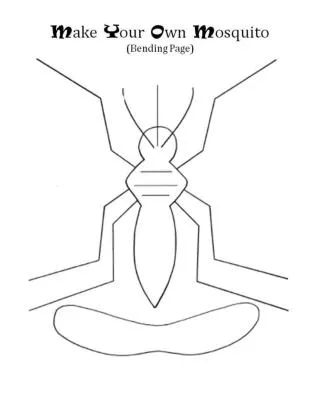
Engage children in a hands-on craft project by creating a mosquito model using simple materials. This guide outlines the steps to trace, cut, and assemble a mosquito from tag board and colorful pipe cleaners. Kids will learn how to design the body and wings, decorate with markers, and attach a cute proboscis and antennae. With creativity and a bit of glue, they’ll make their mosquitoes come alive! Perfect for educational activities or fun home projects.

E N D
MakeYourOwnMosquito Materials: tag board 5/16” round adhesive labels black markers push pin or small hole punch stencils-body and wings pencil and glue legs & antennae (white pipe cleaner) proboscis (red pipe cleaner) Trace mosquito body on tag board. Cut out body. Write name on one side. Color other side black with marker of choice. Bend body along center (figure a). Push 3 holes on either side of thorax with push pin (figure b). Carefully push 3 pipe cleaners through holes (figure c). Glue pipe cleaners. Put a dab of glue next to each hole. Glue antennae and proboscis wire in place. See page 27. Let dry thoroughly. Glue two shiny sequens for eyes. Place mosquito on bending page. Bend legs. Cut wings out of white paper. Draw wing vein pattern. Glue on wings.