Microscopy Practical Lesson Rules & Observations
Learn the basic rules and practical guidelines for using a microscope effectively in this lesson. Understand the parts of a light microscope and observe tissue sections to enhance your microscopy skills.


Microscopy Practical Lesson Rules & Observations
E N D
Presentation Transcript
Basic rules in practical lesson: • No being late, no absence • Bring textbook and so on • Take care of your microscope, computer and slides Don’t use computer randomly Some functions are forbidden You can only use it to watch samples , receive and look through my coursewares (PPT), • Keep the room clean. • Don’t take anything of lab out from lab
Purpose and requirements: Ⅰ. A. Master the use of the microscope. B. Familiar with the general structure of the light microscope: composed of mechanical and optical parts. Ⅱ. Observation: tissue sections (spinal ganglion)
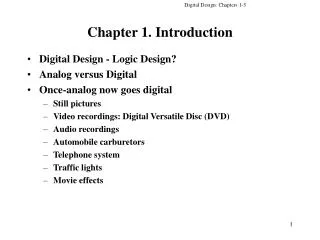
Ocular Lens Body Tube Nose Piece Arm Objective Lenses Stage retainer stage adjustment knobs. light switch Diaphragm Light Source light adjustment konb Fine focus konb Base Coarse focus konb Skip to Magnification Section
Body Tube • The body tube holds the objective lenses and the ocular lens at the proper distance Diagram
Nose Piece • The Nose Piece holds the objective lenses and can be turned to increase the magnification Diagram
Objective Lenses • The Objective Lenses increase magnification (4x,10x,40x,100x(oil)) Diagram
Stage retainer • retainer holds the slide/specimen in place on the stage. Diagram
Diaphragm • The Diaphragm controls the amount of light on the slide/specimen Turn to let more light in or to make dimmer. Diagram
Light Source • Projects light upwards through the diaphragm, the specimen and the lenses Diagram
Ocular Lens/Eyepiece • Magnifies the specimen image Diagram
Arm • Used to support the microscope when carried. Holds the body tube, nose piece and objective lenses Diagram
Stage • Supports the slide/specimen Diagram
Coarse Adjustment Knob • Moves the stage up and down (quickly) for focusing your image Diagram
Fine Adjustment Knob • This knob moves the stage SLIGHTLY to sharpen the image Diagram
Base • Supports the microscope Diagram
stage adjustment knobs Move the stage and retainer left and right,back and forth Diagram
Magnification • To determine your magnification…you just multiply the ocular lens by the objective lens • Ocular 10x Objective 40x:10 x 40 = 400 So the object is 400 times “larger” Objective Lens have their magnification written on them. Ocular lenses usually magnifies by 10x
Use your microscope correctly and carefully • A. Adjust light • Switch on the light, rotate the nosepiece swing in the 10× objective (low power) into position with a click. Make slide close to the objective( about 1cm ) • B. Place the slide on the stage with its coverslip turned upward. Move the object in the center by turning the m stage adjustment knobs.
C. Observaton Low magnification(4×, 10×):1. Raise the stage by rotating the coarse knob slowly to bring the slide close to the objective(1mm) while keep watching them from the side of the stage with naked eyes.2. Look into the eyepieces and slowly lower the stage with coarse knob until the image appears and is almost in focus.3. Rotate the fine knob back-and-forth to get exact focusing ( sharp) image.
High magnificaton (40×): Before use high power objective Make sure: • ①The cover slip must be upward. • ② the object should be first moved to the center of the viewfield and focused clearly with the 10x objective. Use only the fine adjustment knob under high magnifcation.
Ⅴ.Rules of Observation of tissue sectionsA. Always follow the sequence of naked eye -- lower power-- higher power1. The naked eye examination will get some information of the general shape, size and staining of the section, and of the location of the coverslip.2. Lower power observation will identify the mail structure and overall histologic features of a given section, therefore will find out what it is.3. Higher power observation should be used only for detail work, for example, the microscopic structure of cells.
B. Always combine your eyes - brain -hand.1. When you see a structure in two dimensions on a given section, try to think about its 3-dimentional image.2. When you see an LM structure, try to figure out its EM features • 3. When you see a structure, ask yourself what its function is or what the functional state the tissue or cell is in.4. When you see something on the section, try to draw them down on a piece of paper or your notebook.5. Never get into the habit of raising your hand for assistance before using your eyes and your brain.
Caring for a Microscope • Always use lens paper when cleaning the lenses. Never use rough paper or your fingers. • Make sure it’s on a flat surface • Don’t bang it • NEVER attempt to dismantle any parts of the microscope • always WATCH FROM SIDE when raising the stage or lowering the tube.
Artifacts in tissue sample A number of artifacts that appear in stained may result from improper procedures for making samples (fixation, dehydration, embedding, sectioning and so on ) Artifacts in tissue sample contain tearing artifacts, holes, bubbled appearance, wrinkled appearance, Space , dye deposits and so on, you should try to distinguish them from normal compnents.
H&E stain • The combination of hematoxylin and eosin • Hematoxylin is a basic stain with deep purple or blue color.Can stain Chromatin (i.e., cell nuclei) and ribosome to purple or bluea basophilic ("base-loving"). • Eosin is an acidic stain with a red color. Can stain collagen fibers, red blood cells, muscle filaments, mitochondria to red or pink. aacidophilic (or eosinophilic)
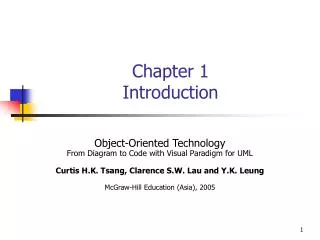
The position of cell membrane cytoplasm nucleus cell structure: spinal ganglia H&E 400x