ArcGIS: ArcMap Data View
ArcGIS: ArcMap Data View. Agenda. The ArcMap Interface Working with Data Review data types/available data Opening Data Viewing Data Navigating Exercise 1 Window Menu Tools Display Properties Exercise 2 Querying Data Exercise 3 Data Frames Exercise 4 Basic Editing

ArcGIS: ArcMap Data View
E N D
Presentation Transcript
Agenda • The ArcMap Interface • Working with Data • Review data types/available data • Opening Data • Viewing Data • Navigating Exercise 1 • Window Menu Tools • Display Properties Exercise 2 • Querying Data Exercise 3 • Data Frames Exercise 4 • Basic Editing • Create new feature • Edit toolbar Exercise 5
Main Menu Toolbar Standard Toolbar Tools Toolbar Map Display Table of Contents Draw Toolbar The ArcMap Interface
Toolbars • Standard Toolbar – Contains tools to navigate directories, cut and paste, undo/redo, and Add Data among other things • Tools Toolbar – Contains tools for navigating in the View canvas as well as finding, identifying, and measuring distances within it. • Draw Toolbar – Almost identical to the drawing toolbars available in most windows applications. Provides tools for adding graphics and text to the view window
Table of Contents • Shows what layers are on the map • Shows how layers are displayed on the map • Shows how data is organized into data frames • Many commands available from “context menus” in the Table of Contents. • Display and Source Tabs
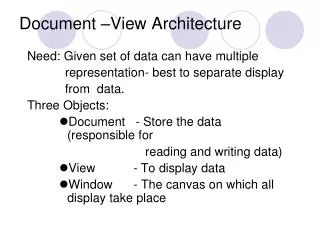
Map Display • Data View • Use for browsing and analyzing geographic data • Focus on geographic elements • Layout View • Use to prepare a presentation quality map • Focus on cartographic elements
Working with Data • Review data types/available data • Opening Data • Viewing Data • Navigating • Window Menu Tools • Display Properties • Querying Data • Data Frames
Vector Data ArcView Shapefiles ArcInfo Coverages Geodatabase CAD drawings Raster Data Most common imagery formats can be read ArcInfo GRIDs, MRSID Data Types for ArcGIS
Data in AFS J:\isis\data\gis\esri Several Data sets ESRI Data and Maps Digital Chart of the World ArcUSA ArcWorld StreetMap Data Geography Network See http://www.geographynetwork.com for a full listing of data resources Available Data
Opening Data • Add Data • Standard Toolbar button • File Menu Option • Use to open raw data files (shapefiles, coverages, etc.) and Layer Files (.lyr) • ArcCatalog • Drag and Drop data from ArcCatalog to ArcMap • Open Map Document • Previously organized data sets can be stored as Map Documents. • Open in ArcMap using “Open” in Standard Toolbar or File Menu • Drag to ArcMap from ArcCatalog
Turning Layers On/off Click box next to Layer name in Table of contents to toggle layer on/off Hold control key to toggle all layers Show/Hide Legend Click on the minus box next to the layer name in the Table of Contents to hide the legend Managing drawing order - default, etc Items on the bottom of the Table of Contents draw first, those at the top draw last Click on a layer name and drag it up or down to change it’s position in the drawing order Viewing Data
Go to Previous Extent Zoom to Center Pan Zoom In Tool Go to Next Extent Zoom To Full Extent Zoom Out Tool Zoom Out From Center Navigating • Tools Toolbar • Zoom In/Out/Full Extent • Pan • Previous/Next Extent • Menu bar and context menu tools • View Menu>Zoom Data • Right-Click on Layer in TOC>Zoom to Layer Ex.1
Window Menu Tools • Overview • Opens a window showing extent of all data in TOC • Move and resize Area of Interest in Overview to change what is displayed in the Data View • Right click on the top bar of the Overview window to change Overview window properties • Magnifier • Opens a new window that you can drag over Map Display to enlarge features • Right click on the top bar of the Magnify window to change Magnify window properties
Display Properties • Access Layer Properties by double clicking on the layer in the Table of Contents • Change Layer Symbology • Click On the Symbology tab in the Layer Properties Dialog • Select the type of Symbology to use from the “Show:” Dialog • Single symbol is used to draw all features in a layer with the same symbol type • Categorical Data may be drawn using unique value Symbols • Quantitative data is often drawn using Graduated Color Symbols Ex.2
Select Tool Identify Tool Querying Data • Identify Tool • With the identify tool you can click on a point in the map display to see the attributes of all features at that point. • Change the “Layers:” in the identify results dialog to focus on information for a specific layer • Selection Tools • The select tool on the tools toolbar allows you to click on a feature to select it. Selected features are outlined in blue • The selection menu offers several other selection tools including a select by attributes option and a tool for setting selectable layers. • Find Tool • The find dialog in the edit menu offers several tools for finding specific features • Right click on results for shortcuts to common tools such as Zoom to Feature, Identify feature, and select feature. Ex.3
Data Frames • A map Document only has a single View window. If you want to work with multiple data sets, you can create additional Data frames. • Data frames can be used to organize items in data view, and become even more important when using layout view • Properties affecting all layers in a view window such as Projection can be set at the data frame level • New Data Frames can be created from the Insert Menu • To make a data frame active, right click on it in the Table of Contents and click on “Activate” Ex.4
Shortcut to editor toolbar Basic Editing Editor toolbar • Create new feature • Not available in ArcMap. You must create new feature in ArcCatalog • In ArcCatalog, right click on a directory and select New>Shapefile • Editor toolbar • Select from View>Toolbars, or use the shortcut button on the Standard toolbar to open the edit toolbar • Several editing tools become available when you “start editing” from the editor menu. • Begin a new shape using the “Create New Feature” tool. • Modify a shape using the “Edit” tool • Special editing functions available by right-clicking on the map display when using either the Edit or Create new feature tools • Change the editing task with the task menu • Edit a different data set by selecting a new Target item Ex.5