
Receiving from Vendor
E N D
Presentation Transcript
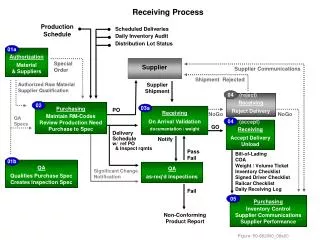
Receiving from Vendor • WcBc is configured for Multiple types of Receiving. The transactions are configured separately. The main difference is very simple. Do you want the receiving personnel to Scan each Unit Id? Or, do you want the Unit Id’s to be generated based on the Number of Packages and Quantity per Package. • Scan each Unit Id: • Scanning each Unit Id creates a higher level of integrity because, they scan each Unit Id and validate the Quantity or manually enter the Quantity depending on the Unit Id Tag Type. • Generate Unit Id at the end of PO Receipt: • Unit Ids are generated upon completion of the PO Receipt based on the Number of Packages and the Quantity per Package. This transaction is quicker to perform but it trust that the user places the correct label on the Container and Pallet.
Receiving – Scan Each Unit Id 1) 2) 3) 1) The PO can be Pre-Printed in WcBc or JDE the Purchase Order & Item numbers are Bar coded on the Receiver Sheet. Function Keys F9=PO Search 2) The Packing Slip field is Optional or can be switched with other prompting such as Country of Origin, etc… 3) Scan the Item from the Product, Vendor, Receiver Document, PO Document, or the Pre-Printed Thermal Labels. This will search the Purchase Order for any Open Lines for this Item. Press ESC to the first open line for the Purchase Order. ¹ See the Rules for Entering/Scanning Item numbers.
Scan each Unit Id (Continued) 4) 5) 6) 4) Scan the Item from the Product, Vendor, Receiver Document, PO Document, or the Pre-Printed Thermal Labels. This is a Verification Scan. Function Keys F2=Search for another Item F3=Skip to the Next Item F5=Inventory Inquiry F9=Replenishment Transfer 5) Scan the 1st Unit Id being Received. This can be any type of Containment Unit Id. This is normally a Pre-Printed, General, Loose, or Static Unit Id. Function Keys F2=Search for another Item F3=Skip to the Next Item 6) Enter the Quantity on the Unit Id. The Quantity will be Defaulted if the Purchase Order tag was Pre-Printed. This can be any type of Containment Unit Id. Function Keys F2=Search for another Item F3=Skip to the Next Item F5=Inventory Inquiry F9=Unit of Measure Help ¹ See the Rules for Entering/Scanning Item and Unit Id numbers.
Scan each Unit Id (Continued) 7) 8) 9) 7) Scan the 2nd Unit Id. Once you are finished with all the Unit Ids then Press the F6=Finish key to go to the Location To Prompt. If tracking Pallet Ids then the Pallet Id would prompt after each To Unit Id. Function Keys F2=Search for another Item F3=Skip to the Next Item F6=Finished with Units 8) Scan the Location To. Function Keys F2=Search for another Item F3=Skip to the Next Item F5=Inventory Inquiry 9) The Transaction Receipted with the “OV” number will be displayed for 2 seconds. This will display for each Unit Id that was received. ¹ See the Rules for Entering/Scanning Location and Unit Id numbers.
Receiving – Generate Unit Id’s 1) 2) 3) 1) The PO can be Pre-Printed in WcBc or JDE the Purchase Order & Item numbers are Bar coded on the Receiver Sheet. Function Keys F9=PO Search 2) The Packing Slip field is Optional or can be switched with other prompting such as Country of Origin, etc… 3) Scan the Item from the Product, Vendor, Receiver Document, PO Document, or the Pre-Printed Thermal Labels. This will search the Purchase Order for any Open Lines for this Item. Press ESC to the first open line for the Purchase Order. ¹ See the Rules for Entering/Scanning Item numbers.
Generate Unit Id’s (Continued) 4) 5) 6) 4) Scan the Item from the Product, Vendor, Receiver Document, PO Document, or the Pre-Printed Thermal Labels. This is a Verification Scan. Function Keys F2=Search for another Item F3=Skip to the Next Item F5=Inventory Inquiry F9=Replenishment Transfer 5) Enter the Total Quantity to Receive in the primary Unit of Measure. Function Keys F2=Search for another Item F3=Skip to the Next Item F5=Inventory Inquiry F9=UOM Help F12=WcBc Calculator 6) Scan the Location To. Function Keys F2=Search for another Item F3=Skip to the Next Item F5=Inventory Inquiry ¹ See the Rules for Entering/Scanning Item numbers.
Generate Unit Id’s – (Continued) 7) 8) 9) Continue to next slide. 8) The Transaction Receipted with the “OV” number will be displayed. Must Press the enter key to Continue. 7) Number of Master Labels (Optional). This Prints off a Master Label that can be attached to the Packing List. Function Keys F2=Search for another Item F3=Skip to the Next Item F5=Inventory Inquiry F9=Replenishment Transfer ¹ See the Rules for Entering/Scanning Item numbers.
Generate Unit Id’s (Continued) 9) 10) Note: In this case 2 Labels will be printed with Container Unit Id’s and Quantities of 5 each. 9) The Number of Containers with the same Unit Quantity. 10) The Quantity Per Container. Once the Total Quantity Received has been matched with Unit Id quantities then the Container Labels will be printed. Go back to screen (9) until the Total Quantity received has been matched with Unit Id Quantities. ¹ See the Rules for Entering/Scanning Pallet Ids.